Welcome to our Translator’s Handbook. This is where we collect the resources we need to translate GeoDirectory into all the different languages of the world. My name is Ismi and I’m here to help.
Who translates? (Everyone!)
Find your Language Team
Setup
Say Hi/Bonjour/Selamat
Translate some strings
Request Validation
Become a PTE
GD Locale Topics
GD Lead Translators
Additional Resources
Who does translations? Everyone! All the plugin users together!
In 2017 WordPress translations changed completely. First there was a change in where translations are stored, and now the responsibility for who creates the translations has changed, too. Instead of plugin authors, it is now all of us, the plugin users and site managers and everyone together who are responsible for translating plugins into our own language.
It’s a big job, but luckily both WordPress.org and AyeCode are providing us with tools and support to help us get organized. Join us to reach the goal of making GeoDirectory available in 20+ languages in 2018! Read on to find out more about how to join us #polyglots to #makewordpress.
Find Your Language Translation Team on WordPress.org
Every language has a team. If you want to be a translator, you should go find out how to join the team for your language: https://make.wordpress.org/polyglots/teams/
Setup your accounts
Most translation team leaders are on WordPress slack. Here are the steps to quickly setup your WordPress and WordPress Slack accounts.
- Login/Register at http://wordpress.org
- Login/Register (same account) at https://translate.wordpress.org
- Visit https://make.wordpress.org/chat and use the same account to register for Slack
- Visit https://gravatar.com to set an image for your new
@chat.wordpress.com address
- Visit https://make.wordpress.org/polyglots/teams/ and find your language, then click on “View Team”
Say Hi and ask to how to join your language team
Once you know where to find your language team, and you have all your accounts setup, it’s time to say hello to your language team.
Introduce yourself on #polyglots
Start with saying “Hi” in the #polyglots channel on WordPress Slack.
- Open WordPress Slack
- Click the + next to channel
- Search for #polyglots
- Join the channel
- Say “Hello” (or something like it). Introduce yourself, and mention which language team you want to join. For example: “Hello, everyone @here ! I am new, and want to join the language team. @ismiaini @alexrollin”
Say hi to your language team leaders
Next, you can message some of the leaders of the team, to let them know. Visit your language team page, or look through the requests or the GD Translations to find other WordPress users who have validated in the past. Then make a direct message in Slack to say hello to them also:
- Open WordPress Slack
- Click the plus next to Direct Message
- Search for the people from your translation team and add them to the message.
- Also add @ismiaini and @alexrollin to share the joy
- Enter a message and say “Hi” again and introduce yourself, like you did in the #polyglots channel.
Ask your team at these questions
There are, at least, two (2) questions that you want to ask your language team leaders before you submit a request for help with validation:
- “How do I join the team?”
- “Is there anything you can tell me before I make a request for validation?”
Note: Be nice to these folks, as they have worked hard at what they do and obviously care a great deal about translation into your own language. They are your new collaborators, and you are their new team member. Enjoy the opportunity to meet these new colleagues and to work together on this great project called WordPress.
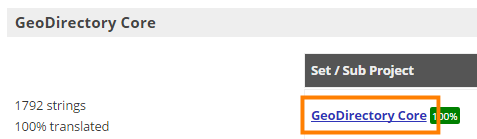
Translate some strings
Visit the GeoDirectory page for your language: https://translate.wordpress.org/projects/wp-plugins/geodirectory
The best way to get started is to click on one of the incomplete projects and then click on “untranslated”. This gives you a list of strings that need translation. Double click and add a translation. Easy!
Request Validation
Once you have translated some strings, you can ask your language team for help with validation. You can make your request here: https://make.wordpress.org/polyglots/?resolved=unresolved
Here is a template you can use to make your request. All the users tagged in the request will receive a notification.
Hello #polyglots! I translated some strings with our project language team and we need your help with validation.
o fr_FR @MyUsername @ismiaini @alexrollin
Pleased to answer comments and questions below in the comments.
CAUTION: Your language team will be happier if you contact them by WordPress Slack to say hi, first, BEFORE you request help. Your team may also have additional suggestions or rules about joining their team. Be sure to ask “How do I join the team?” before you ask “Is there anything you can tell me before I make a request for validation?”.
What’s a PTE?
Once you translate some strings, the strings must be validated by someone who is a member of your language team. Remember the person you said “hi” to above? Someone like them. Once you join your language team, and then complete a translation for GeoDirectory, you can ask a leader of your language team to set you up as a PTE for GeoDirectory for your language. A “PTE”, which is an acronym for “Project Translation Editor”. PTEs can validate strings. PTEs are assigned by the WordPress language team to to projects in their language. For example, a person who translates GD into Russian would go and talk to the Russian team members and ask them to validate the new translations. Then, when they finish, the translation team might make them a PTE for the GeoDirectory Russian translation. Being a PTE means that your strings are automatically validated, and you can validate the contributions of others, too.
GD Translation Leads
Are you committed to keeping up GeoDirectory translations for your native language? Here’s the rundown of what goes with the territory:
- Join the WordPress language team for your native language.
- Complete and continuously update the translation of GeoDirectory core and readme.txt on WordPress.org for your langage.
- Complete and continuously update the translations of the GD Addons here.
- Follow your own WordPress language team’s guidelines for translations and collaboration with other translators.
One lead translator from each language will receive a GeoDirectory membership that will remain active as long as they remain a translation lead on the GD Translation Team.
GD Translation Topics
Join up with others here on GD that speak your language. Some languages have a forum topic they call “home”; if your language doesn’t have one, go ahead and create it in the transations forum.
Existing Locale Forum Topics
| Locale (English) |
Locale (Native) |
WP Locale |
Team Topic |
| Indonesian |
Bahasa Indonesia |
id_ID |
https://wpgeodirectory.com/support/topic/indonesian-locale/ |
| French (France) |
Français |
fr_FR |
https://wpgeodirectory.com/support/topic/french-locale/ |
Additional Resources


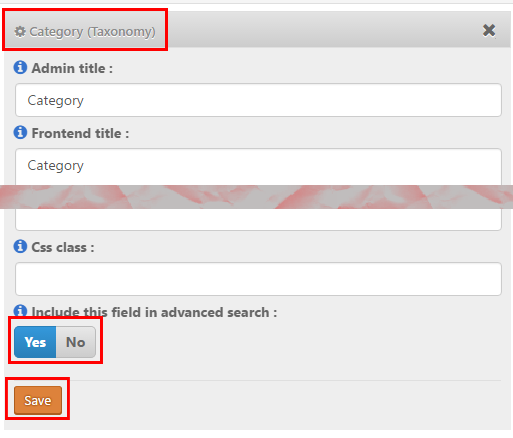
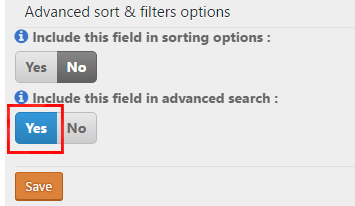
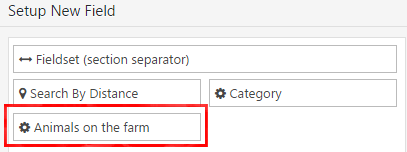
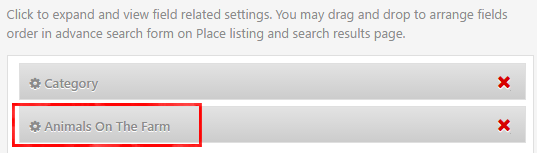
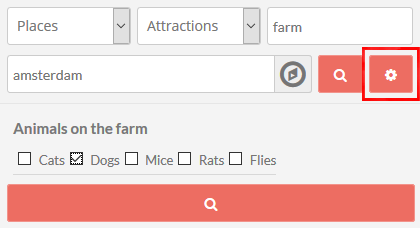
 This selector will only be shown if you have more than one
  The categories drop down can be set up for each Custom Post Type and the Advanced Search addon is required.