How to Build a City Directory in WordPress
In the digital age, information is truly at our fingertips. From finding the nearest bakery to the best bicycle shop in town, a city directory can be a pivotal resource for locals and tourists alike.
In this guide, we will demystify building a city directory using WordPress, one of the world’s most popular content management systems.
Whether you’re a WordPress beginner or a seasoned expert, we’ll walk you through each step, from conceptualizing your directory to launching it online. We will provide you with all the tools and knowledge you need to get started.
By the end of this article, you’ll know how to create a comprehensive, user-friendly city directory that is both functional and visually appealing.
So let’s dive into the exciting world of WordPress and start building your city directory.
What Should I Include in a City Directory?
The first step in building a city directory is deciding what content you want to include.
Your directory could be as basic or comprehensive as you’d like – it all depends on your target audience and the resources you have available.
Generally speaking, a city directory should include:
- Business Listings: This is the backbone of any city directory. List businesses by categories, such as restaurants, retail stores, hotels, and service providers. Include essential details such as business hours, contact information, and a brief description of the services they offer.
- Job Listings: job listings can be easily monetized if the directory receives decent traffic and usually generates a good amount of traffic once the job boards start getting traction.
- Points of Interest: Highlight popular tourist attractions, landmarks, museums, parks, and other points of interest. Include a brief description, location, opening hours, and other relevant information.
- Community Resources: Include information about community centers, libraries, hospitals, police stations, and other critical public resources. This section is especially helpful for newcomers to the city.
- Events Calendar: A regularly updated calendar of events can add value to your city directory and bring back visitors repeatedly. This could include concerts, festivals, public meetings, sports events, etc. Include details such as the event date, time, venue, and a brief description. GeoDirectory features a free events add-on that lets you do this.
- Public Transportation: Details about the city’s public transportation system, such as bus and train schedules, fare information, and route maps, can be incredibly helpful for residents and visitors.
- Housing and Real Estate: Listings of available housing, real estate listings, or noteworthy residential areas can benefit individuals planning to move to the city.
- Local News and Updates: This could involve updates about city development projects, changes in local regulations, or other important news that residents should be aware of.
- Reviews and Ratings: Allowing users to rate and review businesses and points of interest can add an interactive element to your directory and provide valuable feedback for other users.
- Maps and Navigation: Embedding a map for each listed location will help users find their way around. Providing directions or navigational aids can be a helpful feature, especially for larger cities.
Remember, ensuring the information is accurate, up-to-date, and user-friendly is key to a successful city directory.
Tailor your directory to your specific city and audience, and you’ll create a resource that residents and visitors will turn to time and time again.
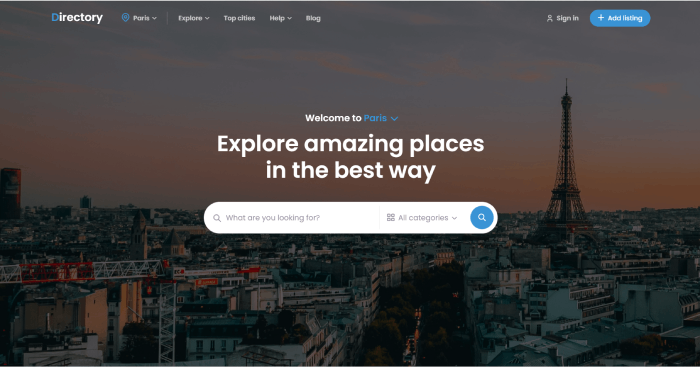
Step 1: Choosing the right theme
A well-suited theme is crucial when creating a city directory site with WordPress. GeoDirectory conveniently offers a beautiful selection of themes – some of which are free, and others that range from $19 to $39.
In April 2023, we released the new FSE Directory theme, and if you are interested in building a city directory with WordPress, you should consider it as it is the most customizable Directory Theme ever built and it’s ideally suited to build your next City Directory.
All GeoDirectory themes are adaptable to single or multi-city directories and integrate seamlessly with Google Maps.
They include predefined listing types for various city features and events, plus a user-friendly front-end listing submission system with payment processing.
Step 2: Setting Up Domain and Hosting
A WordPress theme is the skeleton of your website, but to bring it to life, you need a domain and hosting.
The domain name is your website’s unique internet address, while the hosting service stores your site’s data and makes it accessible online (e.g., Cloudways, SiteGround, and WP Engine).
Some tips for naming your city directory:
- Local Relevance: Incorporate the city or region name in your domain. This directly signals the website’s purpose and can enhance local search engine optimization.
- Directory Indication: Consider including terms like “directory,” “guide,” or “hub” in your domain name. This helps communicate the nature of your site to users.
- Keep it Simple and Memorable: The domain name should be easy to remember and type. Avoid complex spellings, excessive hyphens, or numbers, as these can confuse users.
- Dot-Com Dominance: If available, opt for a “.com” domain. It’s the most recognized and trusted domain extension.
- Avoid Copyright Issues: Ensure the domain name doesn’t infringe upon trademarks or existing brands. This can lead to legal issues and confusion among users.
- Consider Future Expansion: If you plan to expand your directory to include more cities or regions in the future, choose a domain name that allows for this growth.
Step 3: Install GeoDirectory & Configure Your Settings
Once you have your domain and hosting, it’s time to install GeoDirectory, the leading WordPress Directory Plugin.
This is a crucial step for creating a functional city directory, as it provides all the necessary tools for managing listings, events, payments, reviews, ratings, and more.
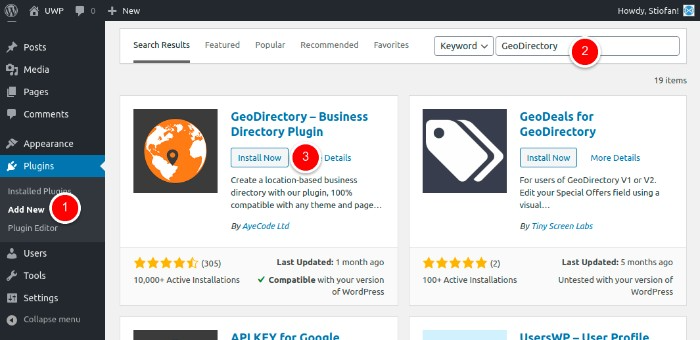
- From the Dashboard select Plugins > Add New.
- In the search field enter “GeoDirectory”, then select install on “GeoDirectory – Business Directory Plugin”
- After installation, click Activate.
Once activated you will find a new menu item on the WordPress dashboard.
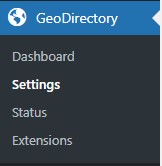
The GeoDirectory > Dashboard shows you Actions Required and Statistics about your City Directory.
Under Settings, you will find the following:
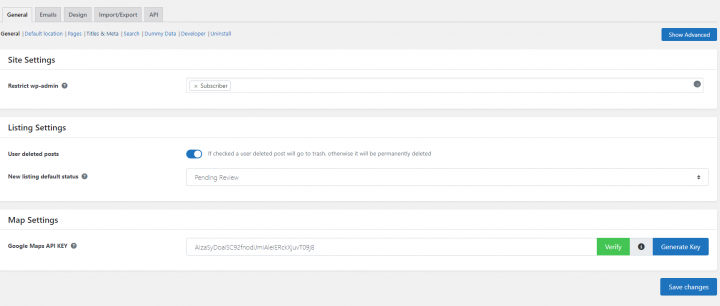
- General: This section is where you handle listings and map settings. Where you select the default location which is the starting point of the add listing form map and Directory pages are set up. It also includes SEO settings, Search settings, Dummy data creation, and more.
- Email: This is where to set up Email and Notification options. This is also where you can modify the email templates.
- Design: Under this tab, you find general design options for the listings archive page, single listing page, reviews, and email templates.
- Import/Export: This is where you can import and export listings, categories, reviews, and settings in bulk via CSV file.
- API: The API tab allows you to enable the REST API for listings and to create an API key for any external application to interact with API.
Remember, configuring these settings best to match your vision and the needs of your audience is crucial for the success of your city directory website.
Step 4: Personalize Submission Form Fields
GeoDirectory comes equipped with standard form fields for listing submissions, appropriate for a basic city directory structure. Of course, you can tailor these fields to your specific needs, enhancing the relevancy and depth of your directory listings.
- Begin by navigating to ‘CPT > Settings > Custom Fields’ on your WordPress dashboard.

2. Here, you’ll find the interface divided into two sections. ‘Add New CPT Form Field’ on the left is for creating new fields, while the right panel displays the fields currently available on the ‘Add New CPT Listing Form’.
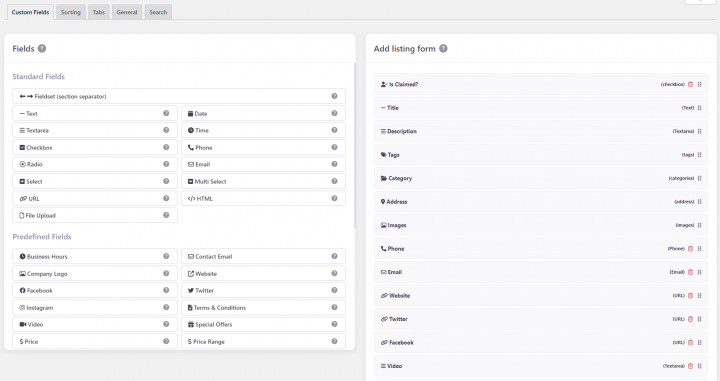
3. Within these sections, you have the choice of ‘Standard Fields’, ‘Predefined Fields’, and a ‘Custom Fields’ area. This last one is particularly useful for developers, enabling them to incorporate their own custom fields through custom code.
4. To add a new custom field, click on your desired field in the left panel, and it will be added to the right panel.
5. Click the newly added custom field and the settings will appear in the right panel.
6. Once you’ve customized your field, click ‘Save’. Be sure to check the ‘Is Active?’ option before saving to ensure your custom field will be visible on your site.
Some ideas for your city directory:
- Add a ‘Neighborhood’ Field: If your city has distinct neighborhoods or boroughs, you might want to add a ‘Neighborhood’ dropdown menu in your submission form. This can help visitors find businesses in specific parts of the city. (Location Manager add-on required)
- Include a ‘Business Hours’ Field: This can be beneficial for users as they can know when the listed businesses or services are open.
- Integrate a ‘Parking Available’ Checkbox: If parking is a concern in your city, a checkbox indicating whether a location has parking available could be a useful addition.
- Add ‘Public Transport Links’ Field: This could provide information about nearby public transport links for each listing. It could be a text field where users can enter information about the nearest subway station, bus routes, etc.
- Create a ‘Special Features’ Field: This could be a text box where listers can add any unique attributes or services their business offers.
Step 5: Creating Your Categories
A city directory website can quickly become overwhelming with hundreds, if not thousands, of listings. The key to maintaining organization and usability lies in well-structured categories.
The GeoDirectory themes allow you to establish categories in a hierarchical form, from a parent category to its subsequent subcategories.
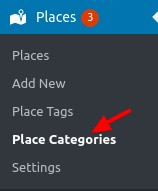
To begin with, go to your WordPress dashboard and select ‘CPT > CPT Categories’. Here, you’ll notice a form on the left side of the page, allowing you to create a new category.
Follow these steps:
- Name: Input the name of the category you want to create. Typically, it’s better to use a plural term such as ‘Cars’ rather than ‘Car’. This is the only required field, though we advise completing the subsequent fields for a more robust directory.

- Slug: Define the category slug. This will form part of the URL that leads to this category’s page.
- Parent Category: If necessary, you can position your new category as a subcategory under a parent category.
- Description: Include a brief description of the category, if desired.
- Category Top Description: This text will appear at the top of your category’s listings page.
- Default Listing Image: Choose a default image for listings within this category.
- Map Icon: Optionally, select a map icon from your Media files to represent this category on any maps.
- Category Icon: Setting a category icon without a specific Map Icon will auto-generate a Map Icon using the Category Icon and Category Color values. Be aware that not all icons are supported.
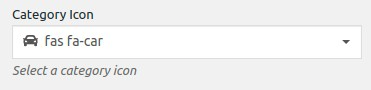
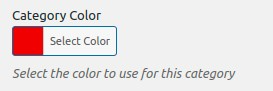
Category Color: Choose a color for this category. This color is also used to create a custom Map Icon and is utilized in other settings around the site.
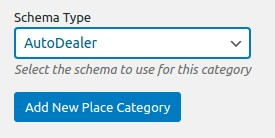
Schema Type: If a suitable schema type exists for your category type, it’s beneficial to set one. This informs search engines about the data they can expect, and sometimes, Google might display Schema-specific information in search results.
After completing these fields, submit your new category. It will now be available when adding new listings to your city directory.
Step 6: Add Your First Listing with the Submission Form
You’ve successfully completed all the fundamental steps to create a city directory site in WordPress. With the full system established, it’s time to add your inaugural listing.
Navigate to the directory page you established in step three.
Here, you’ll find an “Add Listing” button. Click on it to bring up the submission form. Complete the form with relevant information and submit your first listing.
Ensure that everything is functioning smoothly. If you’ve set up any email notifications, make sure to verify these as well. A handy feature of the Business Directory Plugin is its CSV Import & Export capability. This allows you to maintain backups and add multiple items in one go.
Step 7: Attract Visitors to Your City Directory
Congratulations! You’ve successfully built a city directory in WordPress. You can now integrate your directory page into your main menu or any other appropriate location on your website.
Now it’s time to promote your city directory. Some tried-and-true methods include SEO, social media promotion, content marketing, paid advertising, and promotional deals. But you already know those methods.
Related: Boost Your Directory Website’s Traffic with this Comprehensive SEO Guide.
Here are some more creative and actionable strategies to get started on now:
- Host a Launch Event: Consider organizing an event to launch your directory. This could be a meet-and-greet with local businesses, a promotional event with interactive activities, or even a virtual event.
- Run a Contest: Organize a fun and engaging contest. For instance, have users vote for their favorite local business or share their favorite city spots on social media with a designated hashtag. Reward winners with exclusive deals or special recognition.
- Leverage User-Generated Content: Encourage users to share their experiences with businesses listed in the directory. This could be through reviews, social media posts, or blog contributions. Rewarding the best contributions can increase participation.
- Develop a Referral Program: Incentivize users to refer others to your directory. This could be through offering exclusive benefits, discounts, or premium features for successful referrals.
- Establish a Local Ambassador Program: Identify influential locals who love your city and would be happy to promote your directory. Provide them with the tools and incentives to spread the word.
- Offer Exclusive Content: Provide content that users won’t find anywhere else. This could be interviews with local celebrities, deep dives into local history, or insider tips for living in the city.
- Collaborate with a Local Charity: Partner with a local charity and donate a portion of your profits for a certain period. This can generate positive publicity and bring more attention to your directory.
- Utilize QR Codes: Distribute flyers or posters with a QR code that directly links to your directory. This can be a quick and easy way for people to access your directory on the go.
- Create Video Content: A video tour of some top businesses or locations in the city can be engaging content. Share these videos on social media and on your directory site.
- Design an Interactive City Tour: Based on your directory listings, design a virtual or real-life city tour. This can showcase the breadth of your directory and provide a fun experience for users.
Ready to give your city the best directory it’s ever seen?
All in all, creating a city directory in WordPress is a rewarding endeavor that brings your city closer to your online audience. With careful planning, robust organization, and strategic customization, you can create an engaging and informative city directory that benefits local businesses and residents alike.
Remember, a city directory is more than just a collection of listings. It’s a dynamic platform that showcases the spirit of your city. Therefore, continually updating your directory, responding to user feedback, and promoting your platform creatively is essential to maintain its relevance and usefulness.
Use the tips and strategies outlined in this article as your guide. With the right approach and dedication, you can turn your city directory into a valuable resource that enriches your local community and beyond.
Newsletter - Stay Updated!
Get the latest news, tips, and exclusive content directly in your inbox.