GD > Map
Introduction
Maps! Maps! Maps Everywhere!
In this page we cover some of the awesome things you can do with maps when you use GeoDirectory.
Design
GD Map Element
Add maps to your site with the GD Map block. As with all GeoDirectory design elements you can use a Widget, Shortcode, or Gutenberg block.
Map Type
GeoDirectory V2’s GD Map element has a setting called type. This setting has three options
- Auto – GeoDirectory will automatically switch the map type setting based on the GeoDirectory page type where it is shown.
- Directory – can show post type selector, category filter. Most often used on Location page. Also good choice for individual WP Pages.
- Archive – For use in the Archive and Search page templates. When shown in an archive or search page this map type will automatically display the listings that are shown in GD Loop on that archive page.
- Post – For the Detail page to show a single post id on the map. Can also be used in an individual page to show a map point when a listing ID is specified.
Page Design and Map Type
Let’s look at it the other way around. If you are working on a specific page template, which map type to select?
- Location – Directory map. Location pages can show multiple post types with GD Listings, so, use a directory map and adjust the options to show the the post type selector and category filter.
- Archive or Search – Archive map. Archive maps show the results from GD Loop (not GD Listings). You can also use all_posts=1 to show ALL posts of the active CPT.
- Detail – Post map.
Map Basic Options
These options are shown as soon as you start configuring the GD Map element.
The default shortcode is
[gd_map width="100%" height="425px" maptype="ROADMAP" zoom="0" map_type="auto" post_settings="1"]- Title –
title="My Title"Set an optional title for the element.
- Width –
width="100%"Width of the map in % or px. When set to 100% the map will expand to fill the container in which it is placed.
- Height –
height="425px"The height of the map in %, px, or vh.
- Mapview –
maptype="ROADMAP"the type of map view that will be used by default.
- Zoom – The zoom level. You can experiment with different values. Auto is recommended and will set the zoom automatically to show all the listings within the area of the element.
- Map Type –
map_type="auto"Select which type of map to be displayed. Auto is recommended.
- Enable mouse scroll zoom? –
scrollwheel="1"– Allows scrollwheel users to scroll the map.
Advanced Options
Post Type Filter –
Display a map. Use the Directory map type on pages that may display more than one listing Custom Post Type. This pay type should be used on the Location page template.
cat_filter="1" shows the category filter for the current post_type displayed on the map.
post_type="gd_place" for directory maps, usually, so you can choose which post type is shown by default on the map. Use the options in Custom Post Types to change the order.
[gd_map width=”100%” height=”425px” maptype=”ROADMAP” zoom=”0″ map_type=”archive” post_settings=”1″ post_type=”gd_event”]
[gd_map width=”100%” height=”425px” maptype=”ROADMAP” zoom=”0″ map_type=”directory” post_settings=”1″ post_type=”gd_event”]
Speed Up with Marker Clusters
If you are loading hundreds or thousands of locations on a map, this can demand a lot of resources from your site.
Save those resources by using the Marker Cluster Addon, see the doc here for all the info.
Once installed you can add the marker cluster feature to any map by editing the widget options to enable marker clusters.
For a GD Map shortcode,
marker_cluster="1" Archive Map Options
Use the Archive map type for pages that will only display one listing Custom Post Type. This map should be used on the archive template page and the search page, as we as most non-GD pages like a WordPress page with a map of listings.Use the Post map type for display on the detail page.
Post Map Options
The Post map type is for use on the details page (and only the details page).
Map Directions
map_directions="1"- Display the Map APIs utility for getting directions.
- For OSM this is a text field inside the border of the map.
- For Google, this is a text field below the map.
Location Map
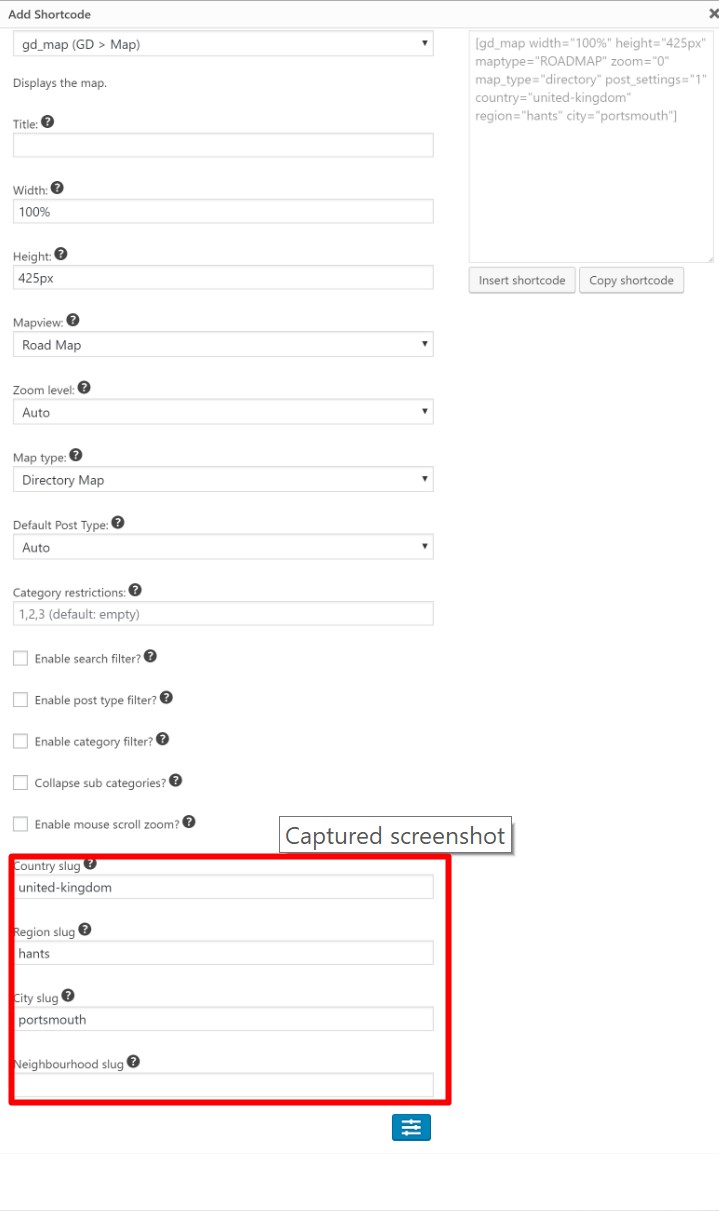
With GDV2 it is possible to create a map that shows listings from a particular city location. This feature works the same for GD Map as for GD Listings, the idea being that you can show a map and listings together on a WordPress page with an automatic query for listings that are IN the city location.
To use this feature you must know the ‘slugs’ for the location. You can find these on a location page or a detail page.
For example:
http://myawesome site.com/places/indonesia/west-java/bogor/forest-and-jungle-planting/awesome-jungle-planter-peopleThe slugs here are:
country: indonesia
region: west-java
city: bogor
Now add these to the GD Map element like so:
(If the location fields are not visible, make sure to adjust the map type value to Directory or Archive map types).
Location GD Map with Location GD Listing
You can setup GD Listings to show for a specific location, too.
Enter the slugs as mentioned above in the GD Map settings, and make sure to enable the option for the location filter. The param to enable the filter in the GD Listings shortcode is:
add_location_filter=1
Special Map
You can also show listings from a GD Listings element in a map on a WordPress page.
On non GD pages you can show markers corresponding to a GD Listings widget/shortcode by entering the CSS CLASS or CSS ID in tags parameter.
In most cases GD Listings uses the class “.geodir-listings”, but if you have multiple listings widgets on the same page then the CSS ID of the one you want to feature in the map should be used in tags.
Ex:
tags=".geodir-listings"or
tags="#gd_listings-2"Ex:
[gd_map width="100%" height="425px" maptype="ROADMAP" zoom="12" map_type="archive" post_settings="1" tags=".geodir-listings"]
[gd_listings title="test special title" sort_by="az" layout="4"]
GD Post Directions
The GD Post Directions element can be used in the Detail or Archive item template, or as a widget on the detail page for a CPT that has a physical location.
The output is a link to the maps service. The link uses the lat/lon of the listing location.
GD Post Directions shows a link.
GD Post Address – gd__post_address
The shiny new GD Post Address widget gives you control over how the location is displayed. You can use it in a sidebar as awidget, add it as a shortcode in a tab, or even as a block.
The GD Post Address element uses a simple tag scheme to allow you to format the address in almost any manner you might want, including adding arbitrary commas, and even line breaks after each address part.
To use it, just add the GD Post Address element as a widget to your sidebar. Hover over the “i” near the input field to see the detailed instructions shown here:
Enter the address tags as required, adding _br or _brc to the tag adds a line break or comma and line break after it.
Available tags: %%street%% %%neighbourhood%% %%city%% %%region%% %%country%% %%zip%% %%latitude%% %%longitude%% %%br%
To show the entire address:
On one line: %%street%%, %%neighbourhood%%, %%city%%, %%region%%, %%country%%, %%zip%%
Import and Export Map and Address Data
GeoCoding and Reverse Geocoding
GeoDirectory uses the Maps API of your choice to geocode listing addresses during a listing import. If you supply a complete address without latitude and longitude, then the address is sent to the Map API, which returns the closest latitude and longitude known for the address. The coordinates are then stored in the listing.
When entering a listing through the add listing or backend form, you have the opportunity to use a map and drag the pin to the correct location on the map. This sets the latitude and longitude for the post. As soon as the latitude and longitude are known, the coordinates are sent to the Maps API for reverse Geocoding. Unless you have disabled it, once the Maps API returns the result, then the address will be updated with the information from the Maps API.
Reverse Geocoding for import of listings is not available. In order to import listings, address is required. If your CSV has only latitude and longitude, then there are a wide variety of services available to help you set the closest address for your listings. Try a Google search for “reverse geocode csv”.
Customizing
CSS and PHP Snippets
Remove compass and streetview links from Google Maps with Custom CSS – Snippet in Topic
Remove an arbitrary string from GD Post Address template if neighborhood is empty – Snippet in topic
Open Map Bubble detail page links in a new tab – Snippet in topic
CSS
/*Make the category legend for a directory map wider*/
div#gd_map_canvas_directory_cat {
    width: 45%;
}
PHP
Set the zoom level of the map on the add-listing page
// Set add listing map default zoom level
add_action('geodir_address_extra_listing_fields', function( $cf ) {

	global $gd_post,$mapzoom;
	if(empty($gd_post->mapzoom)){
		$mapzoom = 16;
	}
});
Get Support
Get support on our forum, find out more here: https://wpgeodirectory.com/docs-v2/geodirectory/support/
FAQ – Frequently Asked Questions
Override GD Details Tab Default Map
Be default the map shown on the detail page, the one that is in the tabs, that map uses the GD Map element with the option “Use post map zoom and type?” enabled. That means that whenever a user enters the add listing form and adjusts the map zoom, or the map type, that zoom level is saved with the listing and used to determine the zoom of the map on the tab (or any other map shown on the page with the option enabled).
So, want to change that? Remove the default map tab, and add a Shortcode as a new tab with a GD Map element that has the map settings you want.
To override the default settings of shortcodes used in tabs you have to:
Go to the tabs UI for the CPT (Places – Settings – Tab (tab) – Map – Edit
Click Remove to remove the tab
Scroll down to find the “Shortcode” field on the left and click to add a Shortcode to the right side.
Use the shortcode builder button to confgure a GD Map as you like, then save.
Visit the listing to viw your new map.You might want to use a shortcode like this one:
[gd_map width="100%" height="425px" maptype="ROADMAP" zoom="14" map_type="post" post_settings="0"]What you don’t want is
post_settings="1"because that will use the zoom settings of the user doing the input.
Filter by categories
You can setup your map to include or exclude or show only specific categories.
Most commonly members want to display only one or two specific categories.
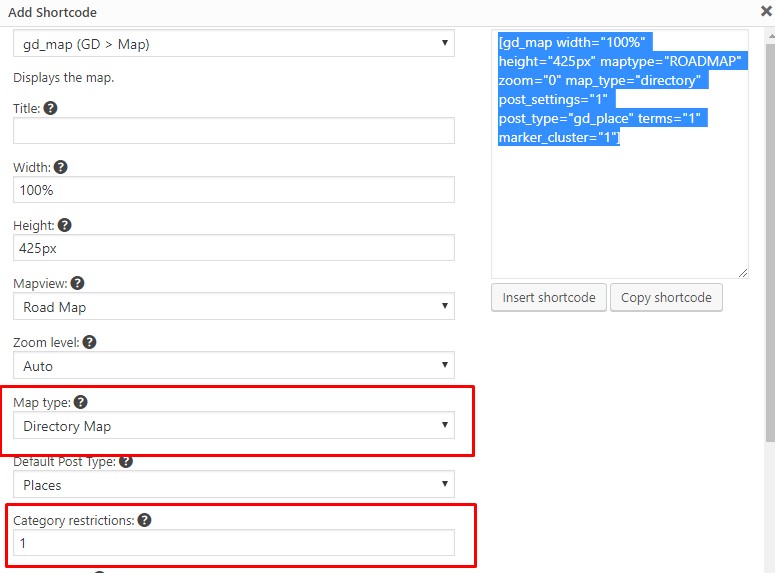
To do this, open the shortcode builder to GD > Map ( https://wpgeodirectory.com/docs-v2/geodirectory/shortcode-builder/ )
Then choose a Directory map type, and set your category filters.
You will need to know the ID if the categories. In the example below the ID is 1 which shows as
terms="1"in the shortcode below:
[gd_map width="100%" height="425px" maptype="ROADMAP" zoom="0" map_type="directory" post_settings="1" post_type="gd_place" terms="1" marker_cluster="1"]
How to list ‘online businesses’
Is your directory featuring ‘online’ locations? In some cases, even though a business may not have a specific address, or the address should not be public online, you still want to show them on a map.
You have several options for how to list these businesses with GeoDirectory.
First, though, if you don’t need maps, or an address at all, then, with the Location Manager installed you can use the option to “Disable physical address” in the CPT General settings. Go here to see this setting.
If you want maps, then you will want to consider the following options:
- The street address field is the main field where you would type ‘123 My St.’ but you can add any address you want, there, as long as something is added. A BnB might add “Near the center square”. You can inform users that this field will not be shown at all on the frontend, and therefore to feel free to enter accurate info.
- The Map Pin can also be placed anywhere. There is an option in the Location tab (settings) to disable address update if the pin is moved.
- Field Descriptions are yours to change. Use them to give instructions to your listing owners about how to use the street and map pin to their advantage.
- GD Post Address gives you complete control of what you display. I recommend you use that in your details page sidebar to setup and (advanced) template that simply shows the city as the address, instead of the street. That is absolutely possible to do.
Hiding Maps
Add Listing Page
You can hide the map on the add listing page with CSS:
#geodir_address_map_row {
    display: none;
}
GD Details Page
You can allow your listing owners to decide if they want to show a map or not by using the GD > Dynamic Content element. Find an example for that here:
https://wpgeodirectory.com/docs-v2/design/gd_dynamic_content/
Map Markers
Looking for an update to your map markers?
Here are some links to map icon resources:
https://mapmarker.io/editor
https://mapicons.mapsmarker.com/
GeoDirectory V1 & V2 default markers including a PSD template (zip file).
Custom? Contact GD Experts: https://geodirectoryexperts.com