How to Create a Directory Website (with WordPress)
Want to create a directory website?
The easiest way to create a directory website is to implement the following steps:
- Choose a platform (we recommend WordPress)
- Pick your niche
- Design and customize your directory website
- Gather and organize your data
- Optimize for SEO
- Promote your directory website
- Monitor and improve
Before diving into the details, let’s first understand the key benefits of creating a directory website for you and your visitors.
Some people need a map, compass, and a pack of hunting dogs to find the business they’re after.
Luckily, others will have your business directory website to guide them to what they need.
Your directory will be the ultimate resource for finding information about businesses, products, and services in any specific area or industry.
With the right tools, setting up your own business directory website is surprisingly easy.
This guide will show you how to create a powerful online directory using WordPress.
Why start a directory website?
- Passive income: Monetize your directory with ads, listing fees, affiliate marketing, premium listings, or sponsored content, and earn money effortlessly.
- Flexibility: Work from anywhere with an internet connection, enjoying the freedom of a digital nomad without the hassle of finding accommodation.
- Build a strong network: Connect with various businesses and people, potentially forging valuable relationships that could benefit your future ventures.
Step 1: Choose a platform
The first step in creating your business directory website is choosing the right platform.
With many options available, it’s best to go with user-friendly platforms like WordPress, Wix, or Squarespace:
- WordPress: The Swiss Army Knife of website builders—versatile, powerful, and highly customizable, allowing you to create anything without limitations.
- Wix: Flashy and easy to use, packed with excellent features, but it has limited customization options and fewer plugins.
- Squarespace is sleek, minimalist, and visually appealing, but it has limited functionality and can be pricey.
Our recommendations for beginners
If you’re new to website building, WordPress is your best bet.
With countless tutorials and resources available, plus a vast plugin marketplace, you’ll have all the tools you need to build the perfect site.
For instance, the GeoDirectory plugin lets you set up a powerful directory website in minutes. It features advanced search, social media integration, ratings, reviews, and more. It’s easy to customize and manage.
In this guide, we’ll show you how to use it.
Step 2: Picking your niche
The next step is to pick your niche. What kind of businesses or products do you want to feature on your website?
Choose a niche for your directory. What types of businesses or products do you want to feature?
- Identify Your Target Audience: Determine who you want to attract—small businesses, large corporations, or a specific industry.
- Research Your Competition: Explore existing directories and look for market gaps. Identify what makes your directory unique and how you can stand out.
- Consider Geographical Location: Decide if your directory will focus on a specific city, state, or region. Tailor your directory to the needs of businesses and users in that area.
- Narrow Down Categories: Focus on key categories relevant to your target audience. Keep them well-defined and easy to navigate.
- Test Your Ideas: Get feedback from potential users and businesses to validate your concept before launching.
Examples of Niche Business Directories:
- A vegan restaurant directory for a specific city
- Pet grooming services in a particular region
- Women-owned businesses in a specific industry
- Eco-friendly products in a specific country
Get creative and find a niche that resonates with you and your audience.
Check this link for a tutorial on creating a restaurant directory with WordPress or How to Create a Classified Ad Website.
Once you’ve chosen your niche, you’re ready for the next step.
Step 3: Design and customize your directory website
Now that you’ve chosen a platform and identified your niche, it’s time to design and customize your directory website.
Start by installing and setting up the GeoDirectory plugin:
- Install the plugin
- Complete the setup wizard
- Create listings and categories
- Set up widgets
- Add links to the menu bar
For guidance, watch this walk-through by Nicole Sauk, which covers these steps:
Once the basics are set up, you can begin customizing the design—this is where the fun begins!
You can choose your preferred WordPress Directory Theme for GeoDirectory to create a beautiful website that reflects your business.
WordPress Directory Themes and Page Builder Tutorials
If you need help choosing a 3rd party theme to use with GeoDirectory, we have a fantastic series of tutorials: How To Create A Directory Website.
Beyond the pre-built designs, you’ll want to personalize your site to make it stand out. Here are some tips:
- Choose a unique color scheme that reflects your brand, city, or target audience.
- Customize your logo with colors and images that align with your niche.
- Use high-quality images specific to your brand and niche.
- Customize your fonts for a consistent, professional look.
- Add personal touches, like a welcome message or personal story, to connect with your audience.
- Use widgets and plugins to add features like social media feeds or contact forms.
GeoDirectory offers powerful add-ons to enhance your site. Check them out here. Below are some must-haves:
- Location Manager: Ideal for scaling globally, allowing you to manage different directory locations individually.
- Advanced Search: Helps users filter searches by criteria you set, making it easier to find listings.
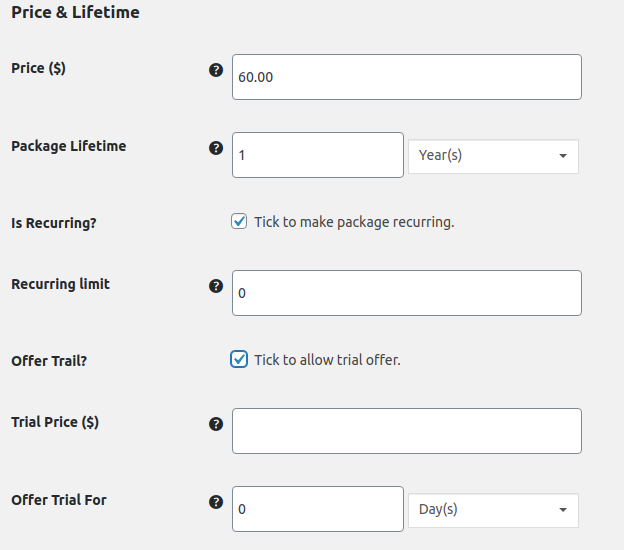
- Pricing Manager: Lets you monetize listings with premium options, manage payments, and set up pricing models.
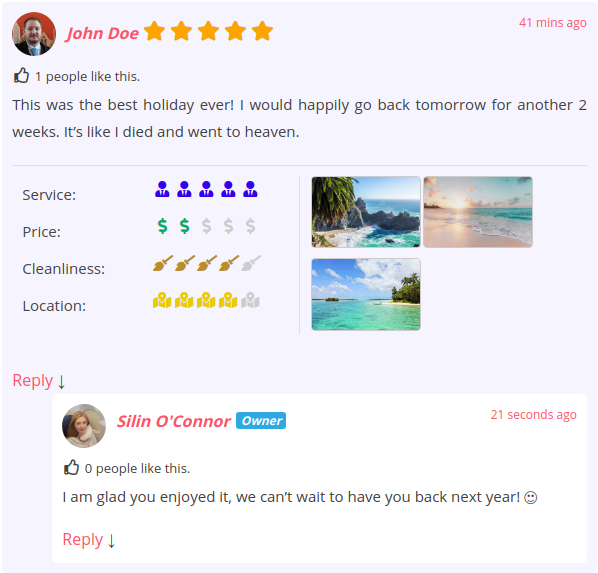
- Multi-Ratings and Reviews: Builds credibility by allowing users to leave reviews with customizable icons and rating categories.
These add-ons will help you maximize your directory’s potential and user experience.
It’s time to populate your directory with listings—one of the most time-consuming but rewarding steps in creating your site!
- Start with Dummy Data: Use dummy data to test features, customizations, and how GeoDirectory handles different content types.
- Import Your Data: If you have your database, use the CSV import tool to add and categorize listings in bulk. Check out this guide on how to import/export data.
- Organize Your Listings: Set up categories, tags, and sub-categories to help users quickly navigate your directory and find what they need.
- Add Filters: Use filters to refine search results, making it easier for users to find specific listings without wading through long lists.
Properly organizing your data ensures a better user experience and makes your directory valuable!
Step 5: Optimize for SEO
SEO is crucial for your directory’s long-term success, so start building your SEO foundation now. In the next section, we’ll cover short-term marketing strategies.
To optimize your business listings for SEO, follow these steps:
A. Keyword Research and Targeting
- Brainstorm potential keywords your audience might use to find related services.
- Use tools like Google Keyword Planner to find relevant, high-volume keywords.
- Include target keywords in titles, descriptions, and relevant listings fields.
- Create SEO content based on low to medium-competition keywords.
B. Optimizing Meta Tags and Content
- Optimize title tags and meta descriptions with concise, accurate information and keywords.
- Use target keywords within your listings to provide relevant information about each business.
C. Building Backlinks
- Reach out to industry websites and businesses for backlinks to your listings.
- Create valuable content that other sites will want to link to, like blog posts or infographics.
- Focus on getting backlinks from reputable websites in your industry.
GeoDirectory’s built-in SEO optimization makes it easier to set your directory up for success.
Pro tip: Consider hiring an SEO agency for expert guidance, as SEO can be complex and time-consuming.
For more tips, check out this SEO guide for online directories.
Step 6: Promote your directory website
Now that your directory website is set up, it’s time to promote it. Here are some effective ways to get the word out:
Social Media Marketing
- Choose the Right Platforms: Focus on where your target audience spends time online. For example, LinkedIn is great for local businesses, while Instagram suits food directories.
- Create a Content Calendar: Post regularly about updates, featured businesses, events, tips, and insights related to your niche.
- Engage with Your Audience: Respond to comments and messages to show you value their input.
- Use Social Media Ads: Platforms like Facebook and LinkedIn allow targeted advertising to reach your ideal audience.
- Partner with Influencers and Businesses: Collaborate with industry influencers or other businesses for cross-promotion to boost credibility and reach.
Email Marketing
- Collect Email Addresses: On your website and social media, use sign-up forms with compelling offers to gather email addresses.
- Use Email Marketing Software: Tools like MailChimp can help automate newsletters, promotions, and updates.
- Highlight New and Featured Listings: Announce new businesses and spotlight different ones monthly to keep your directory engaging.
- Share Industry News and Events: Keep your subscribers informed about relevant trends and upcoming events.
- Personalize Your Emails: Use recipients’ names and make your content relevant. Craft catchy subject lines and clear calls to action to boost engagement.
Networking and Partnerships
- Attend Local Events: Networking events and business meetups are great for building relationships with other business owners.
- Host Events or Webinars: Showcase your expertise and attract potential customers by hosting informative events.
- Offer Referral Programs: Provide discounts or incentives to encourage customers to refer new businesses, helping you expand your directory and build loyalty.
Promoting your directory through these strategies will help you attract more users, grow your listings, and establish a strong presence in your niche.
Step 7: Monitor and improve
Congratulations!
You’ve launched your business directory website, but the journey doesn’t end here.
To ensure success, you must continuously monitor, update, and improve your site.
Here are some tips:
Analyzing Website Performance
- Tools like Google Analytics can be used to track traffic and user behavior. This will help you identify what’s working well and what needs improvement.
- Key metrics to watch include bounce rate, time on site, and page views.
- GeoDirectory offers a Google Analytics add-on that integrates tracking and shares basic stats on your site.
Gathering Customer Feedback
- Ask customers for feedback through surveys, reviews, or social media.
- Use their insights to identify areas for improvement and inspire new features or services.
Making Updates and Improvements
- Use feedback and performance data to update content, improve navigation, or add new features to enhance the user experience.
- Regularly refining your website keeps you ahead of the competition and ensures an excellent user experience.
A successful directory website is an ongoing project that requires constant attention and refinement—keep evolving to stay ahead!
Start a profitable directory business today with GeoDirectory
Building a business directory website can be both rewarding and profitable. By following the steps in this guide, you can create a professional directory that delivers value to your customers and generates passive income.
- Choose a niche, personalize your website, promote it through various channels, and keep improving it to ensure your directory stands out from the competition and is a valuable resource for businesses and consumers.
- You can turn your passion into a thriving online business with the right tools, resources, and mindset.
So why not give it a try? Your business directory could be the next big thing!
Newsletter - Stay Updated!
Get the latest news, tips, and exclusive content directly in your inbox.