GD > Post Images
Introduction
Image Settings
gd_post_images
Support
Frequently Asked Questions
Introduction
Images make for a pretty site! So here on this page you can find a 360-degree look at all the ways that GeoDirectory works with images.
WordPress Image Size Settings
WordPress controls the actual size and dimension of images on your site.
GeoDirectory provides a variety of options for working with listing related images.
WordPress Image Settings
Your WordPress site has certain preset image sizes. You can find them, and the general image size options, in:
WordPress – Settings – Media
GeoDirectory uses WordPress images sizes. Every time GeoDirectory’s gd_post_images design element is used to show images, you have the option to specify the image size, which are the sizes in the WordPress Media settings.
Read more about WordPress Responsive images here: https://make.wordpress.org/core/2015/11/10/responsive-images-in-wordpress-4-4/
GeoDirecotory will display the image size from the WordPress defaults optimized for the browser viewport. If you add more image sizes your theme may have settings to override the image being served. For overriding you should contact the theme author for support.
You can control the default image size in the WordPress settings. The sizes configured in the options then are shown in the “Image Size” select box in the gd_post_images options:
Do you think your site images are blurry? Adjust the “Large” image size. Make it 1200, or 1400, or as big as you like. Then adjust your GD Post Images to use the large size.
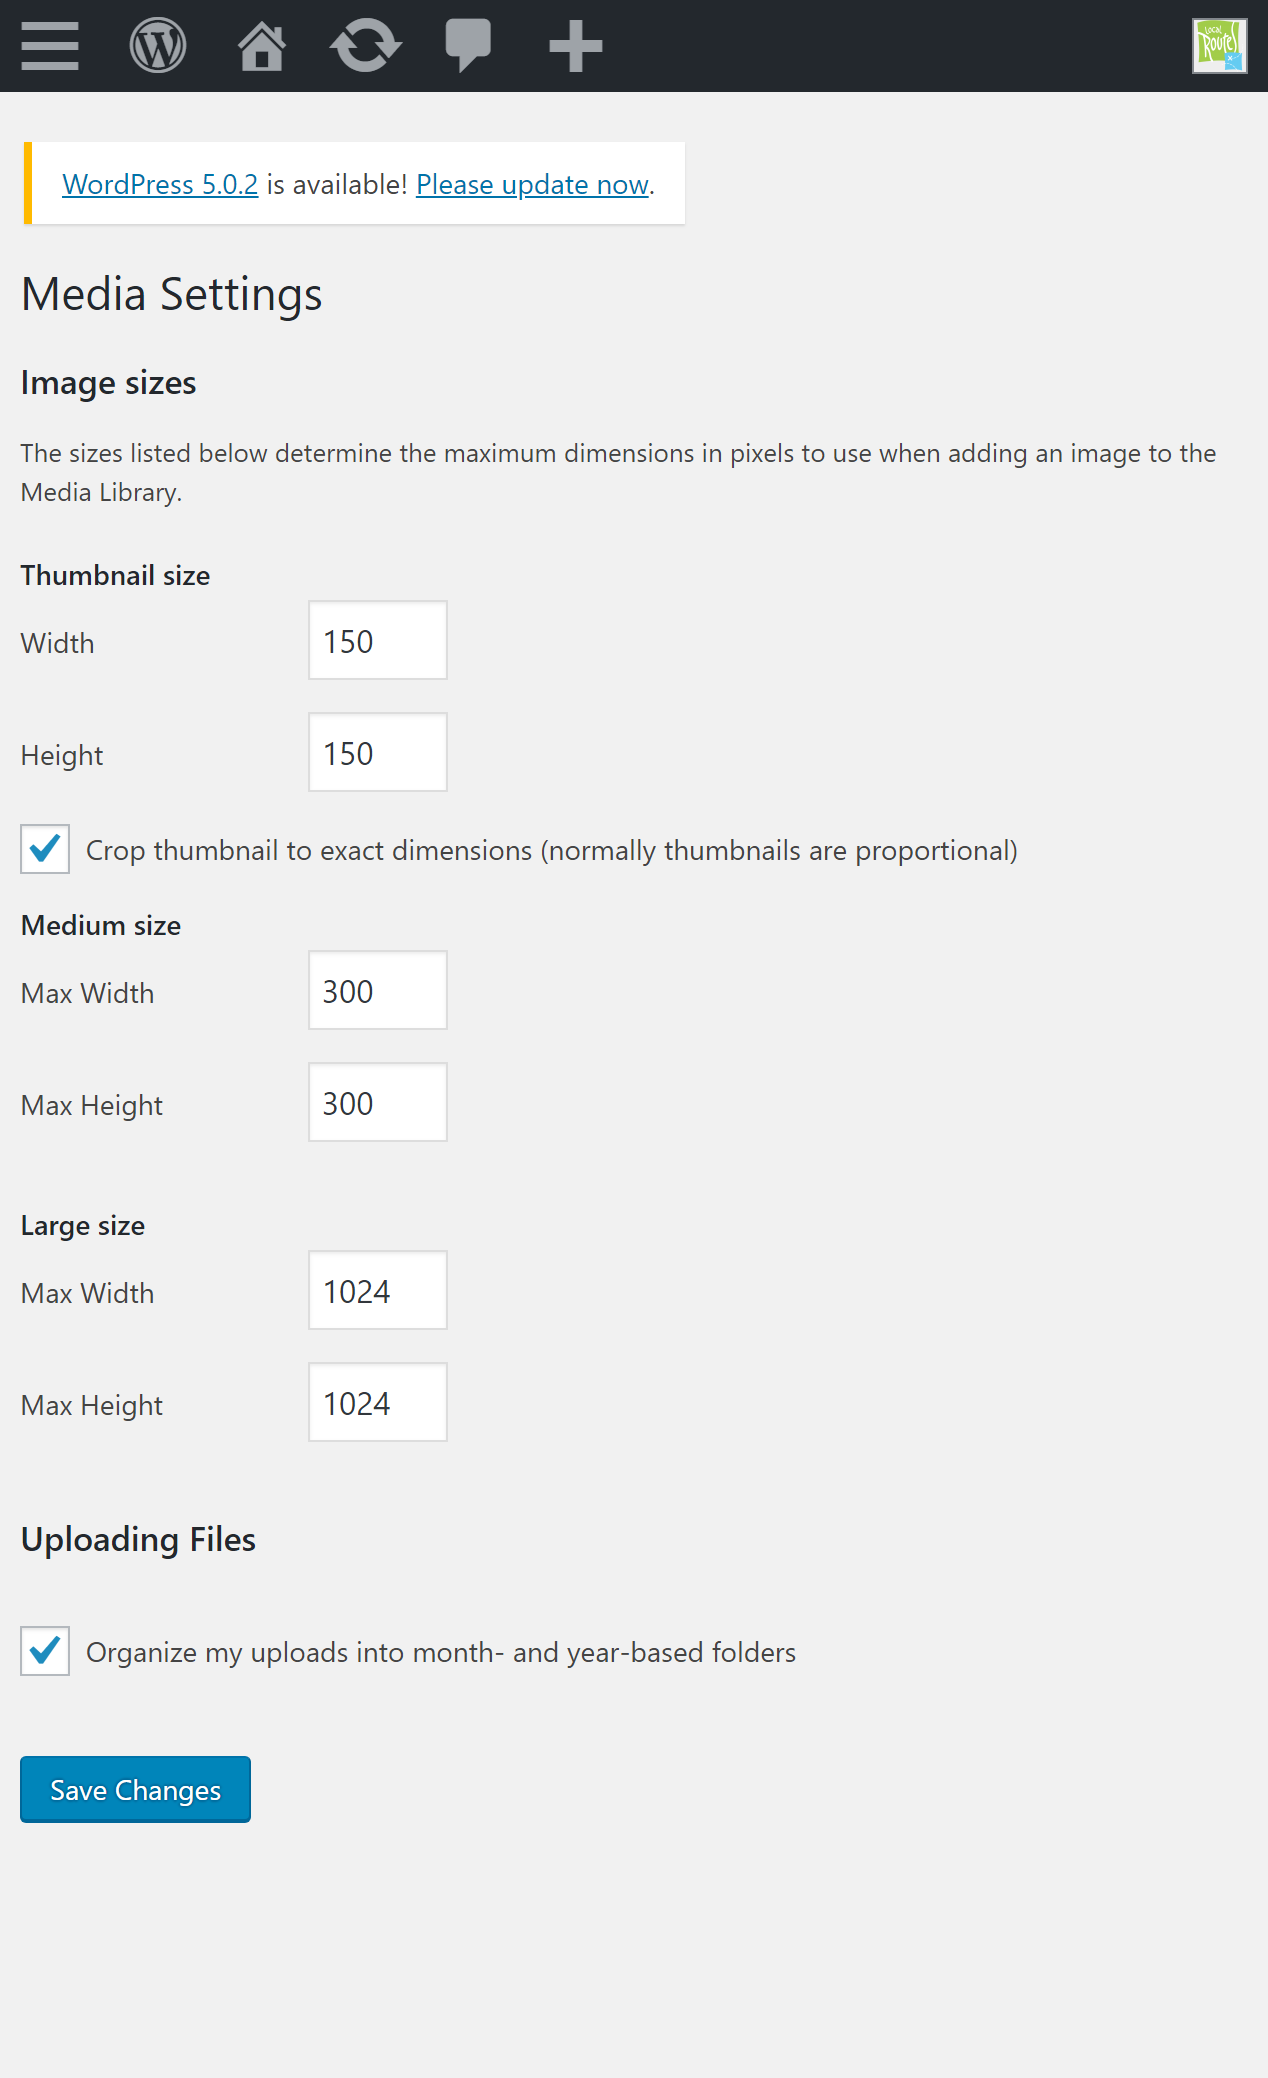
Image sizes are then available in every GD Post Images element
Settings
Theme Featured Image Integration
Some themes provide special features for the post “Featured Image”. GeoDirectory will set the first image from the default image upload as the featured image for the post. You can drag and drop images to sort out which image is first.
If your theme is making use of the featured image for a banner, and you want to disable that, GeoDirectory provides a setting that may help in most circumstances as shown here
GeoDirectory – Settings – Design – Detail
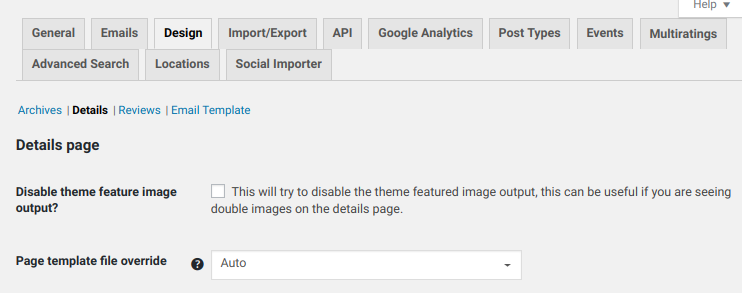
For example, for the Primer theme, without this setting, the theme will load the first image of a listing as a background in the header area. With the setting disabled the banner area has no image background, just the color set for the theme.
Design
Listing and Listing Featured Images
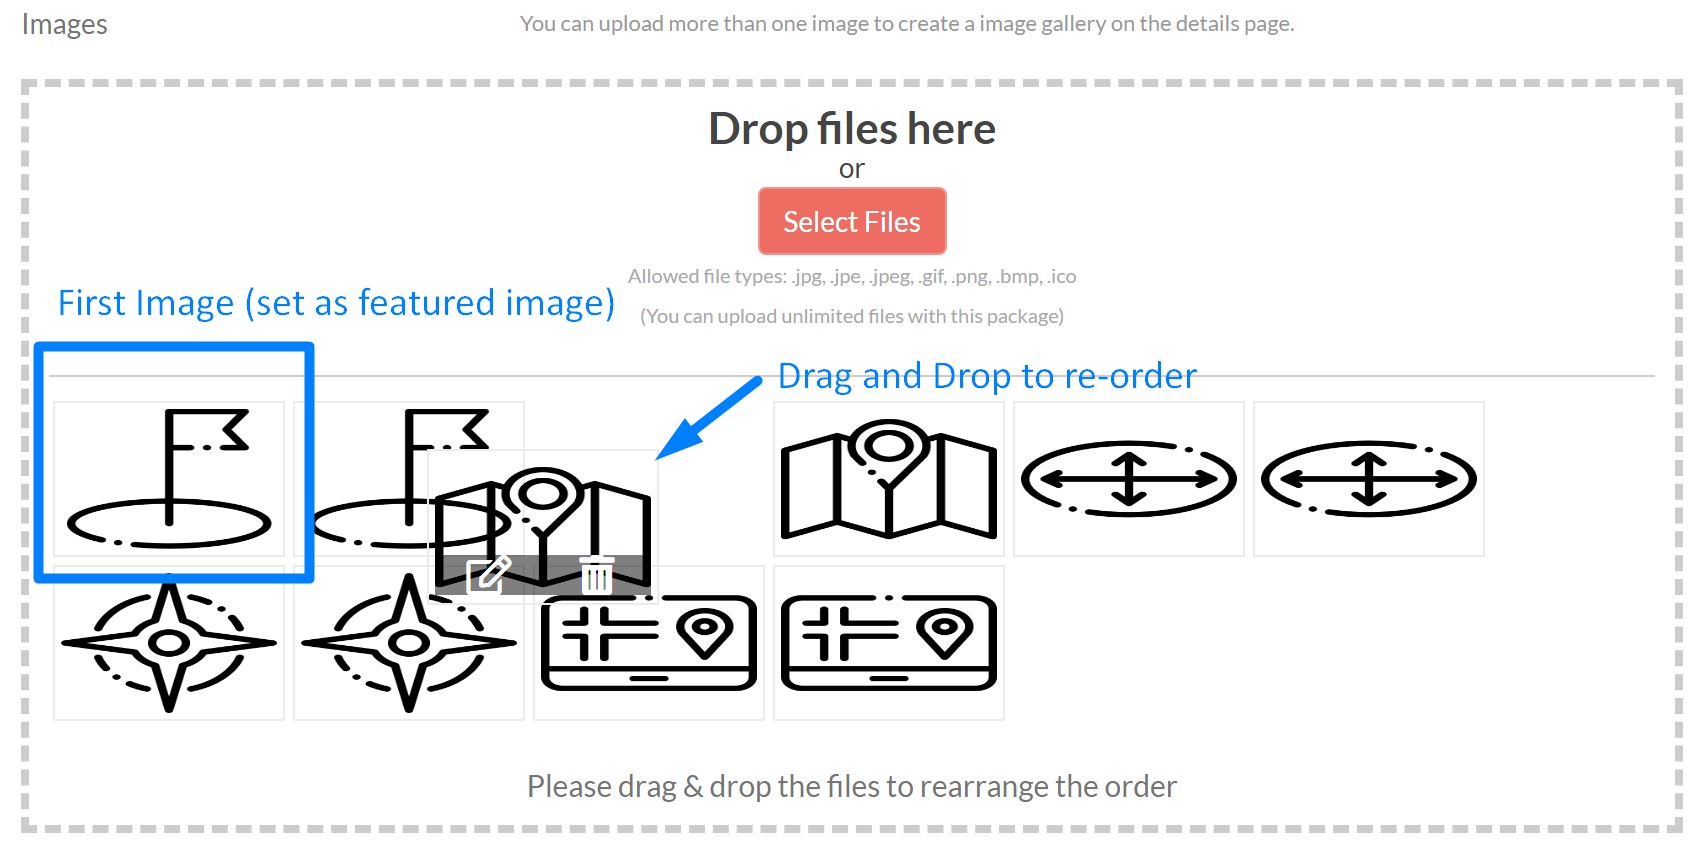
Images are uploaded to a listing through the uploader on the frontend or backend.
Each Listing will have a single field with the label “Images” (key = post_images) where the listing images can be uplaoded.
Once uploaded to the site a thumbnail will immediately display.
Thumbnails are interactive.
Drag and drop them to set the order of the images in the slider or gallery.
Set the first image intentionally by drag and drop. The first image will be the “featured image” and be shown as the single image when using gd_post_image for a single image.
Pages and Page Templates – GD Detail and GD Archive page templates
GD Post Images is included in both the GD Detail and GD Archive Item default templates.
Read about the GD Post Images options below.
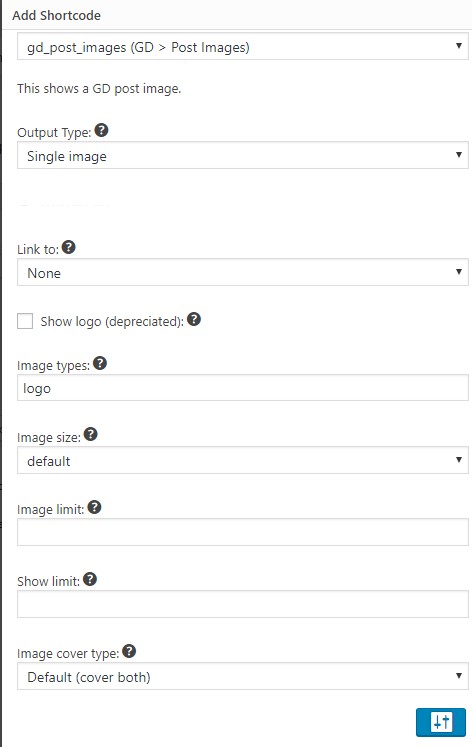
GD Post Images element – gd_post_images
GD Post Images is used to display listing images on the GD Detail and Archive Item templates.
You can configure the GD Post Images element to display any of the following:
- Single – First (featured) image only
- Company Logo image, fallback to first/featured image)
- Slider of post images and/or additional custom image fields
- Gallery of post images and/or additional custom image fields
The settings for GD Post Images are covered below.
Single
Slider
Use GD Post Images to configure a slideshow for use in the Archive or Details templates.
Slider options include:
Slideshow
This setting will ‘autostart’ the slideshow. Set
slideshow=0to turn off the slideshow.
Animation
animation=”fade” or animation=”slide”
Navigation controls
None, Default (arrows left/right), Thumbnails (arrows plus thumbnails)
controlnav=0, 1, or 2
Slider as Carousel
Use the advanced options to set the value for Show Limit. This will determine how many images are shown in the carousel grid.
limit_show="4"[gd_post_images type="slider" ajax_load="1" slideshow="1" show_title="1" animation="slide" controlnav="1" limit="8" limit_show="4"]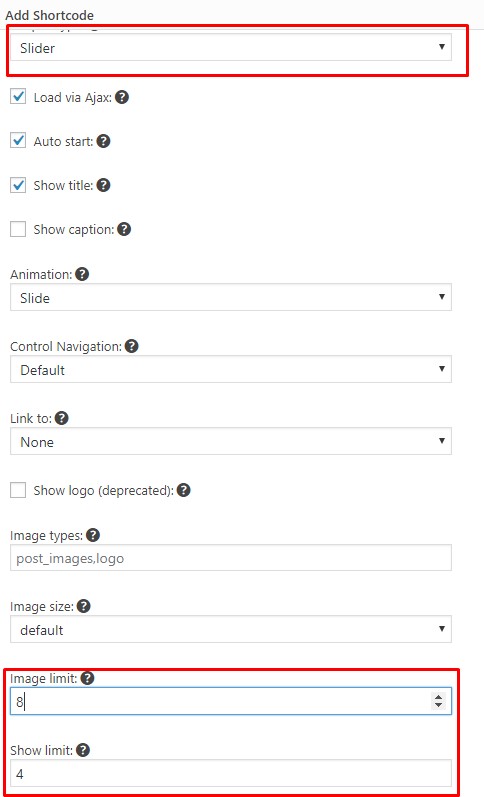
Gallery
Display Custom Images
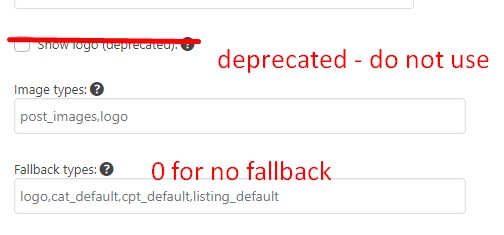
GD Post Images can be used to display the Logo or any other custom image field that you have added to your Custom Post Type.
If you want to display the logo, or another field, you can do that with GD Post Images by setting the Image Types option in the advanced settings, for example
types="logo"Example shortcode for display of the logo as a single image:
[gd_post_images type="image" ajax_load="1" slideshow="1" show_title="1" animation="slide" controlnav="1" types="logo"]![]()
Read more about adding Custom Fields here.
Comment Images
The Multiratings and Reviews addon enables your site visitors to submit images with their review.
Read more about enabling comment images here
Find the setting at:
GeoDirectory – Settings – Multiratings – Enable upload images in comments for a post
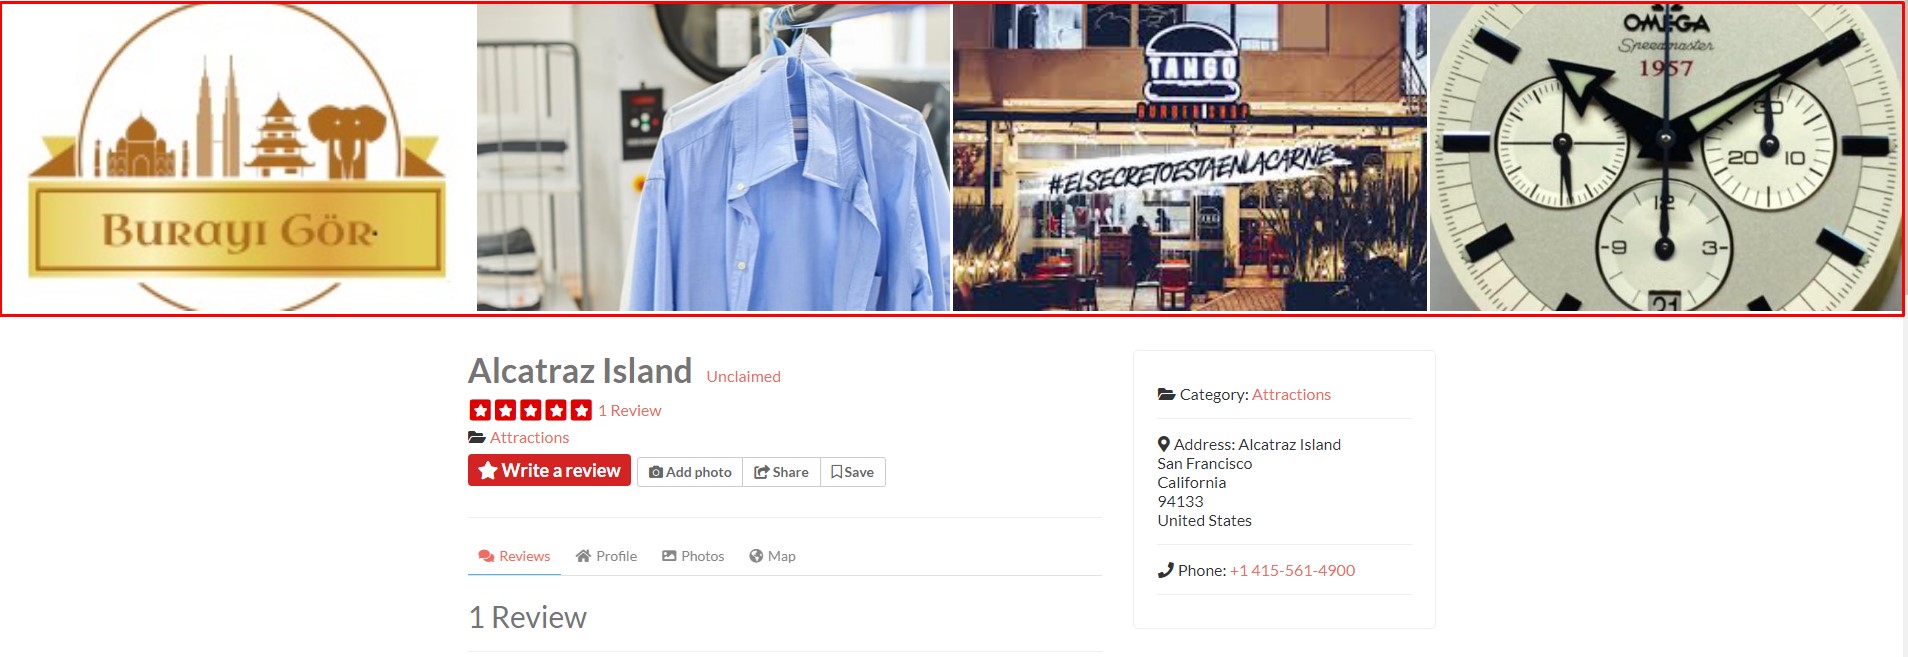
Display Comment Images
With Multiratings installed and user comment image uploads enabled, GD Post Images can display comment images with settings like this, where “Image Types” has the value
types="comment_images"[gd_post_images type="gallery" ajax_load="1" slideshow="1" show_title="1" animation="slide" controlnav="1" link_to="lightbox" types="comment_images" image_size="thumbnail" limit="30" limit_show="5" cover="y"]
Comment Images in a Tab
To display comment images in a tab, visit your CPT Tabs Settings and add a new Shortcode field with the shortcode above, like this:
Read more about how to use the Tabs UI here.
Default/Fallback Images
GD Post Images will display default images when a listing does not yet have any images uploaded to the
post_imagesfield.
Default images are also called fallback images because they have a fallback order. GD Post Images uses the following fallback order:
- If logo is set, display Company Logo image
- First (Featured) image uploaded to the listing post_images field
- CPT Category Default Listing Image
- CPT Default Listing Image
- Default listing image for Archive page display
Company Logo
Company Logo is a predefined field. Add it to your listings in the Custom Fields tab.
The field key will be set automatically to
logo.
First (Featured) Image
Once uploaded, images can be re-ordered with drag and drop. The listing that is first (top left) is considered the listing Featured image.
CPT Category Default Listing Image (ex. Places Attractions Category):
Set at: Places – Place Categories – Attractions (Edit) – Default Listing Image
CPT Default Image (like Places Default Image):
Set at:Places – Settings – General (tab) – Show Advanced – Default image
Listing Default Image
Set at: GeoDirectory – Settings – Design (tab) – Archives (subtab) – Listing default image
Map Default Images
Default map icon
This icon is used in the add-listing form to choose the address of the listing. Find it at:
Set at: GeoDirectory – Settings – General – Show Advanced – Default marker icon
You can use any of the above or any other custom image field as falback. Here are the settings.
Enter fallback_types=0 for no fallback images.
fallback_types=0
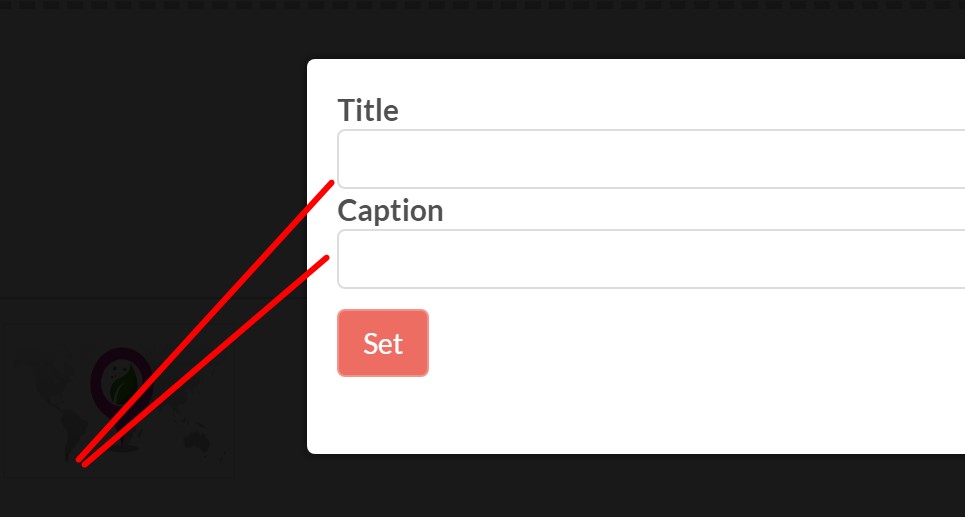
Title and Caption
GeoDirectory V2 supports Titles and Captions for Images.
To show the title and caption
show_title="1″ show_caption="1″
To hide the title and caption
show_title="0″ show_caption="0″
Titles and Captions, just like images, are handled independent of the media library to improve performance.
When mousing over an image the title is used for the hover text and the caption is used for alt.
Edit Title and Meta when uploading and managing images inside the GD listing:
- Upload an image
- Hover over the image
- Select Edit
- Fill in Title and Caption and Save
Customize GD Post Images with CSS
Adjusting the display of GD Post Images with CSS is a customization. If these examples are not what you are seeking, you will need to create the custom CSS yourself or contact a freelance developer.
The following example CSS can be used to adjust the display of Archive item images.
Visible Pixel Width of the Post Images Element
The GD Post Images element is responsive. That means it will expand or shrink to fill the width of the parent element container.
If you want to override that behavior with CSS, you can set a specific width for the images by targeting the element with CSS.
/*GeoDirectory V2 – GD Post Images Slider – Set width*/
.geodir-post-slider{
    max-width: 500px;
    margin: 0 auto;
}
Draw a Border around the Post Images Image
/*GeoDirectory V2 – GD Post Images Border*/
.geodir-image-container .geodir-image-wrapper {
    margin: 0 0 -11px !important;
}
Stretch Images to Fill
This CSS is not recommended; instead use the options in GD Post Images.
/*GeoDirectory V2 – Archive Items – Zoom effect to make images fill the area without distortion*/
.geodir-image-container ul.geodir-images li img {
object-fit: cover!important;
height:100%!important;
}
/*GeoDirectory V2 – Detail Page – Fit image into area without cropping*/
.single .geodir-images img {
    width: 100%!important;
    height: 100%!important;
    object-fit: contain!important;
}
/*GeoDirectory V2 – Remove border radius on images*/
.geodir-image-container ul.geodir-images li,
.geodir-image-container ul.geodir-images li img{
        border-radius: 0 !important;
}
CSS for the Slider
These are examples and you will need to contact a developer to build from or change these examples.
/*GeoDirectory V2 – Make the slider on All detail pages smaller by adding padding*/
body.single .geodir-post-slider {
    padding-left: 20%;
    padding-right: 20%;
}
Max images in a gallery
You can adjust how many images users are allowed to upload with Pricing Package settings. If you just want to limit the number of images displayed so you can regulate your page layout you can use the CSS below and adjust it to meet your needs.
/* gd_post_images gallery – show max 2 images */
ul.geodir-gallery li:nth-child(1n+3) {
    display: none;
}
/* gd_post_images gallery – show max 3 images */
ul.geodir-gallery li:nth-child(1n+4) {
    display: none;
}
Troubleshooting Image Upload Issues
In this guide we cover some of the most common causes for image upload or display failures.
Site URL Setting
Check that your site URL is set correctly.
If your site has an SSL certificate, your site URL should start with https://
If your site has no SSL certificate, your site URL should NOT start with https://; instead it should start with http://Check your site URL in the WordPress general settings at:
WordPress Backend – Settings – General – WordPress Address (URL)
WordPress Backend – Settings – General – Site Address (URL)These two URLs are probably the same unless you are running a multisite.
SSL Certificate Configuration
A misconfigured SSL Certificate can result in images upload failures. Use a tool like https://www.digicert.com/help/ to verify that your SSL is configured correctly. If you see errors you should regenerate your SSL certificate or contact your host for help. This is a common problem for sites that have been migrated or cloned.
Mixed Content
Closely related to SSL is mixed content errors. The root cause of mixed content can also cause image upload issues. Mixed content errors are often the result of adding or removing SSL without updating site URLs. Check our page about mixed content to learn more.
Host Site and Browser Protection
Some managed WordPress hosts disable image uploads on staging sites when access restrictions are put in place.
If your site is on a staging site with one of these hosts, contact the host about disabling the access restrictions to restore uploads.
- Flywheel
- Cloudways
cURL Restrictions
WordPress prefers to use cURL.
Is cUrl enabled?
You can use the Status Report tool to check to see if cURL is enabled on your server. Find the report tool at:
GeoDirectory – Status
You should see this line with a checkmark indicating cURL is enabled.
.htaccess restrictions
If cURL is enabled you can proceed to check your .htaccess file for a rule like the following which will also disable cURL. Your .htaccess file is accessible only by FTP and should be located in the root directory of your WordPress site on your server.RewriteCond %{HTTP_USER_AGENT} curl [NC,OR]WordFence Restrictions
WordFence also has settings that can have an effect on cURL functionality. If you have WordFence installed, try disabling it to see if the issue persists. If disabling WordFence allows the upload of images, then check your WordFence settings to ensure they allow cURL.

Support for Image Related Issues
Need help with images? Get support.
Frequently Asked Questions
Image optimizers including EWW or Smush
Yes, and if you are testing GDV2 now with an image optimizer and run into an issue, please get support.
Map Markers
Find out more about where to find map markers on the maps doc.
Recommended Image Sizes
Before offering recommendations, it is important to note that GeoDirectory does not ‘process’ any images you might upload to your site, whether through listings, settings or otherwise. All image processing is done by WordPress or other plugins but not GeoDirectory.
Before you setup recommendations for your site users about what size or ratio image to use, first make sure that your WordPress site has the sizes you want already setup in the media library settings.
There are two main types of images that you will use with GeoDirectory – Listing images and Map Icons.
Listing Images – Recommendations
You can use any image ratio that you like for your listing images, but, to make them look great, you want them to all be the same.
Image Ratio
If you recommend a ratio to your users, you can recommend either 3:2 or 16:9. 3:2 is very common, and 16:9 is “HD”.
By recommending a ratio you are giving your users a place to start from so they can make the image they have look as best as possible with cropping to the image ratio you recommend.
Image size
Web standard for ‘full screen’ for desktop is now 1366px+, but “Full HD” is 1920×1080. You will need to make a recommendation to your site visitors based on what you plan to do with the images they upload, how they will be displayed, and what size they should be so they look good. The larger the image, the better it will look if you are stretching it to full width.
Logo
If you use a logo on the listing, you can recommend to your listing owners that they upload some other format for a logo. Perhaps you are looking for banner style, so tell them to use an image that is 6:1 ratio minimum 600px wide.
Map Icons
Map Icons should be png images, but you can also use jpg. SVG is not supported. Map icons are shown on the map at 100% of their size, so, generaly speaking it is a good idea to make then @40px width * 50px height.