How to Build a Neighborhood Directory Website
Should You Build a Neighborhood Directory Website?
In today’s fast-paced world, fostering strong and connected communities is more important than ever.
A neighborhood directory can be a powerful tool for achieving this goal.
A neighborhood directory enhances communication and fosters a sense of belonging by providing residents with valuable information about their neighbors, local businesses, and community services.
In this article, we will guide you through building a neighborhood directory, empowering you to create a valuable resource that brings neighbors closer and supports local businesses.
Let’s embark on this journey together and unlock the full potential of your community.
Why a neighborhood directory is worth it
- Community Connectivity: A neighborhood directory fosters a sense of community by providing contact information, facilitating interactions, and promoting neighborly support.
- Communication and Collaboration: It serves as a central hub for exchanging information, coordinating events, and addressing community concerns, enhancing communication and collaboration among residents.
- Resource and Recommendation Hub: The directory offers a valuable resource for residents, providing information about local businesses, services, and amenities, supporting the local economy, and improving quality of life.
- Safety and Security: In times of emergency, a neighborhood directory enables quick communication and assistance among neighbors, enhancing safety and security within the community.
- Sense of Belonging: By promoting social integration and participation, the directory cultivates a strong sense of belonging, contributing to overall well-being and satisfaction within the neighborhood.
Print vs online directories: Why we recommend online
When it comes to creating a neighborhood directory, having an online version is the most efficient and cost-effective solution.
- Real-time Updates: Online directories provide instant updates, while print directories require reprints or supplements for changes.
- Accessibility and Convenience: Online directories offer 24/7 access from any device, unlike print directories that rely on physical copies.
- Enhanced User Experience: Online directories feature interactive elements and easy navigation, unlike print directories’ static format.
- Cost and Environmental Considerations: Online directories eliminate printing costs and reduce paper waste, unlike print directories that require physical resources.
- Privacy and Security: Online directories offer privacy controls for sensitive information, whereas print directories have limited control over physical distribution.
So, what is the best tool to create an online neighborhood directory?
The best way is using WordPress, the world’s most popular website-building tool.
They offer a vast array of templates and plugins that make it incredibly easy to create an online directory for your neighborhood.
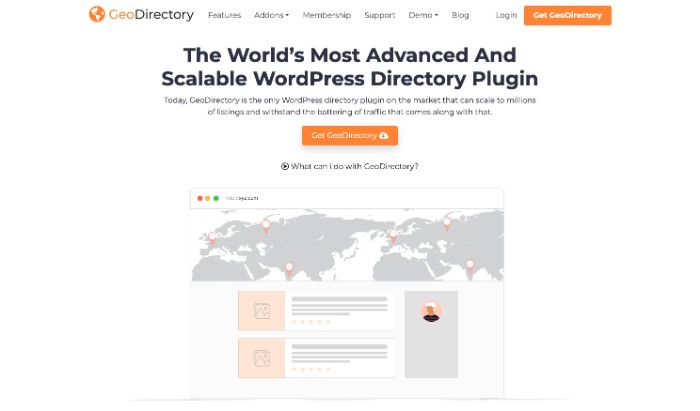
In this guide, for example, we’ll show you how to build a neighborhood directory with the easy-to-use GeoDirectory plugin, the leading directory builder for WordPress users everywhere.
1. Ask: Why do you need a neighborhood directory?
When identifying the purpose and goals of your neighborhood directory, consider the specific features that would align with those objectives:
- Enhancing Community Communication: If your goal is to improve communication, consider incorporating features such as resident profiles, where neighbors can share their contact information and interests. The UsersWp plugin (WordPress User Registration Plugin) is a great integration to your directory builder that enables residents to connect, organize events, or collaborate on community initiatives. Additionally, having a discussion board or community forums encourages dialogue and information exchange among residents.
- Supporting Local Businesses: If promoting local businesses is a primary objective, allow local enterprises to showcase their offerings, contact details, and customer reviews in a dedicated section for business listings. Adding an events calendar can also provide opportunities for businesses to advertise special promotions or events within the community.
- Sharing Important Community Information: If your focus is on sharing community information, ensure the directory has a section for news and announcements. This can serve as a platform for posting updates, neighborhood projects, and development plans. Additionally, a classified ads section can allow residents to post ads, service recommendations, or real estate listings , further facilitating information sharing.
- Improving Neighborhood Safety: For enhancing safety, consider including a safety and emergency resources section. This can provide essential contact numbers, safety tips, and neighborhood watch information. Integration with a reporting system for suspicious activities or a platform to share safety-related information can also be beneficial.
- Promoting Social Engagement: To promote social engagement, feature an events calendar where residents can find and participate in community gatherings, workshops, or shared interest groups. Incorporating volunteer opportunities within the directory can also encourage residents to contribute to social causes and engage in community service.
By aligning the features of your online directory with the purpose and goals identified, you can create a comprehensive and tailored resource that addresses the specific needs and objectives of your community.
2. What to include in a neighborhood directory: Your options
Resident Contact Details
- Names of residents
- Addresses or general location information
- Phone numbers or preferred methods of contact
- Email addresses (if desired)
Business Listings
- Names and descriptions of local businesses
- Contact information (phone numbers, websites, emails)
- Addresses or locations
- Operating hours
- Special promotions or discounts (if applicable)
Amenities and Services
- Information about community amenities (parks, playgrounds, swimming pools)
- Service providers (plumbers, electricians, handymen)
- Healthcare facilities (hospitals, clinics, pharmacies)
- Educational institutions (schools, tutoring centers)
- Religious organizations (churches, mosques, synagogues)
Community Events and Activities
- Upcoming events (festivals, fundraisers, block parties)
- Regularly scheduled activities (book clubs, fitness classes, workshops)
- Event descriptions, dates, times, and locations
Emergency Contacts and Safety Information:
- Local emergency services (police, fire department, ambulance)
- Neighborhood watch information
- Important phone numbers (poison control, non-emergency services)
A Neighborhood Job Board:
This Job Board could cover “shovel snow from my driveway” or “Cut my lawn” jobs for kids to legitimate Job Listings for local businesses.
Community Resources:
- Local government offices and representatives
- Public transportation information
- Waste management guidelines
- Recycling centers or programs
Neighborhood Association or Council Information:
- Details about neighborhood associations or councils
- Board members or representatives
- Meeting schedules and locations
Remember, the specific information included in the neighborhood directory should be based on the needs and preferences of the community.
Regular updates and maintenance are crucial to ensure the directory remains accurate and useful to residents.
3. How to gather information for your neighborhood directory
- Conduct surveys or questionnaires: Design online or paper surveys to capture residents’ information and preferences. Offer incentives or prizes to encourage participation.
- Organize neighborhood social events: Host community gatherings, block parties, or potluck dinners. Create an information booth where residents can provide their contact details and learn about the directory’s purpose.
- Create an online submission form: Develop a simple form on your neighborhood’s website or social media platforms where residents can voluntarily submit their contact information and business details.
- Collaborate with local schools or community centers: Partner with educational institutions or community centers to collect information from families and businesses during school or community events.
- Utilize social media platforms: Create online groups or forums dedicated to the directory. Run targeted online campaigns promoting the directory and encouraging residents to submit their information.
- Engage with local organizations: Work with homeowners’ associations, neighborhood watch groups, local businesses, libraries, healthcare providers, and community services to gather information and ensure comprehensive coverage.
4. Install GeoDirectory & Configure Your Settings
Assuming you already have WordPress installed, you’re ready to begin setting up your directory. Installing GeoDirectory is simple and straightforward, just like any other WordPress plugin.
- From the Dashboard, go to Plugins > Add New.
- Search for the appropriate neighborhood directory plugin (e.g., “Neighborhood Directory Plugin”).
- Click on “Install” for the desired plugin.
- After installation, click “Activate” to activate the plugin.
General Settings
- Establish directory permalinks for SEO optimization, improving the visibility of your neighborhood directory in search engines.
- Fine-tune search functionality to ensure accurate and efficient search results for residents.
- Set terms and conditions for listing submissions, tailored to the specific guidelines and requirements of your neighborhood community.
- Enable security features like a captcha to prevent spam and maintain the integrity of your directory’s content.
Listing Preferences
- Specify the number of items displayed per page, considering the optimal browsing experience for residents in your neighborhood.
- Determine the duration of each listing, aligning with the frequency of updates or changes typically observed within the neighborhood.
- Define the sorting order of items to prioritize specific categories or businesses relevant to your neighborhood.
- Include a contact form for each listing, facilitating easy communication between residents and local businesses.
Email Settings
- Decide whether to publicly display owner emails and customize the format of displayed email addresses based on privacy preferences.
- Configure email notification settings to keep residents informed about updates, events, or important announcements related to the neighborhood.
- Personalize the appearance of email communications to maintain consistency with your neighborhood directory’s branding.
Payment Configuration
- Establish payment policies if you plan to monetize your directory, setting up fees for listings based on the value provided to local businesses.
- Enable recurring payment options for convenience and continuity, allowing businesses to maintain their presence in the neighborhood directory.
Appearance Customization
- Adjust the visual aspects of your directory to reflect the unique character and aesthetics of your neighborhood.
- Personalize the appearance of the listing submission button, ensuring it is visually appealing and encourages engagement.
- Configure options for searching, viewing, and managing listings to provide a seamless and intuitive user experience.
Licenses and Upgrades
- If you have been using the free version of the plugin, consider upgrading to a premium version for additional features and support.
- Access a comprehensive knowledge base for further guidance and information specific to your neighborhood directory.
By customizing these settings, you can create a neighborhood directory that is tailored to the unique needs, preferences, and characteristics of your community, enhancing connectivity, supporting local businesses, and providing a valuable resource for residents.
5. Personalize Submission Form Fields
- Access the ‘CPT > Settings > Custom Fields’ section in your WordPress dashboard.
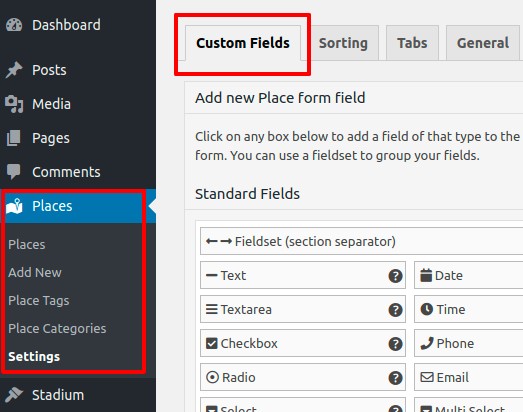
- The interface is divided into two sections: ‘Add New CPT Form Field’ on the left for creating new fields, and the right panel displays the existing fields on the ‘Add New CPT Listing Form’.
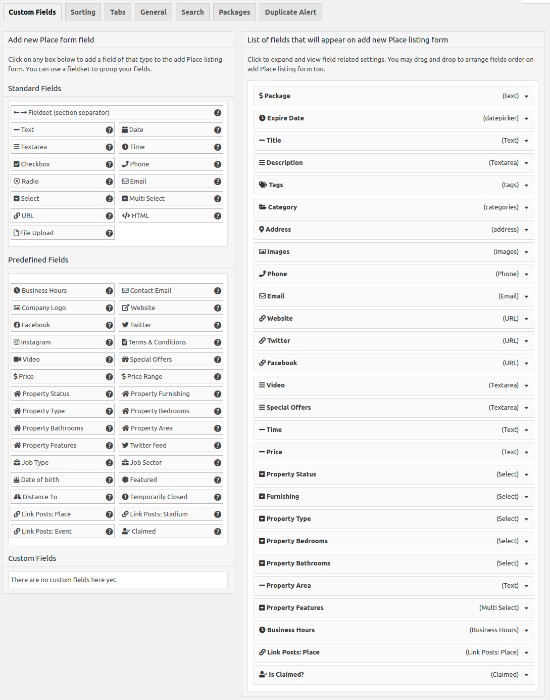
- Choose from ‘Standard Fields’, ‘Predefined Fields’, or the ‘Custom Fields’ area to incorporate your own custom fields through custom code.
- To add a new custom field, click on the desired field in the left panel, and it will be added to the right panel, similar to the WordPress Widget Manager interface.
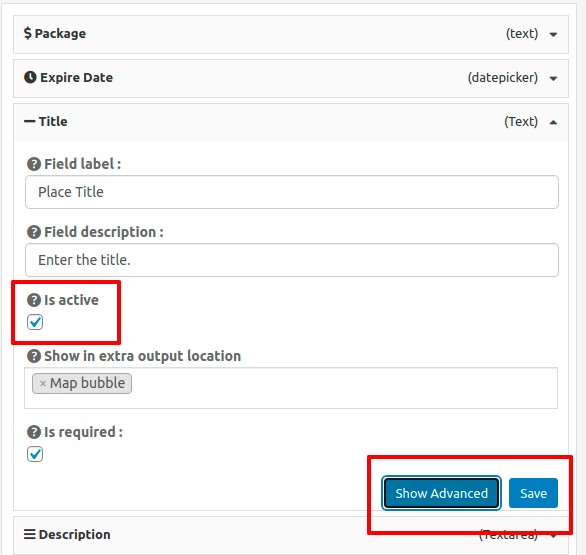
- Customize your field and click ‘Save’. Ensure the ‘Is Active?’ option is checked before saving to make the custom field visible on your site.
Some ideas for your neighborhood directory:
- Add a ‘Neighborhood’ Field: Include a dropdown menu for visitors to find businesses in specific parts of the neighborhood.
- Customize ‘Categories’ Field: Personalize categories to reflect relevant options for your neighborhood, such as ‘Restaurants’, ‘Parks’, ‘Shopping’, or ‘Hospitals’.
- Include a ‘Business Hours’ Field: Provide operating hours for listed businesses or services.
- Integrate a ‘Parking Available’ Checkbox: Indicate whether a location has parking to address parking concerns in the neighborhood.
- Add ‘Public Transport Links’ Field: Allow users to input information about nearby public transportation options.
- Create a ‘Special Features’ Field: Provide a text box for listers to highlight unique attributes or services their business offers.
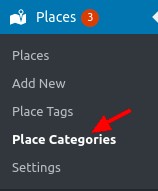
6. Creating Your Categories
By grouping listings into relevant categories such as restaurants, parks, or local services, residents can easily navigate the directory and find the information they need.
Moreover, categories provide opportunities for targeted advertising, marketing, and promotion within the neighborhood, benefiting both businesses and residents.
- Go to your WordPress dashboard and select ‘CPT > CPT Categories’.
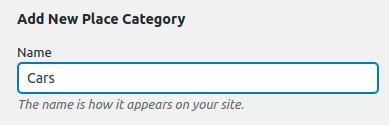
- Use the form on the left side of the page to create a new category.
- Input the category name, preferably in plural form, and define the category slug for the URL.
- Optionally, assign the new category as a subcategory under a parent category.
- Include a brief description and a category top description.
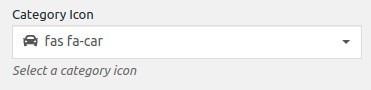
- Choose a default listing image and select map and category icons if desired.
- Assign a color to the category, which is used for the map icon and other settings on the site.

- Set a suitable schema type if available to inform search engines about the data expected.
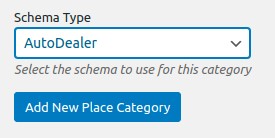
Submit the new category, and it will be available when adding new listings to your neighborhood directory.
7. Promoting your Neighborhood Directory
So, you’ve created your awesome neighborhood directory, and now it’s time to spread the word and engage the community.
Here are some practical and conversational strategies to promote your directory and make it a thriving hub for residents and local businesses:
Spread the Word Locally
- Pin up eye-catching posters or distribute flyers in community centers, libraries, and local businesses. Let everyone know about the directory and its benefits.
- Collaborate with local businesses by asking them to promote the directory on their social media platforms or include information in their customer newsletters.
- Connect with influential individuals in your neighborhood, like local influencers or community leaders, who can help generate buzz and support for your directory.
Leverage Social Media
- Create social media accounts dedicated to your neighborhood directory. Share engaging content regularly, such as featured listings, upcoming events, and stories about local businesses.
- Encourage residents, local businesses, and community organizations to follow and share your social media posts to reach a wider audience.
- Consider running targeted social media ads to specifically target residents within your neighborhood and neighboring communities.
Collaborate with Neighborhood Associations and Groups
- Partner with homeowners’ associations, neighborhood watch groups, and other community organizations. They can help promote the directory through their communication channels and events.
- Offer to give guest presentations or write articles during their meetings or events. Showcase how the directory benefits the community and provide tips on how to make the most of it.
Host Neighborhood Events
- Bring the directory to life by organizing neighborhood events around it. Think local business fairs, community festivals, or networking gatherings.
- Emphasize the directory’s features and encourage residents to participate. This way, they can discover new local businesses and connect with their neighbors, fostering a sense of community.
Encourage User-Generated Content
- Make it interactive! Allow residents to leave reviews, ratings, or recommendations for listed businesses and services. This creates a sense of involvement and community engagement.
- Run fun contests or campaigns where residents can share their favorite directory listings or success stories. Offer prizes to incentivize participation and generate user-generated content.
Collaborate with Local Media
- Get the word out by reaching out to local newspapers, radio stations, or community newsletters. Share stories about the directory’s impact, success stories, or unique features.
- Offer interviews or press releases to gain media coverage and increase awareness within the neighborhood.
Optimize for Local SEO
- Help residents easily find your directory online by optimizing it for local search engine optimization (SEO). Include relevant keywords, location-specific meta tags, and accurate business information.
- Create neighborhood-specific landing pages and provide valuable content related to the community. This helps attract organic traffic and boosts your directory’s visibility.
Seek Feedback and Continuously Improve
- Be open to feedback from residents, local businesses, and directory users. Ask for their thoughts and suggestions to understand their needs better.
- Actively respond to feedback and make necessary updates or enhancements to improve the user experience and keep the directory relevant and valuable.
By implementing these conversational strategies, you’ll create a buzz around your neighborhood directory, engage residents and local businesses, and make it a go-to resource for everything happening in your vibrant community. Let’s make it happen together!
Ready to give your neighborhood the best directory it’s ever seen?
You made it to the end – congrats!
Crafting a directory that brings neighbors closer, supports local businesses, and fosters a sense of community is now within your reach.
Following the steps outlined in this guide, you’ll have the tools to build a comprehensive and user-friendly platform that becomes an invaluable resource for residents and businesses.
Get ready to embark on this journey and witness the positive impact your exceptional directory will have on your neighborhood.
Let’s create an extraordinary resource that connects neighbors and contributes to the growth and vitality of your community.
Newsletter - Stay Updated!
Get the latest news, tips, and exclusive content directly in your inbox.