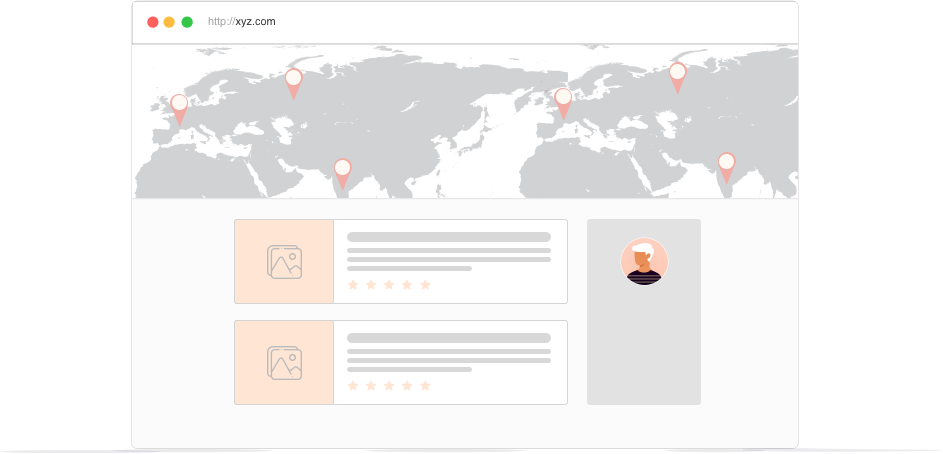
The World’s Most Advanced And Scalable WordPress Directory Plugin
Today, GeoDirectory is the only WordPress directory plugin on the market that can scale to millions of listings and withstand the battering of traffic that comes along with that.
Get GeoDirectoryWhat can i do with GeoDirectory?

If you are upgrading from GD Payments Manager V1 to V2, you must carry out some additional steps. Our new free plugin WP Invoicing will now be required to take payment, and the GD payment manager will still handle the price packages and restrictions. ( You can find out more about WP Invoicing here: https://wpgeodirectory.com/wp-invoicing/ )
GD Payment Manager V2+ Install instructions
Payment Gateway Settings
WP Invoicing has its own gateway plugins which are available in your download area, not all come pre-installed, which means less code has to run and only the gateways you use will need to be installed.
- Payment Gateway Settings: For a quicker upgrade, take note of any of your active payment gateway settings, this will allow you to copy them over quickly.
- Stripe: For gateways like Stripe Payments you will have to update the notification URL in your settings on stripe.com
Installing Payment Manager V2
You will have to manually install the plugin, which is available from your downloads area, this can be done in 3 ways:
- FTP: You can upload (overwrite) the current files on your server.
- Plugin: You can use this plugin to allow you to upload the new zip file and install the update
- Delete + Install: You can also just delete the payments manager V1 and then install the V2 via the zip file (least recommended)
Installing WP Invoicing
You can download our wordpress Invoice plugins from here: wpinvoicing.com; you will find additional payment gateways in your download area under the payment manager.
WPI has its own documentation for installation which you can find here https://wpinvoicing.com/docs/category/getting-started/
You should:
- Install WP Invoicing
- Install any extra gateways needed
- Setup WP Invoicing by following the setup instructions
- The conversion of price packages and invoices should be automatic, if you have any problems you have to use the conversion tool under Invoicing>Settings>Tools
If you have any problems with GD Payment Manager, please post on the GD Payment Manager forums
If you have any problems with WP Invoicing, please post on the WP Invoicing forums (your GD login details will also work here)
Thanks,
The GeoDirectory Team
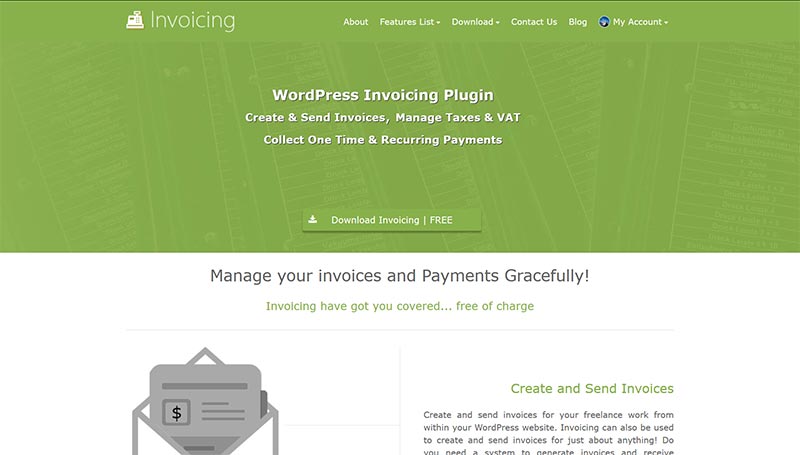
We are happy to announce WP Invoicing (now called GetPaid) is now live for its first public beta. In this post, you will learn all you need to know about this great new product! ( if you are upgrading to GD Payments Manager V2, please see here: https://wpgeodirectory.com/payments-manager-v2-setup/)
What is WP Invoicing?
Invoicing (WPI) is a the best of all WordPress invoice plugins that will allow you to send invoices and recurring invoices (depending on payment gateway) to anyone and have them pay through your WP site.
Invoices produced can be made to be EU VAT compliant which many eCommerce solutions currently are not.
WPI is intended for selling or invoicing for digital or intangible items online anywhere in the world and to be EU VAT compliant.
Most importantly WPI is easy to integrate your product with, we intend to use WPI for all our future product payments and we hope other developers will use WPI also.
Why WP Invoicing?
There are lots of reasons to why we created WPI, some of the most important ones are:
- EU VAT compliance (B2C): If you sell “digital items” to a EU consumers (B2C) you need to be VAT registered in at least one EU country and collect vat from consumers charged at the rate of the consumers country, WPI handles this.
- EU VAT compliance (B2B): If you sell “digital items” to a EU businesses (B2B) you need to collect certain evidence from the business transaction including it’s VAT Number, company name and location, WPI handles this.
- Global tax: WPI can handle charging the correct VAT no matter where your business or your customers.
- Less Code: If we have a centralized plugin that handles all payments for all out products then each product does not have to have its own processing code and all its own custom build gateways, saving you time and money.
- Gateways: By only having one payment system we only have to make payment gateways once, which means we can build more and cheaper.
- Developer Friendly: We have built WPI to be developer friendly, meaning it is super easy for devs to use WPI for their products, this step will allow 3rd part devs to not have to worry about tax compliance or building or maintaining payment gateways.
Who is WP Invoicing for?
WPI is really for 4 different sets of people:
- AyeCode Customers: AyeCode Ltd is the parent company of GeoDirectory, with the release of GD payment manager V2+ WPI will process all payment for GD and also all our upcoming products.
- Developers: Developers can use WPI as their payment solution, meaning they dont have to worry about tax compliance or maintaining many payment gateways and can spend more time improving their products.
- 3rd Part Customers: There are customers of 3rd party developer products, once WPI has compatibility with many 3rd party products, 3rd party customers will only have to pay once for a gateway and it will work for many products.
- Sending Invoices: WPI by its self can be used to send out tax complaint invoices for any digital/intangible items.

Advanced Custom Fields is a fantastic plugin used by millions that convert WordPress into a full-stack CMS, allowing you to create unlimited custom field groups, and types and add them to any type of custom post type.
However not many know about Advanced Custom Fields Scalability limits.
Quite often we get asked if GeoDirectory uses Advanced Custom Fields to manage listings’ custom fields.
When we reply that GeoDirectory has its own Custom Field System built in, they wonder why we decided to “reinvent the wheel”.
While the answer for us is crystal clear, Advanced Custom Fields Scalability is quite limited in building directories.
We thought that maybe, being users, they are not aware of what is going on under the hood and the scalability challenges that a web directory could present.
However, not too long ago, we stumbled upon a poll on a popular WordPress group on Facebook, where the options to vote for the “Best Directory” were: GeoDirectory, a few other Directory Themes available on popular marketplaces and there was also the option ACF + FacetWP.
When we saw the results, we were perplexed, to say the least, ACF + FacetWP had a lot more votes than we would have thought.
People who voted were not supposed to be just simple users, but website developers and WordPress experts.
For this reason, we decided it was time to explain why it is NOT a good idea to use Advanced Custom Fields for a directory.
And why Web Developers shouldn’t offer that solution to anyone unless they don’t care about providing fast, scalable solutions to their customers, that can grow sustainably.
WordPress Custom Fields Scalability Limits
WordPress by default uses the wp_postmeta database table to store custom field data, and it creates 1 row for each custom field used in a post.
Other than that WordPress adds a lot of extra data in this table for each post, each of which will use 1 row of the table.
If you spent some time optimizing SQL queries, you’ll know that’s not an ideal scenario for things like directories and filtering.
In fact, the default database structure is potentially a huge bottleneck for websites with many posts and custom fields.
It is considered one of WordPress’s weak points.
This is because to filter posts by custom fields, you’ll have to join the wp_post table with the wp_postmeta table in your query.
The bigger the tables will grow, the slower the queries will become.
Worst of all if you want to filter by two meta values, you would need to join the post_meta table twice to do it in one query.
This can eat up system memory and drag things down for anything but a small directory.
Advanced Custom Fields Scalability Limits
The Advanced custom fields plugin, is perfect for any website with a low or moderate number of posts, pages, and custom fields in general.
However, except few rare cases, directories are just the opposite.
They have a very high number of posts with potentially a very high number of custom fields too.
The primary Advanced Custom Fields scalability issue is that it creates 2 rows in the wp_postmeta table of your database for each custom field added to a listing.
It will also add several postmeta rows belonging to its own settings.
This means that it will add more than twice the rows in the wp_postmeta table of your database compared to using the default WordPress custom field system.
We did a quick test that should help us better explain this matter.
We created a new WordPress website, deleted the hello world post, and the sample page and we installed Advanced Custom Fields.
We created 1 group and 5 custom fields, and we published 3 posts each using the 5 custom fields.
After this, our wp_postmeta table already counted 83 rows.
That’s insane.
Imagine the number of rows for a directory with 300,000 listings and five custom fields.
With ACF, your wp_postmeta table would count minimum of 3,000,000 rows
How does GeoDirectory Scale?
That is very simple, we create a custom table for each of our custom post types.
Example: wp_gd_gd_place_detail
In this table, we save all custom fields and their data, in a row for each post.
We also built our own PHP API to query our custom tables, just like WordPress has its own PHP API to query default wp database tables.
This means GD, in most cases, only has to join the post table to our table.
We can then filter those results by ANY custom field.
We could filter by 20 custom fields, whereas ACF, even with facetWP (which does speed things up but still has the core limitation), would have to join multiple tables over and over to do the same job in one query, using many times the server memory for the same query.
Conclusions
So if we compare GeoDirectory with WordPress or WP + Advanced Custom Fields, we see that:
WordPress
1) Requires an extra table JOIN for each custom field you want to filter by.
2) wp_postmeta quickly becomes big, slowing down the queries
WP + ACF
1) Requires an extra table JOIN for each custom field you want to filter by.
2) wp_postmeta becomes twice as big compared to using WordPress alone
GeoDirectory
1) No join is required
2) GD does not add to the wp_postmeta info, so does not create unnecessary bulk.
3) The database storing listings data counts 1 row per post
WordPress is known for this limitation in how it stores data. In most cases, this system works fine, but when it comes to large directories, it’s just not the right solution.
That’s why with GeoDirectory, you can create a directory with millions of listings, while with WP + Advanced Custom Fields, you are lucky if you can make a directory with a few hundred listings before starting to see major performance problems.
These are the Advanced Custom Fields scalability limits that made us decide not to use it for GeoDirectory, and this is why you shouldn’t use it too.
If you have any questions, feel free to ask in the comment down below.
WordPress localization features allows you to make plugins and themes easily translatable through WordPress Language files (po/mo files).
This is true especially since WordPress 3.7 and it got a whole lot easier since WordPress 4.6.
A lot of improvement has been made to the whole translation system for WordPress, I felt it really needs a refreshed post.
WordPress language files – The confusion ( Developer edition )
For developers, it comes down to how to let WordPress know you have translation files the proper way.
As developers we were told to use “load_plugin_textdomain()” and point this to our language file in our plugin folder.
However in the past this would be the only place WordPress would look and if a customer added their own language file there, on the next update it would be gone!
There was an article on the web a while back promoting using a second call this time using the function “load_textdomain()” to point to a file in the WP language folder and that is what a lot of people did (including us).
This meant that users could place their language files in a predetermined place in the WP language folder and the translation would not be lost on the plugin update.
WordPress language files – The confusion ( User edition )
Users need to know where to put a custom translation for a plugin/theme, the problem is that in the past this could have been in several places.
The WP documentation tells developer to link to a folder inside their plugin folder called “languages” but the developer might use the folder “lang” and even then this will be lost when the plugin/theme is updated.
Some developers would add a second check again in a place of the developers choosing, but often in a custom named folder in the WP languages folder.
This meant there was no consistent way for a user to know where to place their custom translation files safely.
Loading language files the correct way (2017)
Since WP 4.6 this got a whole lot easier for both users and developers!
As a developer you now just have to make sure you are loading your language files correctly, following the WP documentation as below:
<br />
// for plugins<br />
add_action( 'init', 'myplugin_load_textdomain' );<br />
function myplugin_load_textdomain() {<br />
  load_plugin_textdomain( 'my-plugin', false, basename( dirname( __FILE__ ) ) . '/languages' );<br />
}<br />
<br />
// for themes<br />
add_action( 'after_setup_theme', 'my_theme_setup' );<br />
function my_theme_setup(){<br />
    load_theme_textdomain( 'my-theme', get_template_directory() . '/languages' );<br />
}<br />
Notice we fire these on the ‘init’ and ‘after_setup_theme’ hooks, this should mean everything will load nicely.
If you fire it directly or before their respective hooks you can have problems with some strings not translating and plugins to manipulate translations or to create multi lingual websites such as WPML, might not work at all.
As users we now have a convenient and consistently named place we can place our language files.
- For plugins: /wp-content/languages/plugins/my-plugin-en_US.mo
- For themes: /wp-content/languages/themes/my-theme-en_US.mo
The ‘my-plugin’ and ‘my-theme’ being the textdomain of the plugin/theme (usually found in the plugin readme.txt or the theme style.css at the top).
This is a great improvement over the old way and will prevent losing translation on updates in most cases.
In some cases the plugin/theme might already have a new translation in your languages stored on wp.org, if this is the case then it might overwrite your .mo file but in most cases this will be desired.
You can contribute to translations on wp.org if the plugin is hosted there, if it is a premium plugin there there is little chance it will be overwritten.
Bonus information
WordPress will try to find your WordPress language files in several places,for a plugin with a textdomain ‘my-plugin’ it would first look here:
/wp-content/languages/plugins/my-plugin-en_US.mo
If it does not find a translation there and the plugin specifies where to find one locally, it will look there:
/wp-content/plugins/my-plugin/languages/my-plugin-en_US.mo
If the plugin does no specify a path then WordPress will look here instead:
/wp-content/languages/my-plugin-en_US.mo
The WordPress documentation should be followed but in reality from WP 4.6 you don’t even have to specify a local file if you are not including any (if they are stored on the wp.org repo), so you could just add this:
<br />
// for plugins<br />
add_action( 'init', 'myplugin_load_textdomain' );<br />
function myplugin_load_textdomain() {<br />
  load_plugin_textdomain( 'my-plugin');<br />
}<br />
<br />
// for themes<br />
add_action( 'after_setup_theme', 'my_theme_setup' );<br />
function my_theme_setup(){<br />
    load_theme_textdomain( 'my-theme');<br />
}<br />
I hope this clears translations up a bit and if you have any questions or have anything to add please leave a comment below.
WP Easy Updates
We are happy to introduce WP Easy Updates! WPEU is our new update plugin, we will be using it to provide licencing and updates to all our GeoDirectory addons as well as all our future non GD products, in fact anyone who sells WP Plugins (and soon to be themes) through Easy Digital Downloads (EDD) or even provides a free plugin on github can use WPEU to licence and update their plugins easily!
How to use
With the last round of GD updates you will notice a notification informing you WPEU is now required.
![]()
After installing the plugin it should automatically copy over your already installed licence keys to the new locations. For plugins that require a licence you will see a notification and a place to enter the licence under the plugins page.
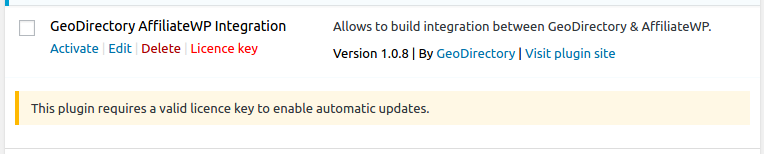
Clicking the “Licence Key” will reveal a place to enter and activate/deactivate a licence key for the product, once the licence key is activated the “Licence Key” text will turn green and the notification message will disappear on the next page refresh.

Why WP Easy Updates?
There are many reasons we have switched to a standalone update plugin:
- The standard EDD update script will try to ping for each plugin update, though we had already modified our own update script to send only one update array check, WPEU will make this easier to maintain.
- WPEU will be able to check for an update for non-active plugins, this is great for users and also for security.
- Much better WP Multisite support, before our update script required the addons to be active and licensed on the main site to work, with WPEU it can be active on any network site.
- Maintenance, before WPEU if we had to make a change to our update script we had to make a change in all addons and then update all addons, this way we only have to update WPEU (which updates itself from github)
- Space, WPEU allows us to remove our old update script from all our addons and saves over 1000 lines of code per addon.
- Pre-release updates, with WPEU we can release any free plugin and update it just from github, in fact WPEU will update itself from github.
- WPEU requires just two lines of code to enable updates to any plugin, this will make it easy to use for us and any 3rd part developers to implement updates in their plugin.
- There is no need for a separate licencing page as licences are entered direct on the plugins page.
For Developers
It is easy for developers to enable updates for their EDD or github plugin by adding only 1-2 lines to their main plugin file DocBlock, for EDD just enter your EDD sales site as the “Update URL” and the post id of the product as the “Update ID” as below:
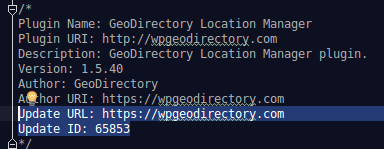
For a github update you just need to enter the “Update URL” as the github URL, it will check against the github releases for updates so you can update your github repo as normal and it will only check against release version numbers.

If you want to add a notification WPEU is required you can use the code snippet here:
https://gist.github.com/Stiofan/d8f5b5aa3922cfb46928966e75424c11
WP Easy Updates is hosted on github here: https://github.com/AyeCode/wp-easy-updates
Find out more about automatic updates for GeoDirectory here” with a link to https://wpgeodirectory.com/docs/installing-addons/#updates
If you have any questions just ask in the comments section.
Update Sept 2019
This has been added as a predefined custom field in V 2.0.0.67. The snippet below will only work if using GeoDirectory V1.
The Problem
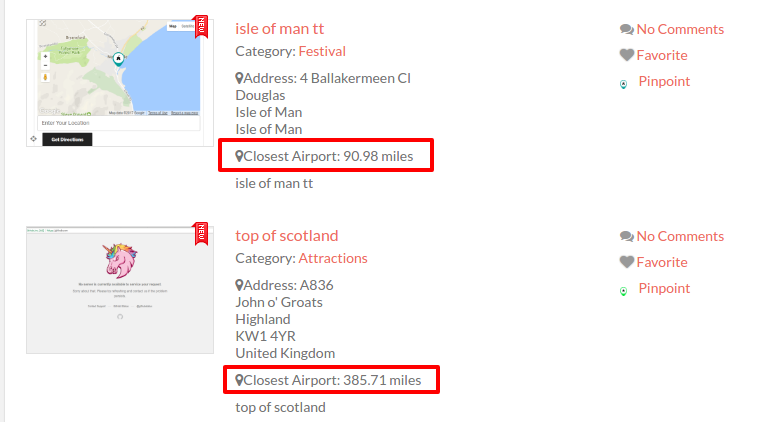
Today a member had a bit of an unusual request, they are using GeoDirectory to run a local festival and they are listing things like accommodation for it. The request was to show the distance in each listing to the main event so users have a clear understanding of how far it will be to the event from each listing. I do something very similar on one of my own sites that is for one location, i list the distance to the airport and the distance to the main town, i have until now just had users enter this distance manually, this is often wrong and i have to correct it.
The Solution
This seemed like the perfect time to create a new custom field, lets call it “Distance to”. The code is below but there are two ways to use this field:
#1 We could just add the field and let the user enter GPS coordinates, it might be for example a “closest airport” field, the user could then enter the GPS info for the closest airport to them.
#2 In this users case he just needs to show the distance to one place and without the user really needing to even know about the field, so when he is adding the custom field he would set the field as a “admin only” field so it is not shown to the user on the frontend and they can’t change it, and then set the “default value” to the GPS coordinates needed and all listings will then show the info needed.
The Code
Are you hosting your bbPress powered support forum within your main install?
That’s going to slow down your money website.
In similar cases, it’s really a good idea to move bbPress into its own website.
Why should I Move bbPress?
The main reason is that you are loading a lot of extra resources on your main website that could be loaded in a sub-domain website or better in sub-directory website.
Until few days ago our support forum was running in the /support/ page of the https://wpgeodirectory.com website slowing down everything.
Now it is running in the home page of the website https://wpgeodirectory.com/support/ keeping the exact same URLs.
The 1st website is no longer loading all bbPress resources and that made it much faster and optimized.
Same happens to the support website, it is almost ONLY loading bbPress resources and that made it faster too.
Moving bbPress is not easy
Making such move until today was close to a nightmare, especially if the forum is quite big like our is.
Doing it via the WordPress default import / export tools was close to impossible.
For this reason we decided to build a dedicated plugin that would automate the entire task.
First we had to turn our single site install into a MultiSite network.
Finally we used our plugin to move the entire forum with a couple of clicks.
After moving it, the plugin is programmed to delete the forum from the original website, leaving you with nothing else to do.
You just have to wait for the plugin to perform the task (which can take up to few hours depending on the size of the forum and the speed of the server.)
We moved 66 Forums, 17,353 Topics and 97,371 Replies into a dedicated Support website and now our main website is over 50% faster.
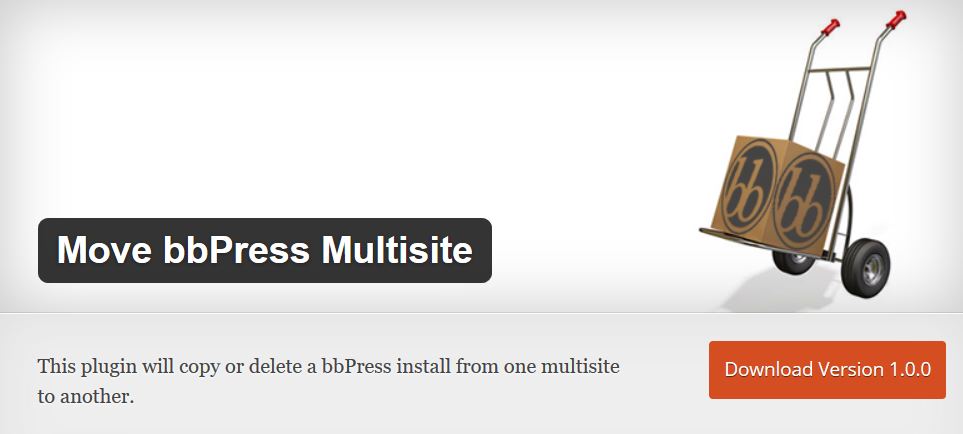
If you have a similar problem, feel free to take advantage of Move bbPress Multisite plugin, we released it for free on the WordPress.org repository. 🙂
Custom bbPress user profiles with UsersWP
If you are using bbpress and you feel like the users profiles are boring, you should consider UsersWP’s bbPress Custom User Profiles. You’ll be able to display Users’ topics, replies, favorite and subscription in beautifully designed users’ profile pages.
In the coming days we will be writing a series of articles on how to keep you WordPress site lean and fast but as a pretext to those articles, we thought we would write a much shorter article on how to make your WordPress site slow. (we see these mistakes made over and over…)
Please don’t follow any of these steps!
Hosting
There are a few tricks to getting the slowest hosting but i am here to let you know them.
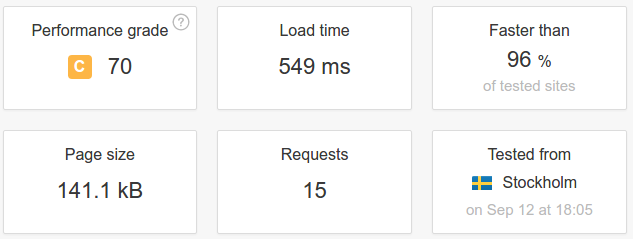
Firstly many people over look this one on a quest for cheap hosting but hosting location can play a big part, for example if you are building a website for a mainly United Kingdom (UK) audience then you are definitely going to want to look for hosting on another continent, the USA or even somewhere like Australia would be great, there is no point in looking for hosting in Europe it would deliver the fastest response times.
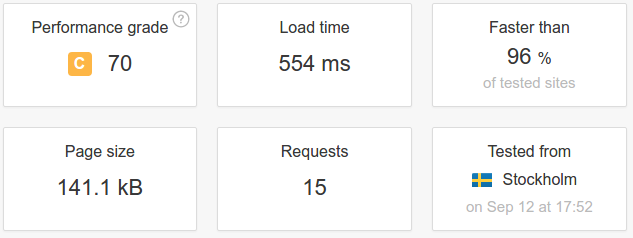
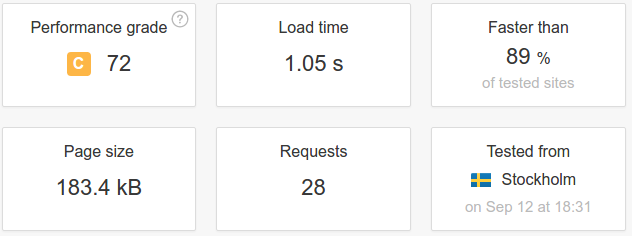
Our test site is hosted in the Netherlands (EU), its a fresh install of 2016 theme
This is the site speed tested from a Swedish (EU) location (very close),

We can see the speed above is far too fast but we can do something about that, if we test the same site from a USA location as a USA based user would experience:
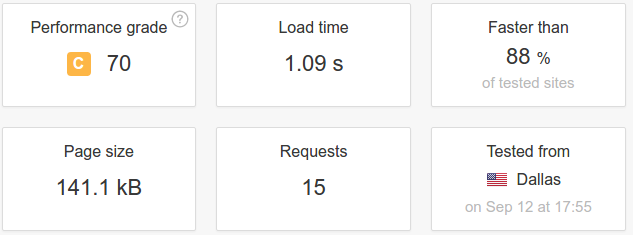
That’s better we have managed to almost double the loading time on to the site just by having our hosting on a different continent and we have already pushed it over the magical 1 second load time.
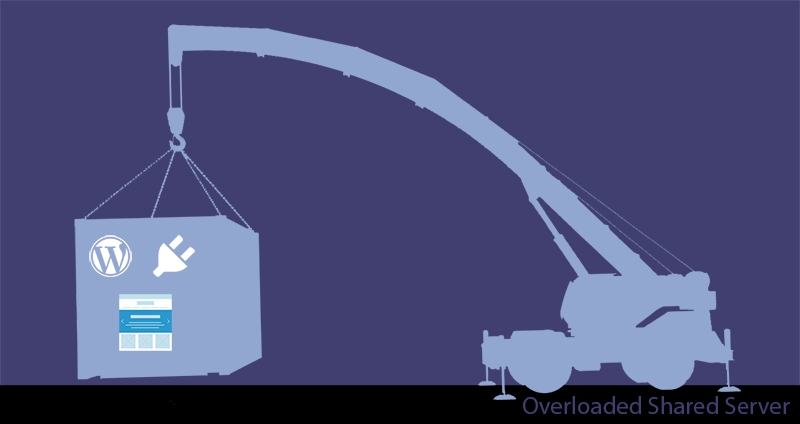
Next you will need to look for shared hosting, these are often not labeled as shared hosting but you can spot them easily.
They are usually the cheapest type of hosting, less than $10-15/month and their pricing tears will increase the number of email addresses or domain/sub domains you can have on the account and mention nothing about server specs like RAM, processing power or the type of hard drive (because we all know 1000 email addresses is what counts).
With hosting like this you usually have anywhere from 400-800 websites running off the one server, you should avoid Virtual Private Servers (VPS) which give you a significant slice of a server resources or even a dedicated server these will be no good for creating a slow site.
Choosing your theme
After you have installed WordPress your next important decision is your theme.
A lot of people think a theme is a theme and they will all load at the same speed but in fact the theme can make a big difference to the loading time of your site, it’s the foundations of your website and everyone knows the foundations have to be right.
The rule of thumb I find is: themes that try to do it all end up with the slower load times, there are some really slow examples out there, below are some baselines, i am sure you can find slower loading themes very easily.
Twenty Sixteen (default WordPress theme)
JS and CSS loaded by default: 89.12kb (9 requests)
Server memory used: 4,356kb
Directory Starter (Our own free theme we recommend)
JS and CSS loaded by default: 72.96kb (11 requests)
Server memory used: 4,340kb
Top selling theme on themeforest (multi purpose theme)
JS and CSS loaded by default: 285.31kb (12 requests)
Server memory used: 15,777kb
These are very non-real world stats but the main takeaways we get from these very basic stats from a multipurpose theme vs a built for purpose theme is that with the multipurpose theme you would only be able to serve around one third the amount of concurrent users and would use up almost 3x the bandwidth and have almost twice the page loading times.
Adding plugins
To coin a phrase “This is where the magic happens”… When it comes to a WordPress website speed this is where you make or break it.
The first thing you have to understand is not all plugins are built equal, it’s not always about the amount of plugins (though that can be a problem in it’s self) it’s about what plugins.
To prove a point i added 562 pointless plugins that do nothing to our test site and activated them all.
And the result…
Yeah nothing happened, basically the same as it was before, so it must be related to the sort of plugins.
If you really want to slow down a site you need to install plugins that are heavy on server resources and add lots of CSS and JS files this will slow down the time it takes to server the webpage and the time it takes the user to download and load the CSS JS in the browser.
We won’t get very far if we install lots of “Hello dolly” plugins that don’t add any CSS/JS and are not very resource hungry
What we need is more of a web application sort of plugin, things that are big and resource hungry and are usually the main point of a site in it’s self like a forum or a shop or a directory, on a shared hosting account with WordPress if you wanted to keep things fast you should onyl ever consider one web application type plugin but here we will install a few to really slow things down 🙂
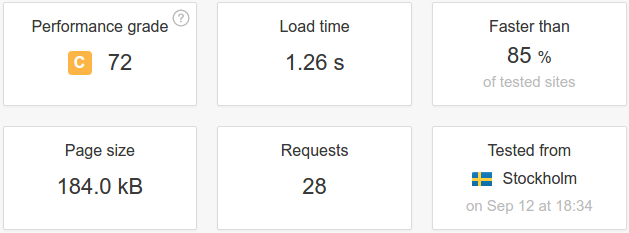
Our test site is a fresh install of WordPress running the 2016 theme and one active plugin for monitoring a few server specs “Query Monitor” it is running off shared hosting in the Netherlands (EU), we will be running all our speed tests from Sweden (EU), lets remind ourselfs of the baseline benchmarks:
![]()
The numbers in black refer to the server resopnse time, memory usage (RAM), database query time and the number of queries run.
Let’s install a few of WordPress’s most popular plugins, remember we will only be installing and activating we will not be fully setting it up and there is no data on the site so it really is best case scenario.
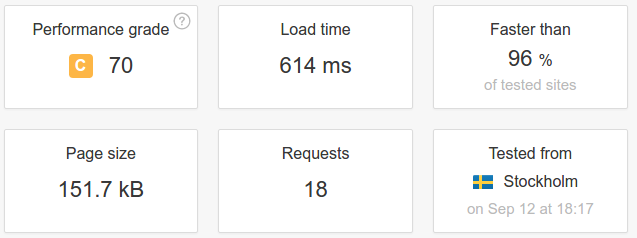
Lets install some basic plugins first:
Contact Form 7 (used for setting up a simple contact form)
![]()
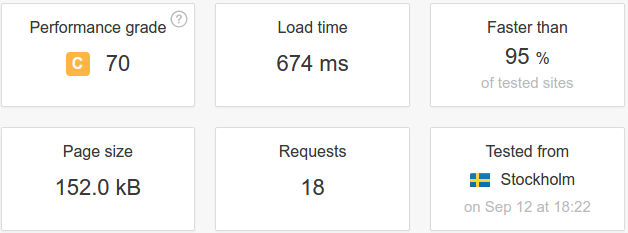
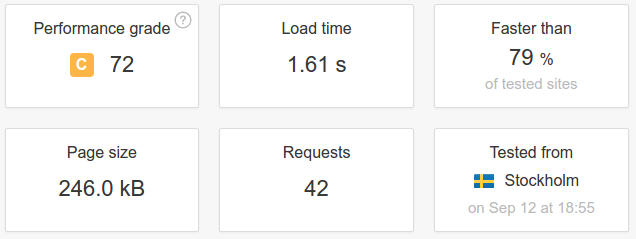
Yoast SEO (most popular SEO plugin)
![]()
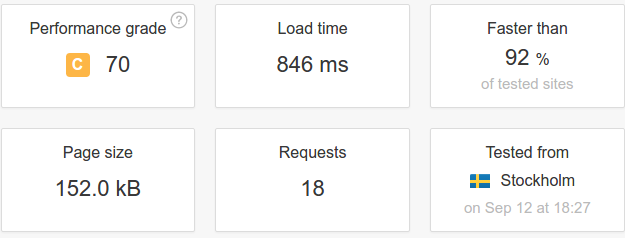
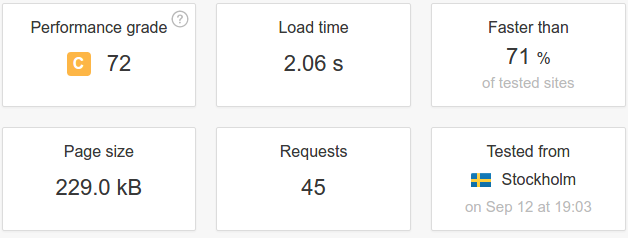
NextGEN Gallery (a image gallery plugin)
![]()
Jetpack (connects to WordPress.com to use some of its features)
![]()
Wordfence Security (a security plugin for WordPress)
![]()
Now we have only 5 basic plugins installed and we are now over double the original load time, now lets install some web application type plugins to really slow things down:
BuddyPress (a social network type plugin for WordPress)
![]()
WooCommerce (a shop plugin for selling anything)
![]()
bbPress (a forum plugin)
![]()
(orange indicates slow database queries)
Easy Digital Downloads (sell digital products)

![]()
Advanced Custom Fields (Custom Fields for WordPress)

![]()
Conclusion
We now have just 10 active plugin on our site and it has went from about half a second to over 3 seconds to load, this test site has no data installed and even the homepage is not loading any images, it really is the best case scenario, in the wild i have seen some professional “website slower” with over 120 active plugins and load times of over 30 seconds.
Each one of the web application type plugins like WooCommerce, EDD, BuddyPress and bbPress usually require other addon plugins to add extra functionality, if you actually wanted to run a site like this you would probably end-up with over 50 plugins and load times of over 10-20 seconds.
So there you go, you now know how to make your WordPress site slow. Just in case you want to have a fast website, over the next few weeks we will be releasing blog posts on how to have a fast website with counters to all the points here.

Google announced on Wednesday Updates to Google Maps APIs Standard Plan. Here you can read the full article.
For all new applications created on or after June 22, a Google Maps API Key will be required. Existing applications will continue to work without a key, but the new limits will be applied to everyone.
Before this announcement, Google Maps API would return up to 25,000 keyless requests per day and would require an API key and payments only after exceeding the 25,000 limit for 90 consecutive days.
Now the API key is requested for all new applications, but the limit is 25,000 free map loads per day without grace days.
Webites and apps admin can purchase extra daily map loads at $0.50 USD for 1,000 additional map loads, up to 100,000 daily extra map loads. Billing must be enabled to be able to purchase extra API requests.
If your website or applications has more than 125,000 daily map loads, you will be required to upgrade to a Premium Plan license.
For those not willing to deal with API limits and for countries were Google Maps is restricted, we extended GeoDirectory few weeks ago to optionally use the OpenStreetMap API.
Today we released version 1.6.4, where we added an option to add the Google Maps API key, you can find the documentation here).
While we were at it, we also created a wee plugin that can solve the Google Maps API key for any theme or plugin that has not been updated to include an API key: Google Maps API KEY plugin.
Just install the plugin and activate it, go to Settings >> Google API key and add your API key. If the Google Maps script has been enqueued correctly, our plugin will add your API key and fix any loading issue.
Google Maps has been completely free of charge for most of us for over 10 years, it will remain free for websites with average traffic, but it will start charging higher traffic websites.
Let us know what you think about this move from Google in the comments down below. Will it push users (you) towards the competition or nothing will really change?
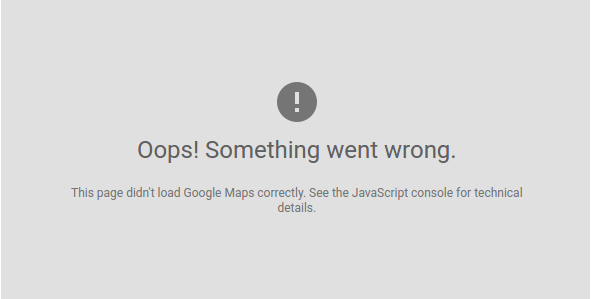
This post will tell you how to fix the “This page didn’t load Google Maps correctly. See the JavaScript console for technical details.” problem with Google Maps.
If you are using GeoDirectory please see our documentation here.
If you want to read about the problem see our blog post here: https://wpgeodirectory.com/google-maps-api-key-and-new-limits/
If you have seen the message “This page didn’t load Google Maps correctly. See the JavaScript console for technical details.” or any of the following messages:
“Esta página no ha cargado Google Maps correctamente.”
“Google Maps ne s’est pas chargé correctement sur cette page.”
“Google Maps non è stata caricata correttamente.”
“Google Maps wurde auf dieser Seite nicht richtig geladen.”
“При загрузке Google Карт на этой странице возникла проблема.”
The chances are you need this fix, if you are using WordPress then we have created a plugin that should fix this for most users who’s plugin or theme is causing this, you can find it here: GOOGLE MAPS API KEY FIX
If you are not using WordPress you will need to find your call to google maps in your source code and add the api key, you can find instruction on creating an API Key here. Once you have your API key you add it to your call to the Google maps file maps.google.com/maps/api/js?key=YOUR-API-KEY-HERE
I hope you found this useful, feedback is always welcome.
The GeoDirectory Team.