The World’s Most Advanced And Scalable WordPress Directory Plugin
GeoDirectory is an enterprise-grade WordPress plugin for building scalable business directories, city guides, real estate listings, job boards, event sites, classifieds, and local discovery platforms. Unlike generic listing plugins, it uses custom database tables, not WordPress post meta, so sites perform well from small local portals to directories with hundreds of thousands or millions of listings. Core features include optimized search, maps, reviews, frontend submission, and an extensive add-on ecosystem for customization. Rated 4.8/5 across 700+ reviews on WordPress.org and Capterra.
Get GeoDirectoryWhat can i do with GeoDirectory?
These are the 1st two add-ons that we release since GeoDirectory V2 was officially launched.
Both add-ons are designed to maximize the potential of your directory.
The first, by acquiring organic backlinks from the websites of your listing owners. Those are gold for SEO purposes.
The second to help you manage imports, exports, and edits in a more flexible way.
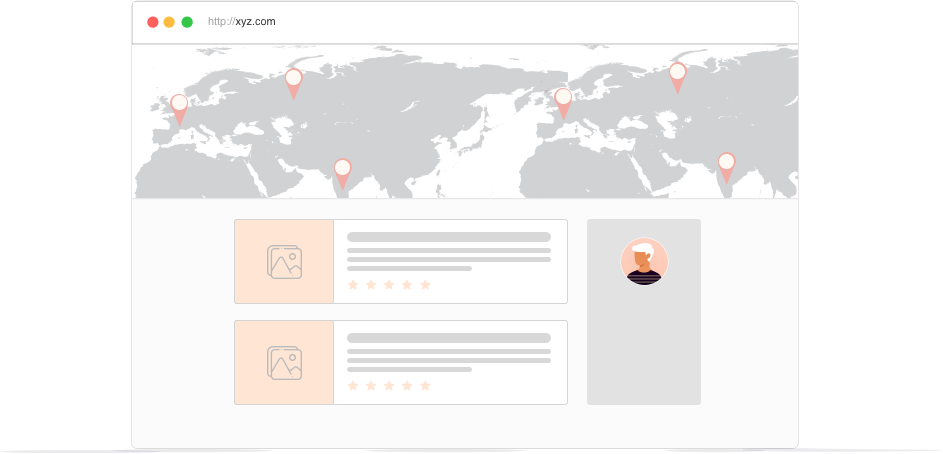
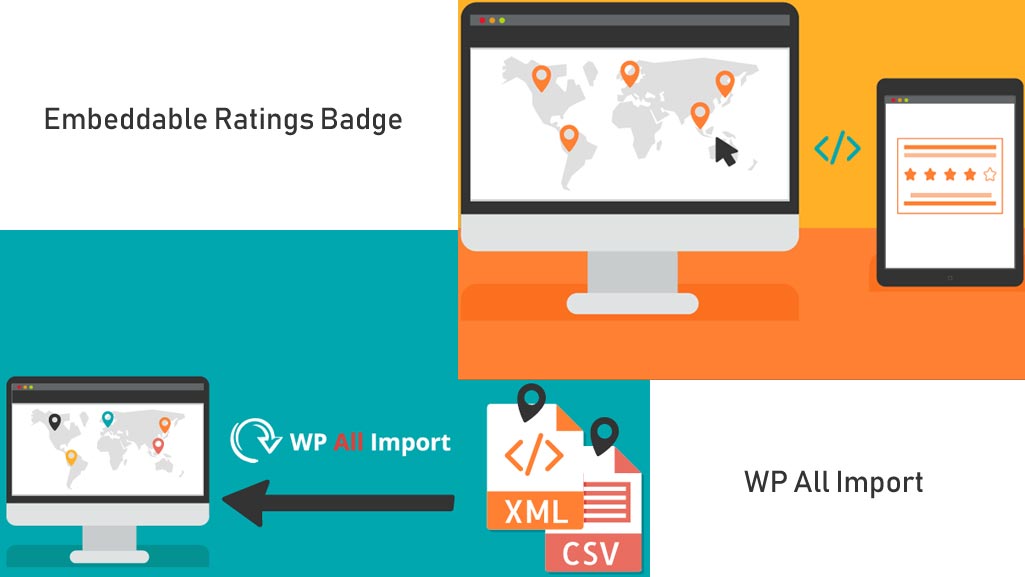
Embeddable Ratings Badge
![]()
One of the best ways to get Google to rank you on top of your competitions is to create a widget that other webmasters want to embed on their sites.
Some examples of very famous widgets that website owners embeded on their sites are:
- YouTube videos
- SoundCloud tracks
- Weather Forecast Widgets
- Trip Advisor Rating Widget
The Embeddable Ratings Badge, mimics the functionality of the Trip Advisor rating widget for your directory.
The directory admin can style the entire widget.

Or allow its users to manipulate some of its styles to adapt to their websites.

WP All Import

Many of you requested integration with Wp All Import, but we never had time to work on it.
We found the time and we also worked with the developers of WP All Import to make sure they approved what we did.
That said, the add-on has not been tested with massive numbers such as a real directory could require, so there still might be few bugs to iron out.
Thus the BETA status. If you find any bug, don’t hesitate to report it in our forums.
These 2 new add-ons are included in all of our memberships and active members should be able to download them from their account area now.
We hope you enjoy them!
Team GeoDirectory

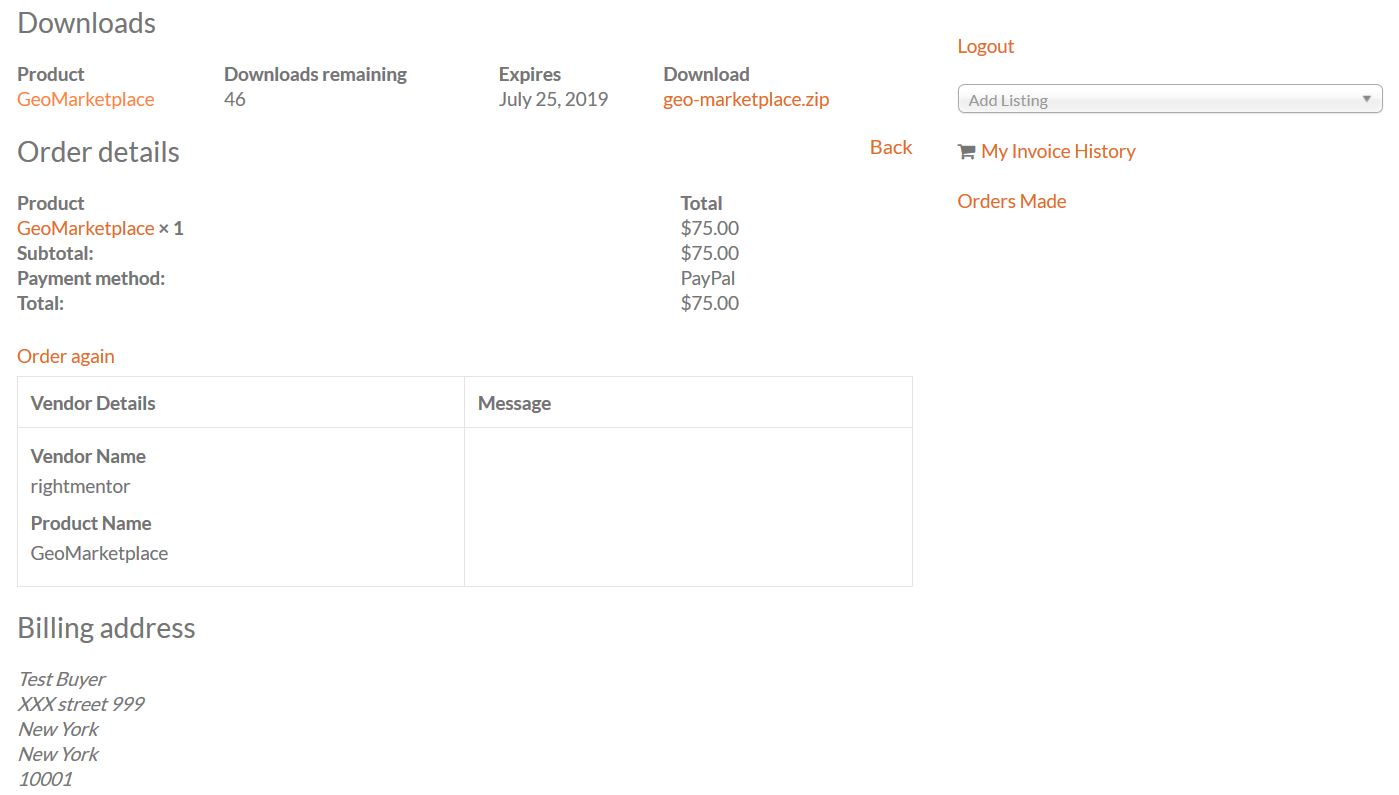
GeoMarketplace is a new plugin created by the top rated Developer of the GeoDirectory Experts Directory: Webnware
It connects WooCommmerce and WC Marketplace with GeoDirectory, to allow listings owners to sell their products from within their listings, by creating a new profile tab called “Shop”.

At the moment it allows to sell only Digital and Physical products, but the developer told us there are plan to integrate the WooCommerce Booking and Box Office Extensions.
So that listings owners could be able to offer online booking capabilities and sell tickets for Events.
We installed the plugin on “GeoDirectory Experts”, our directory of GeoDirectory Developers for Hire, so that they can start selling 3rd party add-ons and or their services packaged at a fix price.
Example could be : GeoDirectory Install & Configuration, SEO, CSV files with public listings data (example: All Hotels in New York) and so on.
Vendor Registration & Dashboard
GeoMarketplace will provide a menu item that behaves differently for different users.
- It will be invisible for non logged in users and regular subscribers.
- It will be visible for listing owners with the anchor text “Become a Vendor”.
- It will be visible for those who registered as vendor with the anchor text “Vendor Dashboard”.
The vendor dashboard comes from WC Marketplace as is:

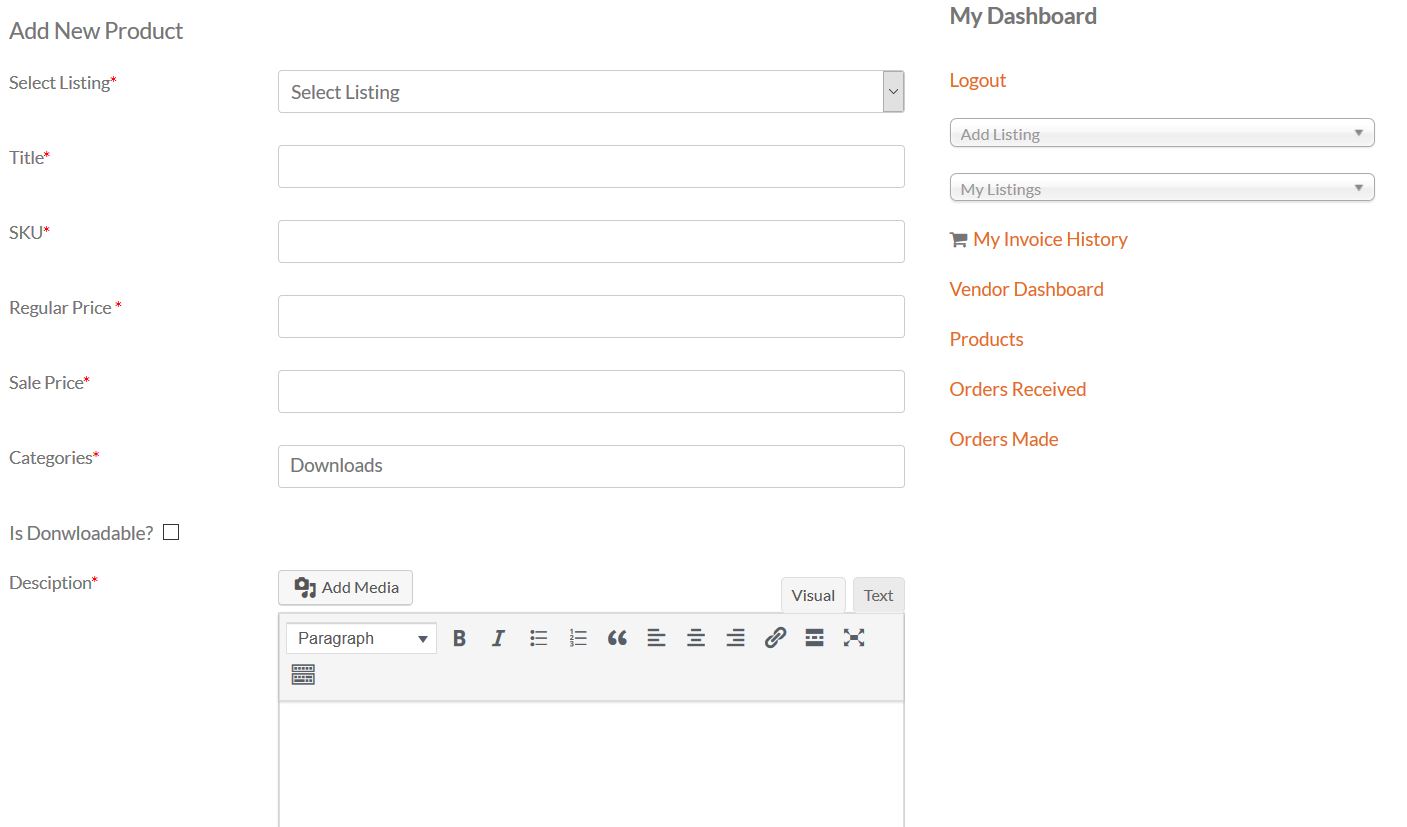
Front End Products Management.
Vendors can create and edit products from a front end form, they can also review orders received.

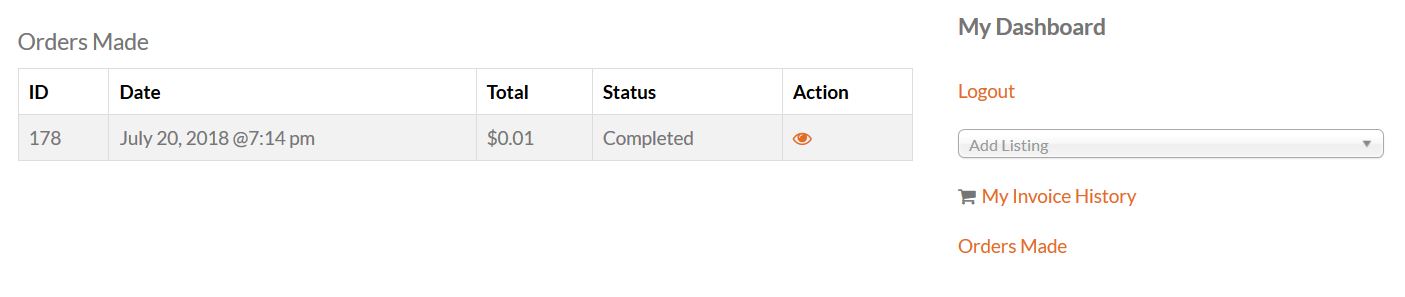
Buyers Front End Orders Management
Buyers can manage orders made and downloads from the front end too.
Custom vendor profiles with UsersWP
If you wish to provide vendors and users with enhanced custom WooCommerce user profiles displaying Purchases, Product reviews, Total Spent, Number of orders and even product listed for Vendors, you can use the UsersWP x WooCommerce add-on for that.
Get it here
The developer decided to sell it through his listing on the GeoDirectory Expert Directory:
Support and Updates
Support and updates will be provided directly by the developer on his website: http://webnware.com/
If you wish to Check out a simpler way to sell online with WordPress, have a look at our new plugin called GetPaid. We’ll soon release the add-ons needed to replace all of the above.

Google Maps Platform, did you hear about it?
Google announced today the launch of the Google Maps Platform. They described the new platform as:
a simplified product structure, pay as you go pricing for all, and more
Technically speaking, from a developers point of view there are no changes to how the Google Maps API will work, the only difference will be in regards to their pricing model.
Starting from June 11, 2018, if you don’t enable billing with a credit card within your Google Maps Platform account and you don’t have have a valid API key for all projects, Google Maps will stop working on your website.
Does it mean that using Google Maps API is no longer free?
No, use up to a certain limits is still free, so it doesn’t mean that you will have to pay for sure. What it means, is that you must have a valid credit card and enable billing on your Google Maps Platform account, to use a Google Maps based applications.
What they radically changed, is the pricing model and the way they calculate the thresholds for free use.
Until 2 years ago, Google Maps API would return up to 25,000 keyless requests per day and would require an API key and payments only after exceeding the 25,000 limit for 90 consecutive days.
2 years ago they introduced the Google Maps API Key and new limits, where each new websites needed a API key and they raised the limit to 25,000 free API requests per day without grace days.
What is the new Google Maps Platform Pricing Model?
Even though they present this as a simplified product structure, the new pricing model is definitely more complex than in the past and calculating the limits to see if your website will need to pay or not, won’t be that easy.
The main simplification is that there is no longer a free general amount of requests. Each API request is counted differently depending on the service requested and they provide a $200/monthly credit to every user.
Requests of Mobile Native Static Maps or Mobile Native Dynamic Maps are free and unlimited. With the $200 credit, you’ll never have to pay for Mobile Native Static Maps or Mobile Native Dynamic Maps requests to the Google Maps API.
Requests to Dynamic Street View cost $0.014 per request up to 100k requests (after the price goes down to $0.0112). With the $200 monthly credit you can do up to 14000 requests.
This is the pricing table for the Google Maps Platform API for Maps:
| Free monthly usage ($200 value) | Price per thousand calls | ||
|---|---|---|---|
| Monthly volume range | 0—100,000 | 100,001+ | |
| Mobile Native Static Maps | Unlimited loads | $0.00 | $0.00 |
| Mobile Native Dynamic Maps | Unlimited loads | $0.00 | $0.00 |
| Embed | Unlimited loads | $0.00 | $0.00 |
| Embed Advanced | Up to 14,000 loads | $14.00 | $11.20 |
| Static Maps | Up to 100,000 loads | $2.00 | $1.60 |
| Dynamic Maps | Up to 28,000 loads | $7.00 | $5.60 |
| Static Street View | Up to 28,000 panos | $7.00 | $5.60 |
| Dynamic Street View | Up to 14,000 panos | $14.00 | $11.20 |
This is the pricing table for the Google Maps Platform API for Routes:
| Free monthly usage ($200 value) | Price per thousand calls | ||
|---|---|---|---|
| Monthly volume range | 0—100,000 | 100,001+ | |
| Directions | Up to 40,000 calls | $5.00 | $4.00 |
| Distance Matrix | Up to 40,000 elements | $5.00 | $4.00 |
| Directions Advanced | Up to 20,000 calls | $10.00 | $8.00 |
| Distance Matrix Advanced | Up to 20,000 elements | $10.00 | $8.00 |
| Roads – Route Traveled | Up to 40,000 calls | $10.00 | $8.00 |
| Roads – Nearest Road | Up to 40,000 calls | $10.00 | $8.00 |
This is the pricing table for the Google Maps Platform API for Places:
| Free monthly usage ($200 value) | Price per thousand calls | ||
|---|---|---|---|
| Monthly volume range | 0—100,000 | 100,001+ | |
| Autocomplete – Per Character | Up to 70,000 chars | $2.83 | $2.26 |
| Autocomplete – Per Session | Up to 11,000 sessions | $17.00 | $13.60 |
| Places Details – Basic | Up to 11,000 calls | $17.00 | $13.60 |
| Places Details – Basic + Contact | Up to 10,000 calls | $20.00 | $16.00 |
| Places Details – Basic + Atmosphere | Up to 9,000 calls | $22.00 | $17.60 |
| Places Details – Basic + Contact + Atmosphere | Up to 8,000 calls | $25.00 | $20.00 |
| Places Photo | Up to 28,000 calls | $7.00 | $5.60 |
| Geocoding | Up to 40,000 calls | $5.00 | $4.00 |
| Geolocation | Up to 40,000 calls | $5.00 | $4.00 |
| Time Zone | Up to 40,000 calls | $5.00 | $4.00 |
| Elevation | Up to 40,000 calls | $5.00 | $4.00 |
| Find Place | Up to 11,000 calls | $17.00 | $13.60 |
| Places – Nearby Search (includes Basic + Contact + Atmosphere) | Up to 5,000 calls | $40.00 | $32.00 |
| Places – Text Search (includes Basic + Contact + Atmosphere) | Up to 5,000 calls | $40.00 | $32.00 |
How do I calculate if I’m within the limits?
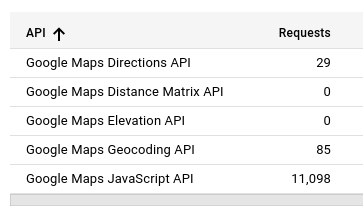
These are the API that GeoDirectory currently uses:
- Directions API: up to 40k free requests
- Distance Matrix API: up to 40k free requests
- Elevation API: up to 40k free requests
- JavaScript Dynamic Maps: up to 28k free requests
- Embedded Maps: Free
- Places API : (limit depends on fields used)
- Static Maps: up to 100,000 loads
- Street View: up to 28,000 panos
- Geocoding API: up to 40k free requests
- Geolocation API: up to 40k free requests
- Time Zone API: up to 40k free requests
What we use the most on GeoDirectory are definitely the Dynamic Maps and the new Google Maps Platform provides 28k free requests for those.
Considering that now they are offering 25k free requests per day, the limit appear to have been dramatically lowered.
Below is an example of a small directory we run (75 listings) for the last 30 days:
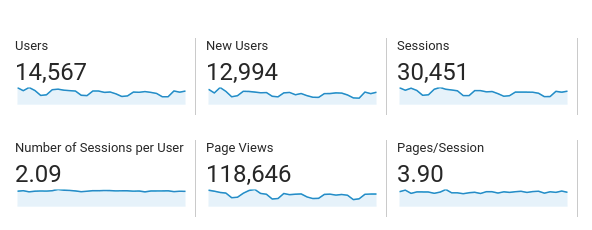
On the face of it the site is using about 40% of its free allowance for about 30k sessions and about 120k page views. For relevancy this site makes around $5,000 a year.
What are the steps to enable billing and keep using the Google Maps API
Google provided a transition tool. You need to visit this URL: https://mapsplatformtransition.withgoogle.com/ and login in the Google Account used to create the Google Maps API key of your Directory.
A screen like this will appear:
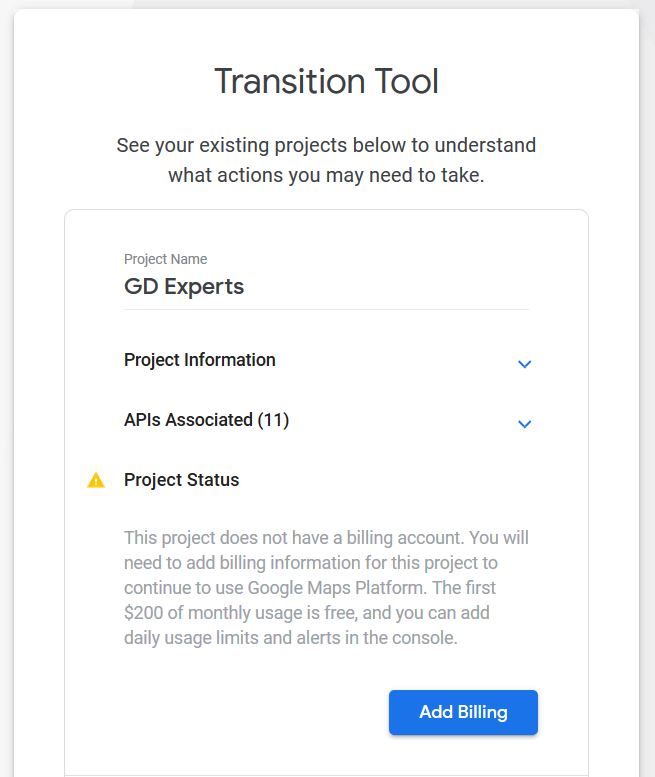
After clicking on the “Add Billing” button, you will be taken to complete a form asking for your personal information and a credit card number.
That is all you need to do.
After enabling billing, the console provides tools to set alarms or limits, so that you never overspend, even in case of unexpected traffic spikes.
What is our response to this news?
The vast majority of our users won’t be affected by these new limits, sure they might be forced to give Google their billing details but most will remain on the free plan.
GeoDirectory already has the option to use Open Street Maps (OSM) which continues to be free and does not even require an API key.
If your site is set to “Auto” for the maps provider (which it is by default) then there is a chance you are already using OSM without even knowing it.
When it’s set to “Auto” we try to load Google maps but if it fails then we will automatically switch to OSM.
This feature was built in a long time ago mostly for our customers who live in countries where the Google maps API is blocked, if anyone visits your GeoDirectory site from a country where the Google API is blocked, then they will see OSM instead of a broken map 🙂
It is currently unclear how Google will handle things when limits are reached, but if it is possible, we will make it so that it will automatically transition to OSM. Just like it does now for users who live in countries where the Google API is blocked.
We may also look at ways to reduce API calls such as implementing static maps (which are 100% free) on the details pages that only load dynamic maps when interacted with.
Conclusion
We knew this day would come the day Google implemented mandatory API keys for all map API calls.
Its almost 2 years since that came into effect, back then this change broke many old plugins and themes that had not developed a system to add a API key to the map calls.
For that we wrote a small plugin to easily generate a API key and fix the calls on the fly https://wordpress.org/plugins/api-key-for-google-maps/. This is now helping over 100,000 websites!
The small percentage of GeoDirectory customers that will be affected by this, have the option to switch to OSM and continue to use maps on their directory for free.
We will continue to develop solutions that reduce API calls where possible.
Thanks,
Team GeoDirectory

Dealing with refunds for digital products in 2022
Whether you are selling WordPress Themes, Plugins, or services, dealing with refunds for digital products is a very delicate matter. When someone requests a refund there is a possibility for either party to feel unsatisfied with the result.
- The vendor may feel the refund request is unjustified.
- The client could be unhappy if the vendor refuses to provide a refund.
We have changed our refund policy several times and now we are convinced there is a right way to deal with refunds, and with this post, we are sharing it with you.
Do online vendors have the right to deny a refund?
Not only do they have the right, (except in the UK under the Consumer Rights Act) but many others do not even provide refunds for digital products.
This is because while digital products can be downloaded they cannot be returned like a physical product, and the same goes for any digital services offered.
Try asking GoDaddy to refund you for a domain you forgot to cancel and you’ll see from their reply what I mean. Last time I tried to contact them concerning this issue they didn’t even reply.
The iTunes App store sales policy clearly says that you cannot cancel a purchase or receive a refund for purchase (but if you have a valid reason, they have been known to make exceptions).
As mentioned above, only in the UK are digital and physical goods treated equally.
However, for a client to get a refund they should be able to prove that the digital product isn’t:
- Of satisfactory quality.
- Fit for a particular purpose.
- As described by the seller.
That’s not that easy to prove.
In almost every country (with some exceptions) refunds for digital products are not mandatory.
In most cases, merchants are only required to clearly post their refund policy.
PayPal has both a buyer and seller protection program. Digital products are not included in seller protection, so refunds for digital products could be granted in dispute cases fairly often.
Before buying, always ask yourself: is there a refund policy?
The onus is on you, as a consumer, to make responsible decisions about the purchases you make online.
Typically there are three types of refund policy.
- The Marketing Suicide: We stand by our product and we provide no refund whatsoever.
- Would be fair, but just isn’t: 30 days’ money back if you asked for support and we failed to provide a solution.
- The smart solution: 30-day money-back guarantee no questions asked.
We tried them all for a long period of time so we can tell you all about them.
The Marketing Suicide – No Refunds
At first, we were so proud and protective of our work that we took it badly on a personal level every time someone even thought to request a refund.
In hindsight, it was not a productive or worthwhile manner in which to conduct ourselves.
It created a bitter, stunted feeling between both parties and left us unhappy.
In addition to increasing our workload when we could have been devoting our attention to improving our products.
It just wasn’t worth it, especially when we considered that we were a growing company with increased visibility.
Our 1st refund policy was the following:
We offer digital media (software) that can be downloaded instantly after a purchase has been made. There is no “trial” or “grace period” after purchasing any product which means all sales are final. Once you have purchased the software, there is no way to “return” it.
It is a member’s responsibility to cancel any payment authorized through PayPal. If you decide to stop the membership and discontinue using our Products, remember to login to your PayPal and cancel the Authorization.
There will be no refund for members that forget to cancel their subscription.
Reading it now gave me chills 🙁, it was a disgraceful way to act, and we learned it the hard way.
Would be fair, but it’s not: 30-day money back if you asked for support and we failed to provide a solution.
When we realized that our 1st refund policy was creating more problems than it was solving, we decided it was time for a change. We looked at the rising stars at the time, that being WooCommerce, and decided to follow in their footsteps.
Our 2nd refund policy stated:
If you are still not satisfied with our products and services after giving us at least one chance to make GeoDirectory work for you (by interacting with us in the support forum):
We will refund your money, as we feel we have failed out responsibilities as support staff.
Ask for a refund within 30 days from your initial purchase here. You will get it, no questions asked.
It is a client’s responsibility to stop payments authorized through PayPal. If you decide you would like to discontinue using our products, please remember to login to your PayPal account and cancel the Authorization.
This was more effective than our first policy but still created friction with clients. Some clients didn’t attempt to seek support and expressed through their inaction their desire to leave our partnership.
Our previous efforts brought us to our third and final policy.
30-day money-back guarantee, no questions asked
Our third and final, refund policy states:
If you are not satisfied with our products and services and are still within 30 days of the original purchase date, your request for a refund will be honored, no questions asked. You can request it here. (Lifetime deals are not covered by this refund policy, please read below)
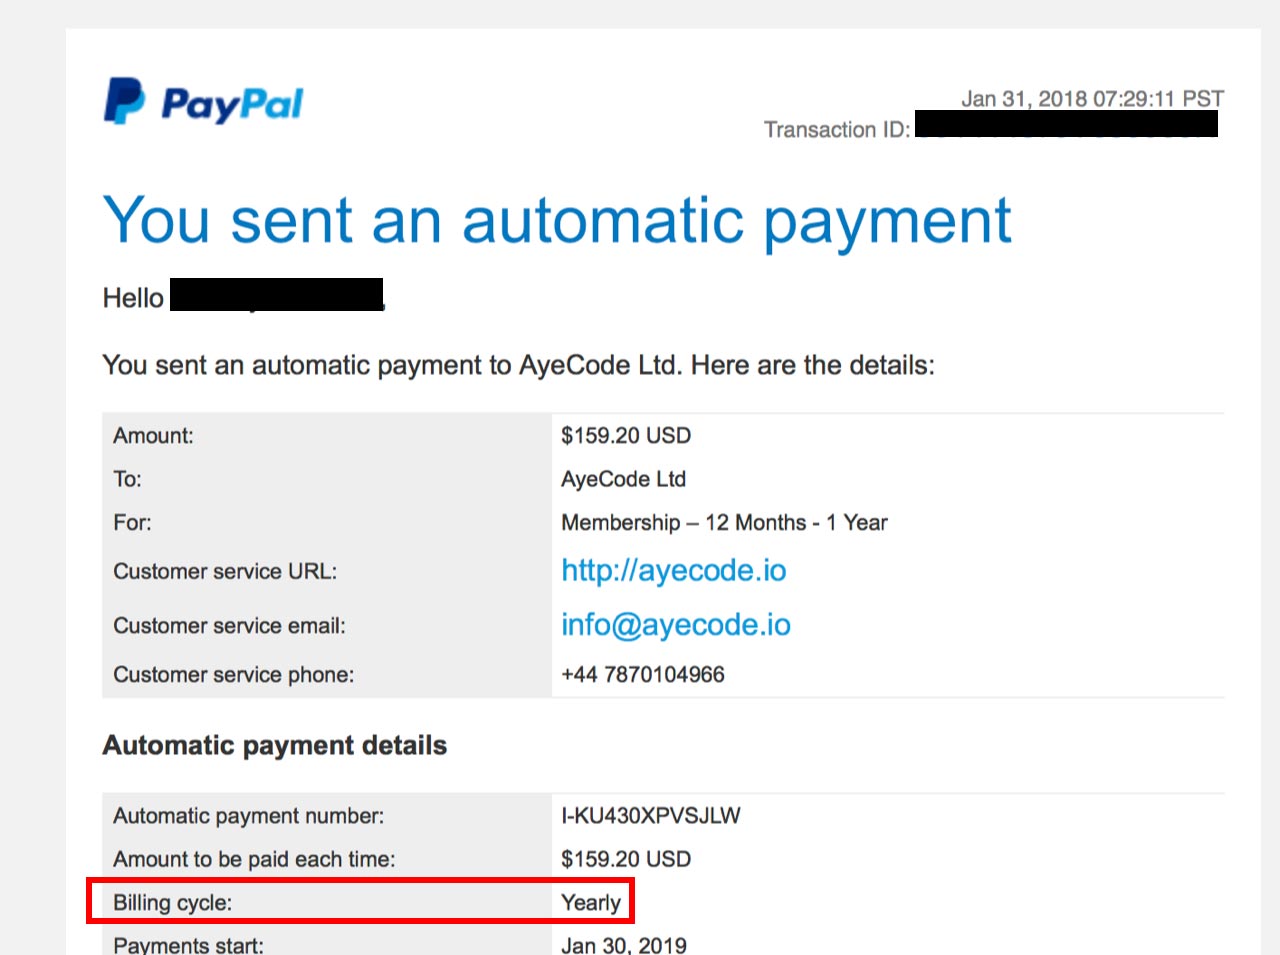
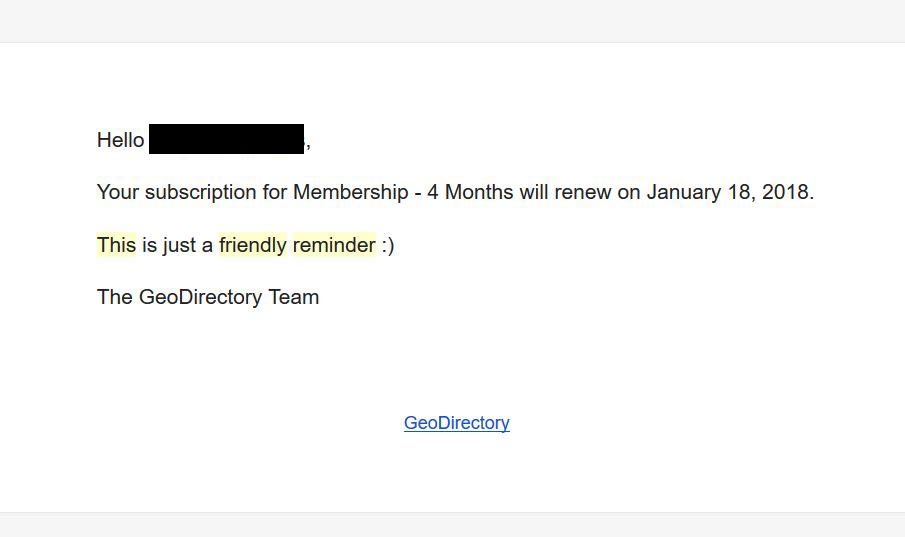
We cannot grant refunds on renewal payments.
We will send you 2 reminders about your renewing subscrition. The first notification is sent two weeks prior to your renewal date and the second email is sent one week prior to your renewal date.
You may use these opportunities to cancel your subscription before the renewal payment is automatically processed.
For our protection, refunds are not permitted on Lifetime Deals.
The payment gateways refund fees for Lifetime Deals are almost as high as the purchase of one of our add-ons.
This is the reason why refunds for the LTD do not make business sense for us.
If you wish to test the product before commiting to the lifetime deal, please consider purchasing a 4, 6, or 12 months membership, which are covered by the refund policy.
If you decide to upgrade to the Lifetime deal before the end of the membership, we will provide a coupon code for the full amount paid for the initial purchase.
Disputes
Should you open a dispute, instead of asking for a refund, we will keep 50% of the disputed amount while we gather evidence for our submission of the refund.
It is a client’s responsibility to cancel payments authorized through PayPal or Stripe.
If you decide to cancel your membership and discontinue using our products, please remember to login to your PayPal and cancel the authorization. (see instruction here for Paypal). For payments made through Stripe, you can cancel the subscription after logging in, through the “Your Account” page.
Why is it the best?
First of all, you may be surprised to find out how many clients request a refund without providing a valid reason. They are an insignificant percentage.
As a business, we are not losing money. It’s lost revenue, but we didn’t lose the respect of a potential future client who may not ever approach us in the future as the result of a bad customer support issue.
We stand by our products and can personally attest to their quality. While our business is in selling products, we would rather maintain a satisfied customer base than naked profiteering.
While we can definitely afford to lose some business, we understand that many of our clients are not so easily able to lose $200 on business investment, such as a digital product.
Why don’t refund renewals?
That should be self-explanatory. We send you 2 reminders. One 2 weeks prior and one 1 week before the renewal takes place.
The product has been used for one year and if you are asking for a refund, it is definitely not because the product was not satisfactory.
The only reason can be, that the customer disregarded both renewal notifications or straight up forgot to cancel. In that case, the onus shouldn’t be on us.
Especially considering the refunds have costs for the vendor.
Why do we state we keep 50% if a dispute is open instead of a direct refund request?
If you open a dispute with your bank, PayPal or Stripe, because you didn’t read our policy, you’ll make us do extra work to gather evidence that PayPal or other Payment Gateways require to close disputes.
Not only this, but in most cases, gateways charge a dispute fee, not only would we be refunding the money but we would be out of pocket also, so this statement is meant as a deterrent so we are not out of pocket. (our first step of a dispute is to email the customer to find out what’s happening, if they close the dispute before we have to gather and submit evidence then we do give a full refund for first-time purchases)
If you fail to read our policy and then go on to open a dispute with your bank, Paypal or Stripe then you are causing us to take time away from improving our products and business.
When you could have asked for a refund directly?
Why do customers open disputes, when you are that willing to refund?
90% of the time for renewals (recurring payments) which are not covered by our refund policy. I guess because they don’t read what they are buying and ignore renewal notifications.
We still to this day get people sending us angry emails that often sound like this:
You charged me without my authorization! I opened a dispute and you better give me my money back!
Obviously, we didn’t charge them without their authorization. We couldn’t even if we wanted to.
What happened is that they didn’t read what they were paying for, and we’re not talking about fine prints.
We are extremely clear about a subscription & recurring payments. It’s written everywhere:
(there are single non-subscription options with our memberships)
On the pricing page
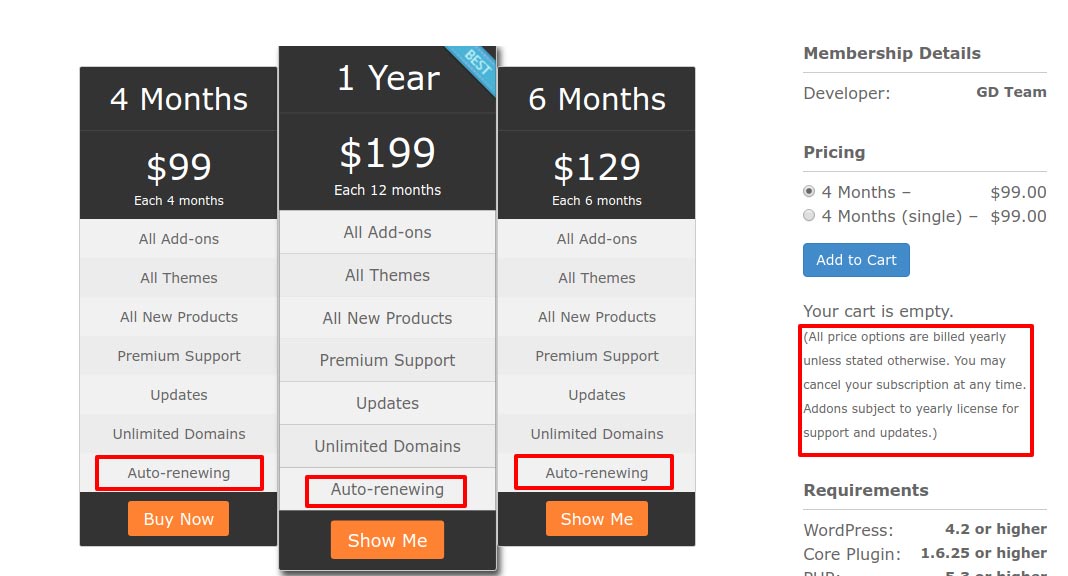
In the Frequently Asked Questions, below the pricing table
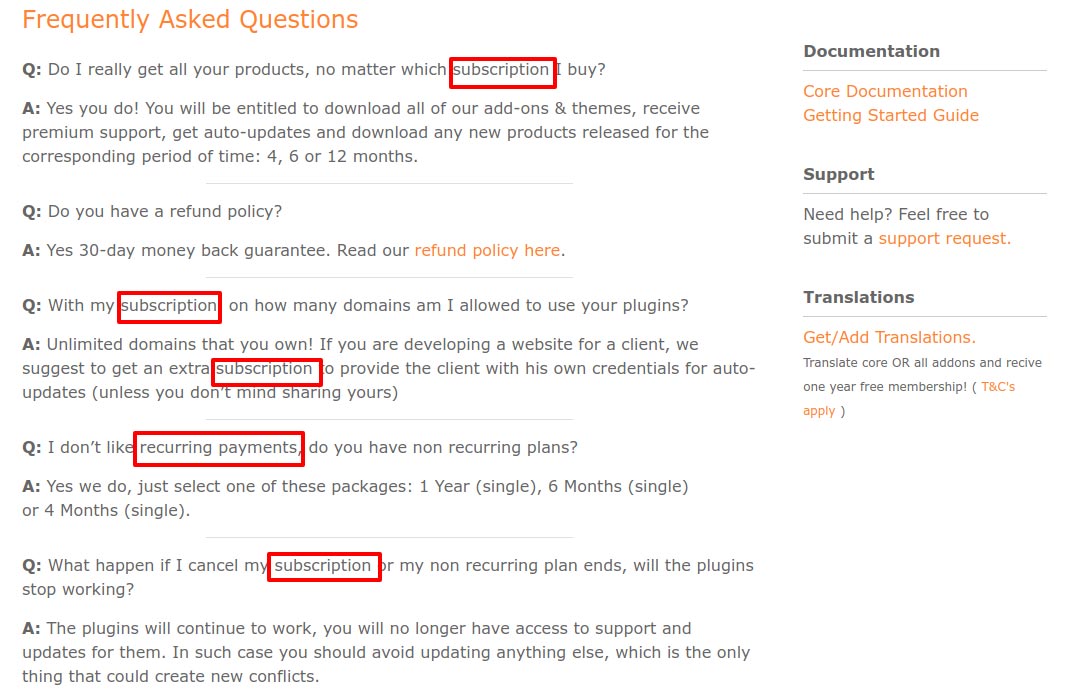
On the Check out page
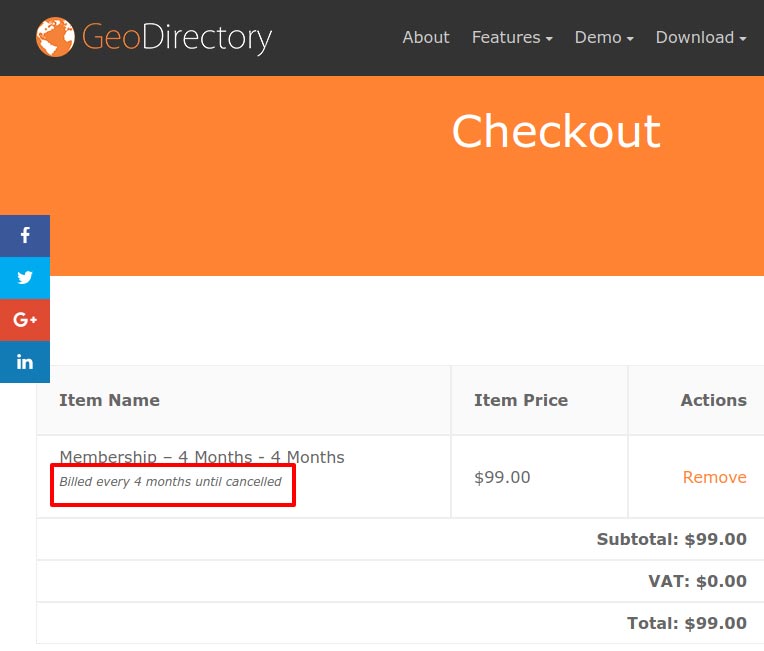
If you use Paypal, it will remind you before the final check out
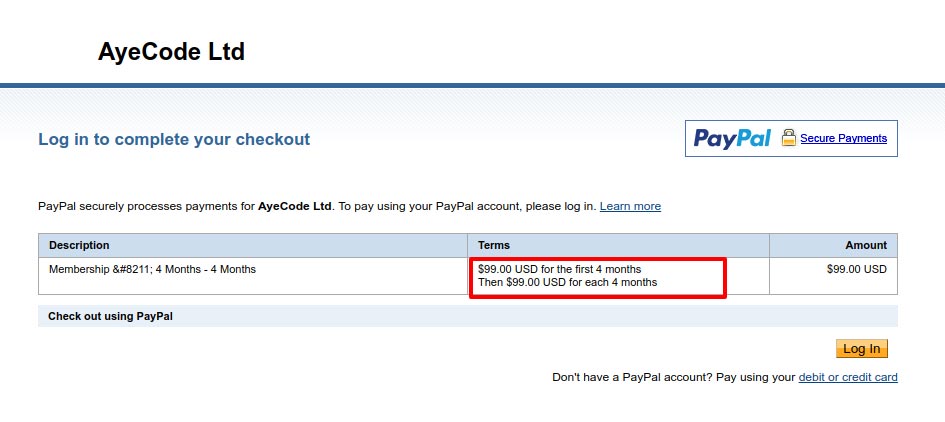
PayPal repeat it once more in their email receipt
Finally, we send you 2 email reminders 14 and 7 days before the renewal.
Conclusions for Buyers
Just make sure you read any and all Terms and Conditions, and the refund policy before buying. Most vendors are honest and are not trying to fool you. By reading the Terms and Conditions, you can make sure this never happens to you.
Conclusions for Vendors
While dealing with refunds is inevitable, dealing with them graciously is more important.
Turning refunds from bad to positive experiences will help to maintain a positive relationship with our client base, and in turn, help our reputation. We will attract back customers in the future that we may have otherwise lost forever.
We may even get referrals from them that we wouldn’t have done if we hadn’t done something to change our policies.
We’ll have less work and be able to keep our stress levels under control, leading to better products in the future and a more positive environment in which to conduct our business.
While we may be losing revenue in the short run, we’ll feel better about our products and clients in the long run.
Do you agree with us? How do you deal with refunds? Please let us know in the comment down below.

The WP plugin directory has been missing a lightweight WordPress User Profile plugin for too long.
Popular user profile plugins are basically full-fledged social network apps.
Some even include content restriction features that generally belong in a membership plugin.
Don’t get me wrong, they are great, but they provide far too many options for anyone who only needs a front-end sign-up form, a front-end login form, a directory of users, and user profile pages.
Introducing UsersWP
Because of the above, we decided to build UsersWP, and this is precisely what it offers:

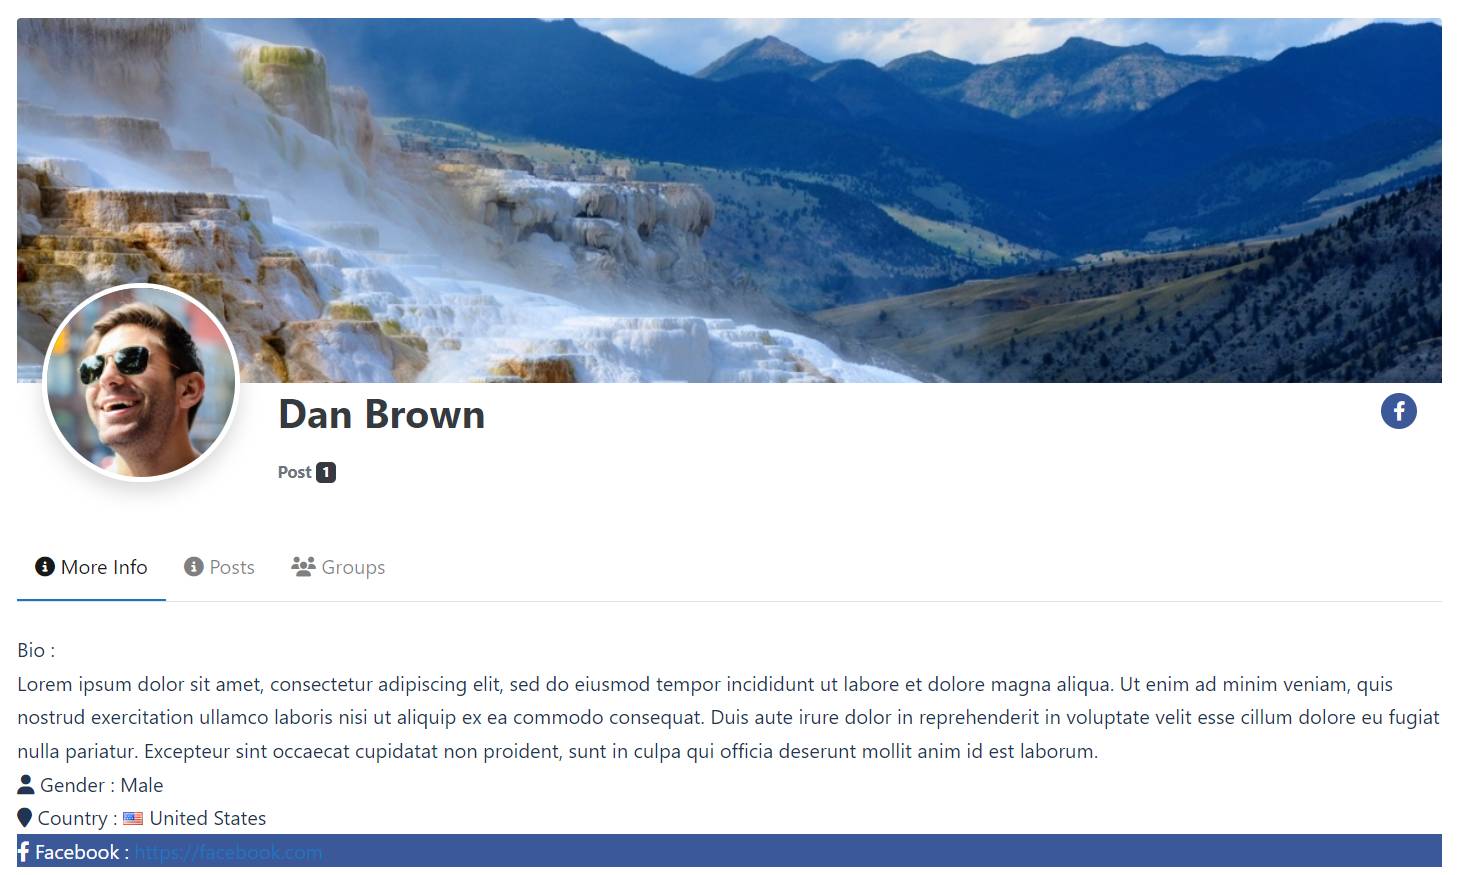
The free plugin can be downloaded here: https://wordpress.org/plugins/userswp/.
A lightweight WordPress User Profile plugin
Some websites’ user-profiles and the user directory are the center of operations.
For example, a dating website.
In many others, it’s a secondary element of the website, and it shouldn’t be bloated with options because it would slow down the rest.
For example, on any directory website, the users’ profiles are not as crucial as the listings or the directory search engine.
We created UsersWP for this second category for e-commerce websites, directories, and magazines where the users’ profiles and users’ interactions are essential but not the core of the business.
Less than 5 minutes of setup
Our main objective with UsersWP was to make it simple.
If WordPress takes less than 5 minutes to install and set up, the user management plugin shouldn’t take more.
In fact, it probably takes less than 2 minutes to configure UsersWP.
There are literally hands full of options.
We made many decisions to make the system less confusing for users.
The initial setup could be ideal for a vast number of websites.
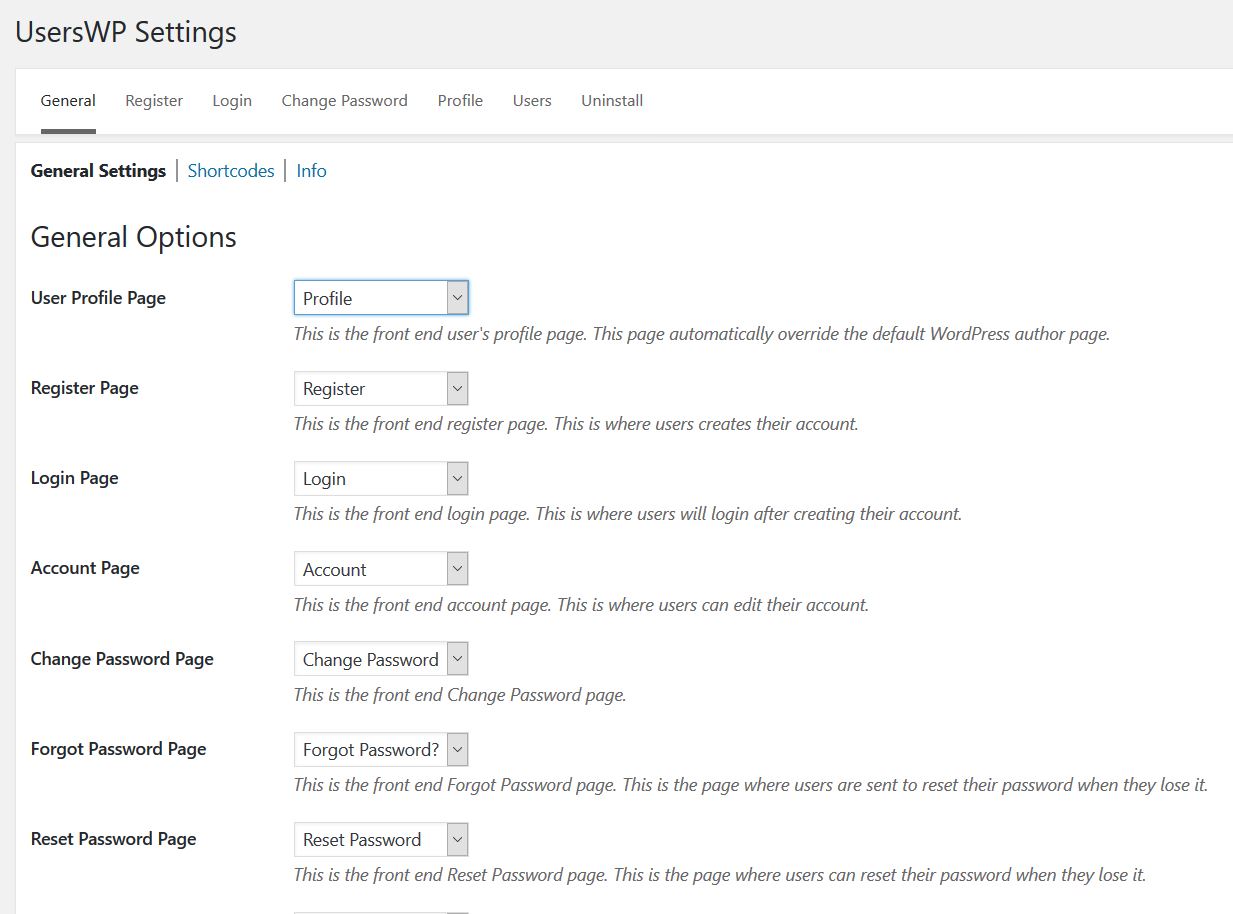
After installation, the plugin creates seven pages and adds the necessary shortcodes in each of them.
Maybe you’ll want to change the page’s name, but that’s it.
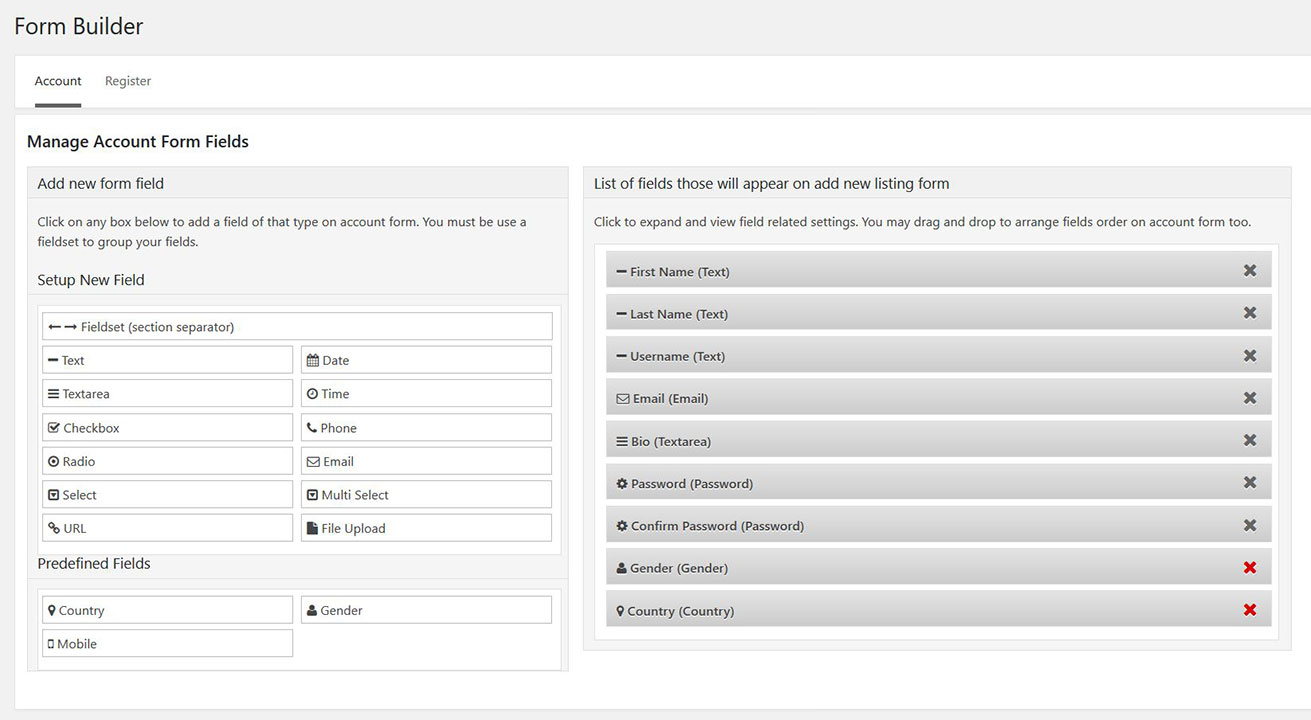
The only thing that will add time is configuring custom fields, but the drag-and-drop account and user registration form builder will make that very easy too.
Fewer options, more hooks
We got rid of many options but added enough filters and actions to make this plugin extremely extensible.
We use hooks and filters to extend the core plugin and integrate it with other plugins such as:
- GeoDirectory (integrated into the core plugin)
- WooCommerce (WooCommerce Users Profiles)
- bbPress (bbPress Users Profiles)
- Easy Digital Downloads (Easy Digital Downloads Users Profiles)
- WP Job Manager (WP Job Manager Users Profiles)
- MailChimp (MailChimp Newsletter Signup on User Registration)
The GeoDirectory integration, for example, will add tabs in the users’ profiles to allow them to see their listings, reviews, and favorites.
Obviously, it’ll also take over the registration and login forms.
The WooCommerce integration will instead add tabs in the users’ profiles to allow them to see their orders and product reviews.
Long story short, UsersWP and its add-ons allow users to interact better with the integrated plugin.
These are just a few of the plugins that we created premium add-ons for.
We also created a few other premium add-ons to extend the community side of websites, like:
- Private Messages
- Users Moderation
- Following
- Profile Progress
More will be built and released in the near future.
Other than premium extensions, we also created two free add-ons:
- reCAPTCHA (to protect website registration from bots)
- Social Login (to allow users to register with the Facebook App Login, for example)
GeoDirectory and UsersWP are integrated without the need for an add-on.
We hope you’ll like UsersWP and decide to make it your WordPress User Profile plugin of choice.
Should you have any feedback that you think will help us improve it, please don’t hesitate to get in touch with us in the comments down below.
If instead, you find any bug, make sure to report it to our support team: https://userswp.io/support/

If you are upgrading from GD Payments Manager V1 to V2, you must carry out some additional steps. Our new free plugin WP Invoicing will now be required to take payment, and the GD payment manager will still handle the price packages and restrictions. ( You can find out more about WP Invoicing here: https://wpgeodirectory.com/wp-invoicing/ )
GD Payment Manager V2+ Install instructions
Payment Gateway Settings
WP Invoicing has its own gateway plugins which are available in your download area, not all come pre-installed, which means less code has to run and only the gateways you use will need to be installed.
- Payment Gateway Settings: For a quicker upgrade, take note of any of your active payment gateway settings, this will allow you to copy them over quickly.
- Stripe: For gateways like Stripe Payments you will have to update the notification URL in your settings on stripe.com
Installing Payment Manager V2
You will have to manually install the plugin, which is available from your downloads area, this can be done in 3 ways:
- FTP: You can upload (overwrite) the current files on your server.
- Plugin: You can use this plugin to allow you to upload the new zip file and install the update
- Delete + Install: You can also just delete the payments manager V1 and then install the V2 via the zip file (least recommended)
Installing WP Invoicing
You can download our wordpress Invoice plugins from here: wpinvoicing.com; you will find additional payment gateways in your download area under the payment manager.
WPI has its own documentation for installation which you can find here https://wpinvoicing.com/docs/category/getting-started/
You should:
- Install WP Invoicing
- Install any extra gateways needed
- Setup WP Invoicing by following the setup instructions
- The conversion of price packages and invoices should be automatic, if you have any problems you have to use the conversion tool under Invoicing>Settings>Tools
If you have any problems with GD Payment Manager, please post on the GD Payment Manager forums
If you have any problems with WP Invoicing, please post on the WP Invoicing forums (your GD login details will also work here)
Thanks,
The GeoDirectory Team
We are happy to announce WP Invoicing (now called GetPaid) is now live for its first public beta. In this post, you will learn all you need to know about this great new product! ( if you are upgrading to GD Payments Manager V2, please see here: https://wpgeodirectory.com/payments-manager-v2-setup/)
What is WP Invoicing?
Invoicing (WPI) is a the best of all WordPress invoice plugins that will allow you to send invoices and recurring invoices (depending on payment gateway) to anyone and have them pay through your WP site.
Invoices produced can be made to be EU VAT compliant which many eCommerce solutions currently are not.
WPI is intended for selling or invoicing for digital or intangible items online anywhere in the world and to be EU VAT compliant.
Most importantly WPI is easy to integrate your product with, we intend to use WPI for all our future product payments and we hope other developers will use WPI also.
Why WP Invoicing?
There are lots of reasons to why we created WPI, some of the most important ones are:
- EU VAT compliance (B2C): If you sell “digital items” to a EU consumers (B2C) you need to be VAT registered in at least one EU country and collect vat from consumers charged at the rate of the consumers country, WPI handles this.
- EU VAT compliance (B2B): If you sell “digital items” to a EU businesses (B2B) you need to collect certain evidence from the business transaction including it’s VAT Number, company name and location, WPI handles this.
- Global tax: WPI can handle charging the correct VAT no matter where your business or your customers.
- Less Code: If we have a centralized plugin that handles all payments for all out products then each product does not have to have its own processing code and all its own custom build gateways, saving you time and money.
- Gateways: By only having one payment system we only have to make payment gateways once, which means we can build more and cheaper.
- Developer Friendly: We have built WPI to be developer friendly, meaning it is super easy for devs to use WPI for their products, this step will allow 3rd part devs to not have to worry about tax compliance or building or maintaining payment gateways.
Who is WP Invoicing for?
WPI is really for 4 different sets of people:
- AyeCode Customers: AyeCode Ltd is the parent company of GeoDirectory, with the release of GD payment manager V2+ WPI will process all payment for GD and also all our upcoming products.
- Developers: Developers can use WPI as their payment solution, meaning they dont have to worry about tax compliance or maintaining many payment gateways and can spend more time improving their products.
- 3rd Part Customers: There are customers of 3rd party developer products, once WPI has compatibility with many 3rd party products, 3rd party customers will only have to pay once for a gateway and it will work for many products.
- Sending Invoices: WPI by its self can be used to send out tax complaint invoices for any digital/intangible items.

Advanced Custom Fields is a fantastic plugin used by millions that convert WordPress into a full-stack CMS, allowing you to create unlimited custom field groups, and types and add them to any type of custom post type.
However not many know about Advanced Custom Fields Scalability limits.
Quite often we get asked if GeoDirectory uses Advanced Custom Fields to manage listings’ custom fields.
When we reply that GeoDirectory has its own Custom Field System built in, they wonder why we decided to “reinvent the wheel”.
While the answer for us is crystal clear, Advanced Custom Fields Scalability is quite limited in building directories.
We thought that maybe, being users, they are not aware of what is going on under the hood and the scalability challenges that a web directory could present.
However, not too long ago, we stumbled upon a poll on a popular WordPress group on Facebook, where the options to vote for the “Best Directory” were: GeoDirectory, a few other Directory Themes available on popular marketplaces and there was also the option ACF + FacetWP.
When we saw the results, we were perplexed, to say the least, ACF + FacetWP had a lot more votes than we would have thought.
People who voted were not supposed to be just simple users, but website developers and WordPress experts.
For this reason, we decided it was time to explain why it is NOT a good idea to use Advanced Custom Fields for a directory.
And why Web Developers shouldn’t offer that solution to anyone unless they don’t care about providing fast, scalable solutions to their customers, that can grow sustainably.
WordPress Custom Fields Scalability Limits
WordPress by default uses the wp_postmeta database table to store custom field data, and it creates 1 row for each custom field used in a post.
Other than that WordPress adds a lot of extra data in this table for each post, each of which will use 1 row of the table.
If you spent some time optimizing SQL queries, you’ll know that’s not an ideal scenario for things like directories and filtering.
In fact, the default database structure is potentially a huge bottleneck for websites with many posts and custom fields.
It is considered one of WordPress’s weak points.
This is because to filter posts by custom fields, you’ll have to join the wp_post table with the wp_postmeta table in your query.
The bigger the tables will grow, the slower the queries will become.
Worst of all if you want to filter by two meta values, you would need to join the post_meta table twice to do it in one query.
This can eat up system memory and drag things down for anything but a small directory.
Advanced Custom Fields Scalability Limits
The Advanced custom fields plugin, is perfect for any website with a low or moderate number of posts, pages, and custom fields in general.
However, except few rare cases, directories are just the opposite.
They have a very high number of posts with potentially a very high number of custom fields too.
The primary Advanced Custom Fields scalability issue is that it creates 2 rows in the wp_postmeta table of your database for each custom field added to a listing.
It will also add several postmeta rows belonging to its own settings.
This means that it will add more than twice the rows in the wp_postmeta table of your database compared to using the default WordPress custom field system.
We did a quick test that should help us better explain this matter.
We created a new WordPress website, deleted the hello world post, and the sample page and we installed Advanced Custom Fields.
We created 1 group and 5 custom fields, and we published 3 posts each using the 5 custom fields.
After this, our wp_postmeta table already counted 83 rows.
That’s insane.
Imagine the number of rows for a directory with 300,000 listings and five custom fields.
With ACF, your wp_postmeta table would count minimum of 3,000,000 rows
How does GeoDirectory Scale?
That is very simple, we create a custom table for each of our custom post types.
Example: wp_gd_gd_place_detail
In this table, we save all custom fields and their data, in a row for each post.
We also built our own PHP API to query our custom tables, just like WordPress has its own PHP API to query default wp database tables.
This means GD, in most cases, only has to join the post table to our table.
We can then filter those results by ANY custom field.
We could filter by 20 custom fields, whereas ACF, even with facetWP (which does speed things up but still has the core limitation), would have to join multiple tables over and over to do the same job in one query, using many times the server memory for the same query.
Conclusions
So if we compare GeoDirectory with WordPress or WP + Advanced Custom Fields, we see that:
WordPress
1) Requires an extra table JOIN for each custom field you want to filter by.
2) wp_postmeta quickly becomes big, slowing down the queries
WP + ACF
1) Requires an extra table JOIN for each custom field you want to filter by.
2) wp_postmeta becomes twice as big compared to using WordPress alone
GeoDirectory
1) No join is required
2) GD does not add to the wp_postmeta info, so does not create unnecessary bulk.
3) The database storing listings data counts 1 row per post
WordPress is known for this limitation in how it stores data. In most cases, this system works fine, but when it comes to large directories, it’s just not the right solution.
That’s why with GeoDirectory, you can create a directory with millions of listings, while with WP + Advanced Custom Fields, you are lucky if you can make a directory with a few hundred listings before starting to see major performance problems.
These are the Advanced Custom Fields scalability limits that made us decide not to use it for GeoDirectory, and this is why you shouldn’t use it too.
If you have any questions, feel free to ask in the comment down below.

WordPress localization features allows you to make plugins and themes easily translatable through WordPress Language files (po/mo files).
This is true especially since WordPress 3.7 and it got a whole lot easier since WordPress 4.6.
A lot of improvement has been made to the whole translation system for WordPress, I felt it really needs a refreshed post.
WordPress language files – The confusion ( Developer edition )
For developers, it comes down to how to let WordPress know you have translation files the proper way.
As developers we were told to use “load_plugin_textdomain()” and point this to our language file in our plugin folder.
However in the past this would be the only place WordPress would look and if a customer added their own language file there, on the next update it would be gone!
There was an article on the web a while back promoting using a second call this time using the function “load_textdomain()” to point to a file in the WP language folder and that is what a lot of people did (including us).
This meant that users could place their language files in a predetermined place in the WP language folder and the translation would not be lost on the plugin update.
WordPress language files – The confusion ( User edition )
Users need to know where to put a custom translation for a plugin/theme, the problem is that in the past this could have been in several places.
The WP documentation tells developer to link to a folder inside their plugin folder called “languages” but the developer might use the folder “lang” and even then this will be lost when the plugin/theme is updated.
Some developers would add a second check again in a place of the developers choosing, but often in a custom named folder in the WP languages folder.
This meant there was no consistent way for a user to know where to place their custom translation files safely.
Loading language files the correct way (2017)
Since WP 4.6 this got a whole lot easier for both users and developers!
As a developer you now just have to make sure you are loading your language files correctly, following the WP documentation as below:
<br />
// for plugins<br />
add_action( 'init', 'myplugin_load_textdomain' );<br />
function myplugin_load_textdomain() {<br />
  load_plugin_textdomain( 'my-plugin', false, basename( dirname( __FILE__ ) ) . '/languages' );<br />
}<br />
<br />
// for themes<br />
add_action( 'after_setup_theme', 'my_theme_setup' );<br />
function my_theme_setup(){<br />
    load_theme_textdomain( 'my-theme', get_template_directory() . '/languages' );<br />
}<br />
Notice we fire these on the ‘init’ and ‘after_setup_theme’ hooks, this should mean everything will load nicely.
If you fire it directly or before their respective hooks you can have problems with some strings not translating and plugins to manipulate translations or to create multi lingual websites such as WPML, might not work at all.
As users we now have a convenient and consistently named place we can place our language files.
- For plugins: /wp-content/languages/plugins/my-plugin-en_US.mo
- For themes: /wp-content/languages/themes/my-theme-en_US.mo
The ‘my-plugin’ and ‘my-theme’ being the textdomain of the plugin/theme (usually found in the plugin readme.txt or the theme style.css at the top).
This is a great improvement over the old way and will prevent losing translation on updates in most cases.
In some cases the plugin/theme might already have a new translation in your languages stored on wp.org, if this is the case then it might overwrite your .mo file but in most cases this will be desired.
You can contribute to translations on wp.org if the plugin is hosted there, if it is a premium plugin there there is little chance it will be overwritten.
Bonus information
WordPress will try to find your WordPress language files in several places,for a plugin with a textdomain ‘my-plugin’ it would first look here:
/wp-content/languages/plugins/my-plugin-en_US.mo
If it does not find a translation there and the plugin specifies where to find one locally, it will look there:
/wp-content/plugins/my-plugin/languages/my-plugin-en_US.mo
If the plugin does no specify a path then WordPress will look here instead:
/wp-content/languages/my-plugin-en_US.mo
The WordPress documentation should be followed but in reality from WP 4.6 you don’t even have to specify a local file if you are not including any (if they are stored on the wp.org repo), so you could just add this:
<br />
// for plugins<br />
add_action( 'init', 'myplugin_load_textdomain' );<br />
function myplugin_load_textdomain() {<br />
  load_plugin_textdomain( 'my-plugin');<br />
}<br />
<br />
// for themes<br />
add_action( 'after_setup_theme', 'my_theme_setup' );<br />
function my_theme_setup(){<br />
    load_theme_textdomain( 'my-theme');<br />
}<br />
I hope this clears translations up a bit and if you have any questions or have anything to add please leave a comment below.
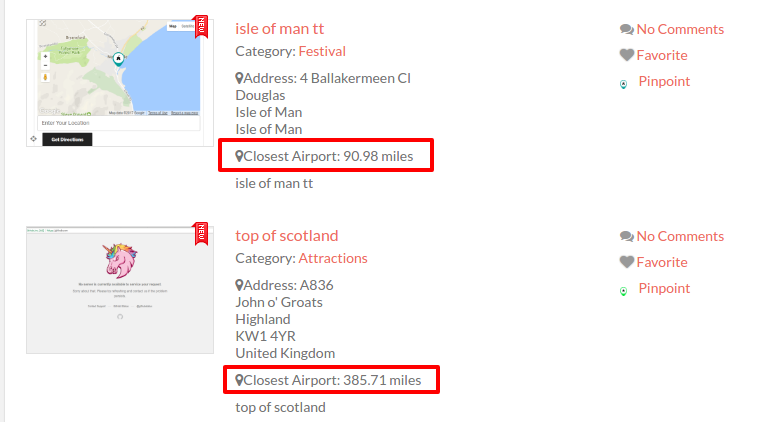
Update Sept 2019
This has been added as a predefined custom field in V 2.0.0.67. The snippet below will only work if using GeoDirectory V1.
The Problem
Today a member had a bit of an unusual request, they are using GeoDirectory to run a local festival and they are listing things like accommodation for it. The request was to show the distance in each listing to the main event so users have a clear understanding of how far it will be to the event from each listing. I do something very similar on one of my own sites that is for one location, i list the distance to the airport and the distance to the main town, i have until now just had users enter this distance manually, this is often wrong and i have to correct it.
The Solution
This seemed like the perfect time to create a new custom field, lets call it “Distance to”. The code is below but there are two ways to use this field:
#1 We could just add the field and let the user enter GPS coordinates, it might be for example a “closest airport” field, the user could then enter the GPS info for the closest airport to them.
#2 In this users case he just needs to show the distance to one place and without the user really needing to even know about the field, so when he is adding the custom field he would set the field as a “admin only” field so it is not shown to the user on the frontend and they can’t change it, and then set the “default value” to the GPS coordinates needed and all listings will then show the info needed.