Featured Listings
Featured listings was built in to GDv1 as a special feature but in GDv2 it has become a standardised feature that can apply to many more things including badges like “NEW”, below are the steps needed to implement this feature.
Setup a custom field
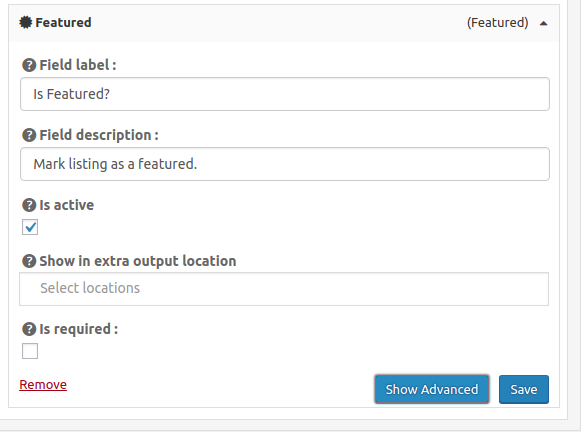
The first thing you need to do is decide on the custom field you wan to implement, for “featured” there is a special custom field you can add under CPT(Places/Events)>Settings>Custom Fields>Predefined Fields>Featured. This field is basically a checkbox that is added to the add/edit listing, by default its set to only be editable by admins but some addons like Payments Manager can also set this field per price package.
After you have added the “Featured” custom field, edit or add a listing and make sure to set it as featured by checking the checkbox, we will use this post as a test post.
(The predefined “Featured” field is just a checkbox custom field with specific settings pre set, you can get the same results with a standard checkbox or any other field but some fields like featured, facebook,twitter etc are used by other addons as the field key is specifically set to a specific name)
Badge setup
Now that you have a listing that is set to featured you can add “badges” with the gd_post_badge widget/shortcode/block to differentiate the listing.
Let’s say we want to add a badge to the listings archive page, we would edit the page template “GD Archive Item template” you can find it quickly under GD>Settings>Pages>Archive item page>Edit. No matter if you are using Gutenberg Blocks or the shortcode builder with the classic editor the settings are the same, you will probably want to add the badge under the title (though you can add it anywhere), we will insert a “gd_post_badge” the settings have details explanations of what they do but the two main settings we want to set are:
- Field Key: Set this to “Featured”
- Field condition: Set this to “is not empty”
Most of the other settings are design based and can let you pick the text/colours/icons that are displayed, a basic example could look like this:
![]()
The badge text can accept font awesome icons so you can use just an icon or an icon and text, you also have the ability to make the badge bigger:
![]()
And you can add multiple badges, for example this is a featured badge and a new listing badge, you can create a new listing badge with the following settings:
- Field Key: Set this to “post_date”
- Field condition: Set this to “is not empty”
- Field condition: Set this to “is less than”
- Value to match: Set this to “+30” (the number of days it will show as new after being added)
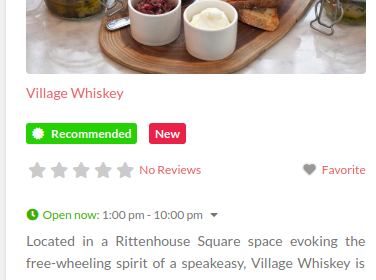
You will also find that the li element is given a class specific to the badges it has so you can add far more granular styling like highlighting the whole post or making the title bigger for featured listings.
![]()
If we give non featured (this could also apply to non-claimed etc) a badge with the following settings:
- Field Key: Set this to “Featured”
- Field condition: Set this to “is empty”
Then we can use the class given “geodir-badge-featured-is_empty” to style listings:
// Make non featured listings greyscale
.geodir-category-list-view li.geodir-badge-featured-is_empty {
    -webkit-filter: grayscale(100%);
    filter: grayscale(100%);
}![]()
// Make non featured listings images blurred
.geodir-category-list-view li.geodir-badge-featured-is_empty img{
    -webkit-filter: blur(10px);
    filter: blur(10px);
}![]()
Sorting
Sorting your listings exactly how you want has never been easier, go to CPT(Places/Events)>Settings>Sorting.
From here you can build exactly how you want your listings to be sorted by default, so lets say we want to order our listing by “featured” first, we would add the featured field and make it active and the default, we can also change the name to something else if we want like “Default” as this will be our default sort option.

Now if we look at a listings page we will see our featured listing first, but you will notice that listings that are not featured don’t have a specific order, you can give each main sort order child sort orders by simply dragging them beneath and to the side of the main soft order, like below:
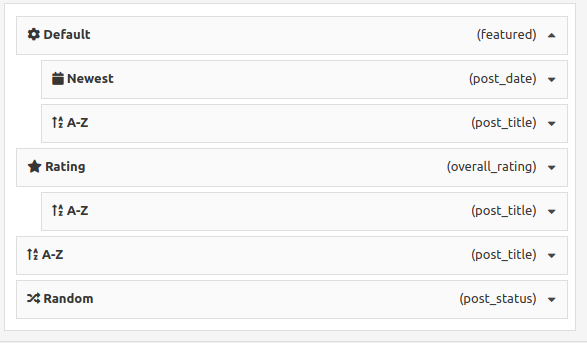
What the above image means is that there are 4 main sort options:
- Default (featured)
- Rating
- A-Z
- Random
The sub items for example for Default (featured) means:
1. featured first
2. if not featured then order by date added
3. if not featured and the date added is the same then sort alphabetically A-Z
The power of this new system is immense and we will be providing more and more examples of how to take full advantage of it.
How can I put the badge on top of the image like the “New” or Featured” banner in V1?
You can also place badges op top of the image. In the Archive template, try placing the badge just above the image.
It helps if you add a special class to the badge. In this CSS example the special class is “.super-special”.
.gd-badge-meta.gd-badge-extra-large.alignright.super-special {
    position: relative;
    left: 50px;
    top: 40px;
    z-index: 3;
}