Import / Export
Listings
Categories
Reviews
Settings
FAQ
Listings
Listings: Import CSV
Configure the options for the import of a CSV of listings.
- Update listing if post ID already exists.
Listings will be updated if the post ID already exists.
- Ignore listing if post ID already exists.
Listing updates will be skipped if the post ID already exists.
- Select and Upload CSV
Choose a CSV from your local file system, then confirm the upload of the CSV.
- Download Sample CSV
Download a sample CSV to review the precise formatting of columns and row data that is expected by on import.
Listings: Export CSV
Configure an export of listings.
-
-
- Post Type
-
Choose the post type for export
-
-
- Max entries per CSV file
-
Select the count of listings that will be exported.
-
-
- Start date and End date
-
Limit the listings exported to a particular time period based on the post creation date.
-
-
- Export CSV
-
Click the button once your export has been configured.
-
-
- Download
-
Download the file and use OpenOffice or LibreOffice for review or edit.
Categories
Categories: Import CSV
Configure the options for the import of a CSV of categories.
-
-
- Update item if item with cat_id/cat_slug already exists.
-
Items will be updated if the ID or slug already exists.
-
-
- Ignore item if item with cat_id/cat_slug already exists.
-
Item updates will be skipped if the ID or slug already exists.
-
-
- Select and Upload CSV
-
Choose a CSV from your local file system, then confirm the upload of the CSV.
-
-
- Download Sample CSV
-
Download a sample CSV to review the precise formatting of columns and row data that is expected by on import.
Categories: Export CSV
Configure an export of categories.
-
-
- Post Type
-
Choose the post type for which categories will be exported.
-
-
- Max entries per CSV file
-
Select the count of items that will be exported.
-
-
- Export CSV
-
Click the button once your export has been configured.
-
-
- Download
-
Download the file and use OpenOffice or LibreOffice for review or edit.
Reviews
Reviews: Import CSV
Configure the options for the import of a CSV of reviews.
-
-
- Update item if review with comment_ID already exists.
-
Items will be updated if the ID already exists.
-
-
- Ignore item if review with comment_ID already exists.
-
Item updates will be skipped if the ID already exists.
-
-
- Select and Upload CSV
-
Choose a CSV from your local file system, then confirm the upload of the CSV.
-
-
- Download Sample CSV
-
Download a sample CSV to review the precise formatting of columns and row data that is expected by on import.
Reviews: Export CSV
Configure an export.
-
-
- Post Type
-
Choose the post type for which items will be exported.
-
-
- Max entries per CSV file
-
Select the count of items that will be exported.
-
-
- Start date and End date
-
Limit the listings exported to a particular time period based on the creation date.
-
-
- Rating
-
Limit the export items based on particular rating.
-
-
- Status
-
Limit the export based on particular status.
-
-
- Export CSV
-
Click the button once your export has been configured.
-
-
- Download
-
Download the file and use OpenOffice or LibreOffice for review or edit.
Settings
Import / Export Settings
Import and export your GeoDirectory Settings between sites or simply back them up via a .json file.
- Import Settings
Select a file from your local file system to import and overwrite site settings.
- Download Settings
Download the file and store in a backup system, or use the file to import settings on a different site.
Customize
For more about using CSS and PHP snippets see our doc about customizing.
Export a single category – Use this snippet to export only listings in a particular category – Snippet
FAQ
Listings: Importing images
When importing listings, you can add image details for the listings in the post_images column. This format is used in other file import fields as well.
In order to allow for commas in the caption, each image statement is ended with a
::double colon.
The structure of the import data in an file image cell is:
URL|ID|TITLE|DESCRIPTION::URL|ID|TITLE|DESCRIPTION::URL|ID|TITLE|DESCRIPTIONFor an import without id, title, or description:
::filename01.jpg|||::filename02.jpg|||::filename03.jpg|||About filenames:
URL
- To upload new images, use the filename like this:
filename.extension- If you already have uploaded the image to an existing listing, the file URL will be shown like this:
https://mysite.com/wp-content/uploads/year/month/filename.extension Note: It is not possible to reference images in the Media Library in this way. This URL is only shown as an example.ID
- Leave this empty when importing new listings.
- When updating listings, include the image ID as exported.
TITLE and DESCRIPTION
- Used as the image title and caption:
- Used as the title and alt tag:
If you want another example, try adding a listing with several images. Hover over the images in the form and add title and descrption to them. Then export the listing. You will see something like this:
Sample Export of post_images field values
https://mysite/wp-content/uploads/2019/05/file01.png|818|Image Title|Image Caption::https://mysite/wp-content/uploads/2019/05/file02.jpg|819||::https://mysite/wp-content/uploads/2019/05/file03.jpg|820||::https://mysite/wp-content/uploads/2019/05/fie04.jpg|821||
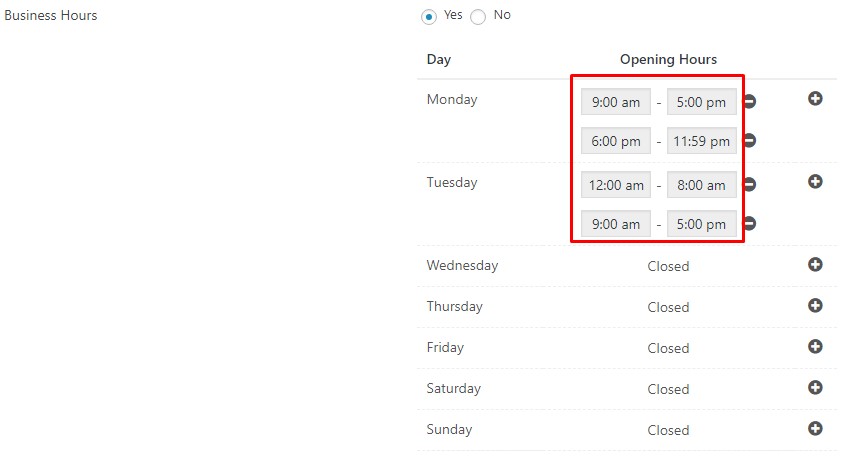
Listings: Business Hours
Business hours can be imported and exported. An example of the format:
["Mo 09:00-17:00,18:00-23:59","Tu 00:00-08:00,09:00-17:00"],["UTC":"-5:00"]To master the format, try adding listings with different examples that are relevant to your directory and then export as described in the recommended procedure below.
Geocode and Reverse Geocode
Assign Category IDs
It is not possible to assign specific category IDs using GeoDirectory options. WordPress creates the ID and assigns it. It is not possible with GeoDirectory import/export and falls outside of support.
Recommended procedure for importing listing data
Complete the Setup of GeoDirectory First
- Enable the Location Manager if you have listings outside your default location. (Failure to enable the Location Manager will results in all your listings being added to the default location).
- Setup maps: Get your Google Maps API key working first (especially if your listings have incomplete address data or are missing lat/lon coordinates so you ca use the superior Geocoding provided by the Google Maps API).
- Set your default location
Create and configure your Custom Post Type
You can use the built in “Places” post type, or create your own with the Custom Post Types addon. In either case, before you import, you should set that custom post type up with all the fields that you want.
- Create your Custom Post Type (or use the built in places CPT).
- Add all the Custom Fields you need for your CPT.
- Add a test listing to make sure all your Custom Fields look and behave as expected.
- Make any necessary changes to the Custom Fields, including re-ordering the fields.
Create or Import Categories
Categories are required. Each category requires the Name, slug, and a map icon. Any category referenced in your import must first be created (completely) in your site under the Custom Post Type that you want to use. See the Categories doc for more info.
When you import your listings, make sure that the category listed as the default category is also listed in the category column.
Once you have imported listings, you will need to run the Term Count tool to update the count of listings in each category.
Do Not Create Locations
- It is not necessary to create locations before importing listings. It is more important to create sample listings in various locations.
- It is recommended to add listings to various locations. Locations are created automatically when listings are added.
Add Test Listings
- Add a test listing for each category. Ex. Title=”Test {category name}”, Category={category name}. This will give you an export that will show you how to map each category in your data.
- Add a listing for each location. This will give you an export that will show you how to map each location in your data and provide you samples that are coming from the Map API of your choice.
- Fill out all your custom fields and image fields, and use multiple images in a test listing. This will show you how the fields map, and give you an example for how images are referenced in exports.
Export Test Listings
- Go to GeoDirectory – Settings – Import/Export – Listings
- Export the listings from the Custom Post Type where you added your categories and test listings.
- Do not use the “Sample Data” file. This file has limited fields. Only the exported listings sheet will contain all your custom fields and be in the appropriate column order.
- Download the CSV Export file.
- Note: You can only edit the file with OpenOffice or LibreOffice Calc. Other editors leave artifacts in saved files that make them unreadable.
Test Import
- Examine the sheet with Open Office or LibreOffice and note that exported listings have a listing ID
- Take notice that the categories are identified by ID.
- Take you downloaded listings export and attempt to re-import.
- Go to the import dialogue and choose the option to “Update listing if post ID already exists.”
- Select your listing file and upload.
- Error? If you see an error, please check here.
- Import
- If no changes were made, there should be no errors.
- Note any errors and report them in a support topic if you cannot address them.
- Make some changes to the file. Try changing the default category of one or more listings, then re-import to see if you made the change correctly.
Merge A Test Set of 5 Records into the Exported Listings file
Now that you have some confidence in the export/import system, you can try merging your data into the exported file format. We recommend you try first with one or two records.
- Open the export file in Open Office or LibreOffice Calc.
- Merge 5 records into the sheet. You will at least need to fill in the required fields including title, categories, and some location data.
- Copy-down location data from the exported listings like country/region/city if it is different. Some country names may be different. See the country file here.
- One by one, copy your data from your sheet, and place it into the appropriate column of the export CSV.
- If you have made any changes to existing listings, be sure to choose the option to “Update listing if post ID already exists.”
- Import the sheet. Address any errors identified during the process ad re-import if necessary.
Merge Data into the Exported Listings file
- Examine the export file with Open Office or LibreOffice. Make note of the columns. Save a backup copy.
- One by one, match the exported column structure to your listing data column structure.
- One by one, copy your data from your sheet, and place it into the appropriate column of the export CSV.
- Map all categories to category IDs.
- If you have made any changes to existing listings, be sure to choose the option to “Update listing if post ID already exists.”
- Import the sheet. Address any errors identified during the process ad re-import if necessary.
- Run the Term Count tool to update the count of listings inside each category.
CSV Error
WordPress does not allow the upload of CSV files (by default). You may see one of several different errors when trying to upload a CSV file, all of which are telling you that you cannot upload a CSV file.
To get around this, install this plugin which makes your site allow the upload of CSV files:
https://wordpress.org/plugins/disable-real-mime-check/Once you have uploaded your files, then you can deactivate and delete the plugin.
Alternatively, you can simply add the plugin code to your theme functions file or use the plugin “code snippets” to add it.
function wp39550_disable_real_mime_check( $data, $file, $filename, $mimes ) {
	$wp_filetype = wp_check_filetype( $filename, $mimes );

	$ext = $wp_filetype['ext'];
	$type = $wp_filetype['type'];
	$proper_filename = $data['proper_filename'];

	return compact( 'ext', 'type', 'proper_filename' );
}
add_filter( 'wp_check_filetype_and_ext', 'wp39550_disable_real_mime_check', 10, 4 );
This issue, not being able to upload a CSV without a workaround, is a result of a WordPress security policy change (not us!) and the verdict is still out about a ‘proper’ resolution. In fact, you may encounter this issue on your site for a number of different reasons (WordPress version, PHP extensions, Multisite rules, the program used to make the CSV file), none of which are related to GeoDirectory code. Check and see that there are several WordPress bugs resulting from the WordPress security policy change:
https://core.trac.wordpress.org/ticket/45615
https://core.trac.wordpress.org/ticket/45633(and many many more)Almost every plugin that accepts CSV uploads was affected by this, including WooCommerce and Easy Digital downloads, both of which have published workarounds that reference the plugin linked above.
All my imported listings are now in the default location after import, what happened?
Make sure to install and setup the Location Manager first before importing listings. See the recommended import procedure above.