The World’s Most Advanced And Scalable WordPress Directory Plugin
Today, GeoDirectory is the only WordPress directory plugin on the market that can scale to millions of listings and withstand the battering of traffic that comes along with that.
Get GeoDirectoryWhat can i do with GeoDirectory?
How the WordPress Directory Theme niche started
When we started this journey, there were only a couple of other players in the WordPress Directory Theme niche.
GeoPlaces by Templatic and Directorypress by PremiumPress.
At that point, Stiofan and I still didn’t know each other. We met in the Templatic forums after buying their theme to build our directories.
However, we found Templatic to be flawed, buggy, and unsuitable for use in developing a live website.
Stiofan started using it, adding fixes to it and making it work for him. It turned into his Barra directory website.
Over 80% of the theme needed major fixes, so we decided to team up, fork it, and create an alternative product.
That’s how we created GeoTheme. After that, Vantage from AppThemes was released and then we saw products popping up one after the other.
Today ThemeForest.net lists 163 items and counting that are a WordPress Directory Theme (last time we checked they were 157).
Several other independent Theme Shops sell their own WordPress Directory Theme too.
GeoTheme ceased to exist over 2 years ago. We decided to turn it into a plugin called GeoDirectory, so webmasters can use it anyway they see fit.
This allows directories to be added to any existing websites without any change being needed to the theme or website.
With so many options, which one to choose in 2021?
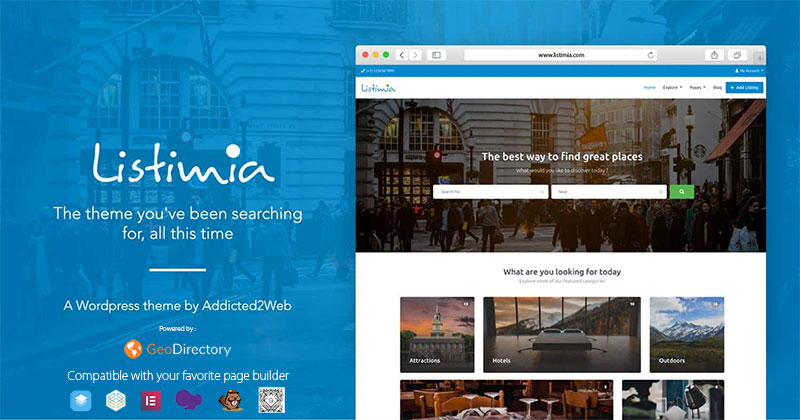
Our 1st answer would be Listimia + GeoDirectory for obvious reasons. Listimia was released in June 2019 and you can see it in this DEMO.
It only costs $39 and revolving around GeoDirectory makes it the most feature-rich Directory Theme for WordPress. Did we say it is sleek, elegant, and professional?
Should you prefer not to make this journey with us, at least let us help you choose wisely.
For that, we bought, installed, and tested the 7 most popular WordPress Directory Themes, so that we can provide scrupulous and objective reviews from specialists of the directory niche.
To praise their Pros and expose their Cons.
Affiliate link disclosure
We hope you appreciate our effort! Having invested $500 to buy all these themes, we need to recoup the investment. Some of the links on this article are “affiliate links”. This means if you click on the link and purchase the item, we will receive an affiliate commission.
Testing Criteria
First of all, we decided to test only 7 themes. The 4 top-selling themes of the moment from ThemeForest.net and the 3 top rankings on the Google.com SERP for the keyword “WordPress directory theme”.
They are:
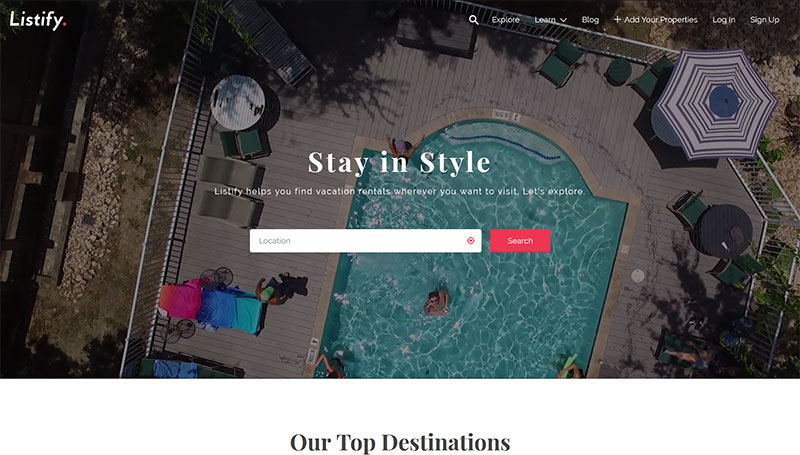
1) Listify by Astoundify
2) Listable by Pixelgrade
3) ListingPro by Cridio Studio
4) MyListing by 27collective
5) DirectoryEngine by EngineThemes
6) Vantage by AppThemes
7) Directory by Templatic
We will test and evaluate them for:
1) Ease of use
2) Design quality
3) Flexibility
4) Use of SEO best practices
5) Quality of support & documentation
6) Quality of code, use of WordPress best practices, and scalability
Why didn’t you review this or that other theme too?
Because of time restraints. There are hundreds of them and we couldn’t review them all. We picked the theme for which the market was showing the strongest preference.
Listify by Astoundify
Ease of use
Installing and setting up this theme was as straightforward as could be.
The setup guide allows you to set up a staging website in less than 5 minutes.
The only tedious part is the procedure to get the Google Maps API Key, which was more of a struggle than anything else in the rest of the install wizard.
I suggest the authors look at our API KEY for Google Maps plugin.
They’ll learn how to streamline the procedure from several steps to a couple of clicks.
Design quality
Listify design is outstanding and easily customizable and should prove accessible even to users with little to no coding/CSS knowledge.
The “Customizer” section contains Style Kits and other options for the user to modify the website style like the logo, elements colors, labels, and typography.
Flexibility
A 3rd party plugin, called WP Job Manager, actually powers the theme, so
there are few built-in options for the management of fields and links.
The first thing that I wanted to test was custom fields to see how Listify handles the posts meta.
I was surprised to find that it basically doesn’t actually handle fields very well.
If you want to add a custom field to the front end add-listing form and listing pages, you have to add code snippets to your child theme or buy yet another premium plugin.
Search filters by custom fields as a consequence are not available. You can filter by location, by category, by keyword, or by tag.
With an extra premium plugin called FacetWP, you can extend that, but I didn’t test it and I can’t say to what extent.
Listify is compatible with WPML, but Polylang is recommended to create a multilingual website.
Use of SEO best practices
The location field is a taxonomy. Because of that, this theme is more suited for a local directory. Bootstrapping a successful website with multiple locations could be next to impossible.
You can search and filter by category and location. But you can only browse archives of listings by location OR by category. For Directories with listings from more than one city, this is a huge SEO limit.
If you want to see the “Private Room” listings in San Diego on the Listify demo, you can only do that by using their search engine. If you copy the URL returned :
and paste it a new browser window, you will see that it won’t show “Private Room” listings in San Diego, but a generic search results page.
This is SEO unfriendly.
You can’t handle SEO meta with SEO Yoast for similar search results pages.
No relevant Title. No relevant metas. Nothing in the URL to help Google index your website for “Private rooms in San Diego”.
For a good directory there should be an archive under a similar structure:
listify-demos.astoundify.com/rentals/united-states/california/san-diego/single-room
That structure allows to assign a unique meta title and meta descriptions and it would be 100% SEO optimized.
Listify handles Rich Snippets but it integrates them in the most basic way possible.
Quality of support & documentation
The documentation is extensive and clear. Support is also polite and efficient.
I submitted one query via comments on the product page and received a response in less than 24 hours.
Quality of code, use of WordPress best practices, and scalability
Out of the box, because it doesn’t use Custom Fields, Listify is scalable, in a similar manner to how WordPress is for posts and pages.
Adding custom fields to the equation, via code snippets or plugin, would quickly degrade performances. This because of how the custom fields are saved in the database.
Code Comments: In general, the code quality is good, lots of the important functions have code comments, but there are still many without any comments or that lack full descriptions, and as such would not be up to WordPress standards.
Actions & Filters: The theme has 134 do_action() and 187 apply_filters() which is good to see (in general the more actions and filters the easier it is for developers to work with).
Escaping (security): Seems good and up to WP standards.
Listify conclusions
While great design and quick setup are definitely obvious pros, this theme is, unfortunately, totally dependent on other plugins. In our opinion, Wp Job Manager is less than ideal for building a business directory.
Since Astoundify has been sold and we don’t know the new developers, I can’t guarantee that Listify is still as stable as it was when we 1st tested. If and when we’ll get the time to check the latest updates, we’ll report here.
Listable by Pixelgrade
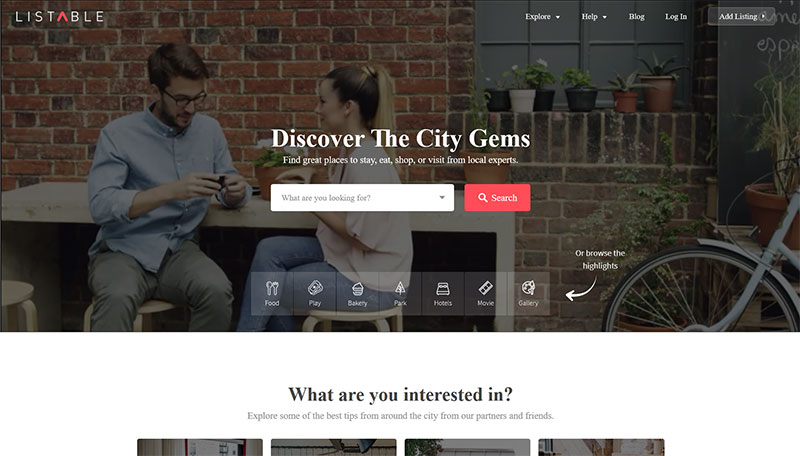
Ease of use
Listable gave a very good first impression, although it wasn’t as smooth and fast as the previous one.
After a few minutes of work, my staging website looked similar to the Listable official demo.
Listable features Mapbox integration. Mapbox is an alternative to Google Maps, although it offers only 1600 map views per day and becomes pretty expensive after that, so it’s not a great choice.
Google Maps is available. They require adding the API key manually, which is time-consuming. Listable’s authors should have a look at what we suggested to the Astoundify team about this.
Design quality
Listable’s major strength is its sleek and pixel-perfect design.
Their customizer options allow the editing of most elements. Tweaking Colors Schemes, Managing Fonts, or adding Custom CSS
Flexibility
Just like Listify, Listable’s weakest point is the plugin powering the directory. WP Job Manager, which I think is far from ideal for a business directory.
Again, in order to create custom fields, you need an extra premium plugin or extra code. The only difference is the Locations that are not a taxonomy, but a post meta.
An extra taxonomy offered is the listing types. I didn’t see their utility because they appear to be for admin only.
Listable is fully compatible with WPML. I tested it and can personally confirm.
Use of SEO best practices
Even though the Location field is not a taxonomy (it is a custom field), the issues are the same that we saw with Listify.
Google will never index your category archives by city (if you have more than one).
A Directory of Hotels located in several cities, including New York, will not rank for keywords like “Hotels in New York”.
With this structure is better to create a single city or a hyper-local directory only.
Listable handles Rich Snippets, but it integrates them in a basic way.
Quality of support & documentation
The documentation is extensive and clear and support is polite and efficient.
I submitted one query via comments on the product page and received an answer in less than 12 hours.
Quality of code, use of WordPress best practices, and scalability
Out of the box, because it doesn’t use Custom Fields, Listable is scalable just like Listify.
But like Listify, if you try to add custom fields performance problems quickly arise.
Code Comments: Some code comments exist, but most functions are un-commented and ones that have comments are not up to WP standards.
Actions & Filters: The theme has 141 do_action() and 136 apply_filters() (in general the more actions and filters the easier it is for developers to work with).
Escaping (security): Mostly good and to WP standards though I would like to see all POST data escaped even in the backend functions.
Listable conclusions
Great design and easy setup, but same problems as Listify, as again their choice to use WP Job Manager limited their potential.
Also, because most of the plugins are premium, I couldn’t test them all. Buying them all would bring the total investment to over $300.
For example, I couldn’t test paid listings, claim listings, bookmarks, and listings tags. All monetization options come at an extra cost.
The same consideration I made for Listify is valid for Listable too. It’s a shame that it’s not compatible with GeoDirectory. Plenty of our current members would have bought it.
ListingPro by Cridio Studio
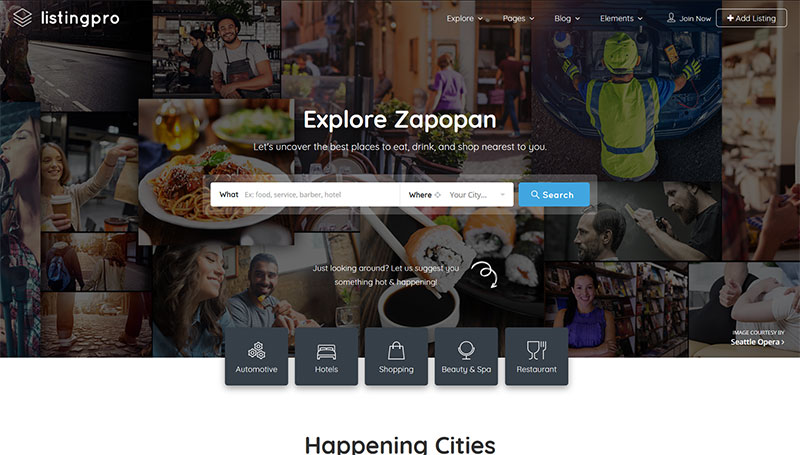
Ease of use
Things didn’t go very smoothly with ListingPro at first. I unzipped the archive and found 5 zip files in it:
- Documentation-1.0.zip,
- listingpro.zip,
- listingpro-Bulk-import-addon.zip,
- listingpro-child.zip, and Live-demo-Content.zip.
I installed both the parent and the child theme and activated the child theme. I was redirected to the setup wizard page, where the first step requires installing the mandatory and recommended plugins. This step failed and I couldn’t proceed.
I had to ask for support, which, fortunately, was very fast in getting back to me. They explained that to set up everything I had to activate the parent theme. This shows the process is buggy because activating the parent or child theme shouldn’t change anything.
If it’s better for the setup process to activate the parent theme first, why not hide the child theme zip file and add a step to the setup wizard that installs and activates the child theme once everything else is done? (Like Listify does.)
In any case, after activating the parent theme the problem was gone and I had a staging website similar to their official demo to start my tests.
The author added a default Google Maps API key, to avoid users seeing an error on their maps when first visiting the website.
This is good and bad.
It’s positive to avoid showing an error to the users at first. But that API key will quickly reach its limit, all users that missed changing it and will be presented with the map error. Possibly when their website is live, which is worse.
And, as in the two previous themes, with ListingPro you can’t fetch the Maps API automatically.
Design quality
The front-end design for ListingPro is outstanding and the customization options are limitless, but the excessive use of colors on the dashboard is a bit grating and quickly becomes an eyesore.
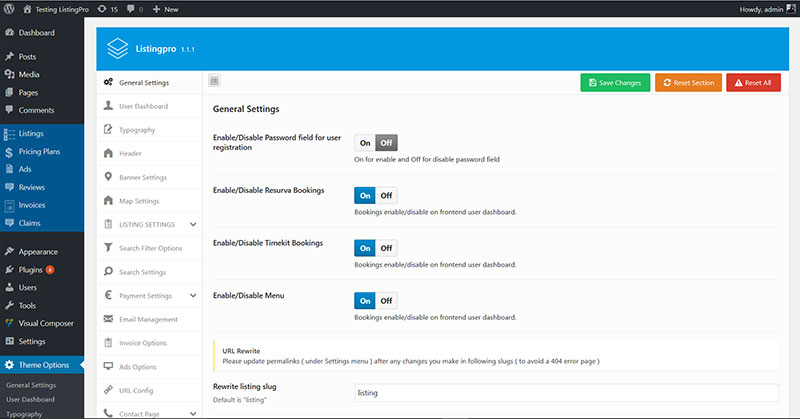
I prefer when plugins and themes blend graciously into the WordPress UI, using its original styles and elements.
ListingPro doesn’t use the Theme Customizer for its styling and customization options. Being all in the dashboard theme options means that you can’t preview your styling changes while doing them.
Flexibility
ListingsPro is a WordPress Directory Theme that comes with all Directory features built-in. It doesn’t rely on 3rd party plugins to operate the directory portion of the theme.
This is a big advantage, especially for those on a tight budget.
Unlike WP Job Manager, ListingsPro handles custom fields. You can create fields of the following types: Text, Checkbox, Checkbox (Switch On/Off), Multi check, Radio, and Select.
Custom fields are unavailable as advanced search filters and are only used as Additional Business Info. Advance search filters are predefined and the admin cannot edit them. They are Price, Open Time, Highest Rated, Most Reviewed, and Categories.
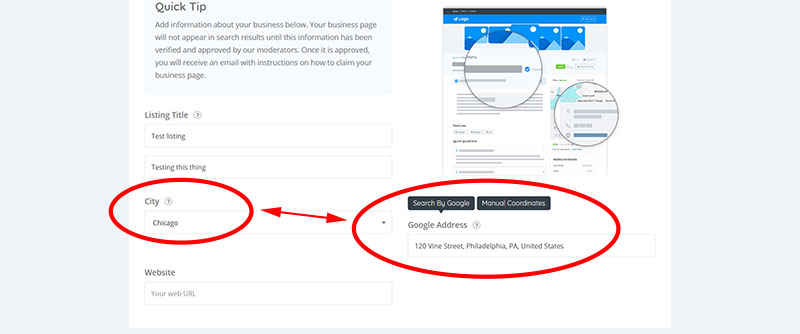
Locations are a Taxonomy and the add listing page requires to select a location. This means that if you want to build a countrywide directory, you must enter all Cities of that country in advance.
Because there is no proper validation, you can input an address from a city (even if is not valid) and select a different city as your location. This is sloppy design, and could really use a more thought out approach from the designer.
Another taxonomy offered is: “features”. Features are category dependent. A taxonomy nested within another taxonomy.
ListingPro features two options for monetization: Paid listings and ads. Paid listings allow the enabling and disabling of a few options.
You can show or hide: Contact information, Google map, Video, and the Gallery.
Paid Ads give listing owners the option to buy extra impressions in featured areas of the theme. This is very interesting but its implementation is pretty basic. For example, you can only set one price and ad duration per ad slot.
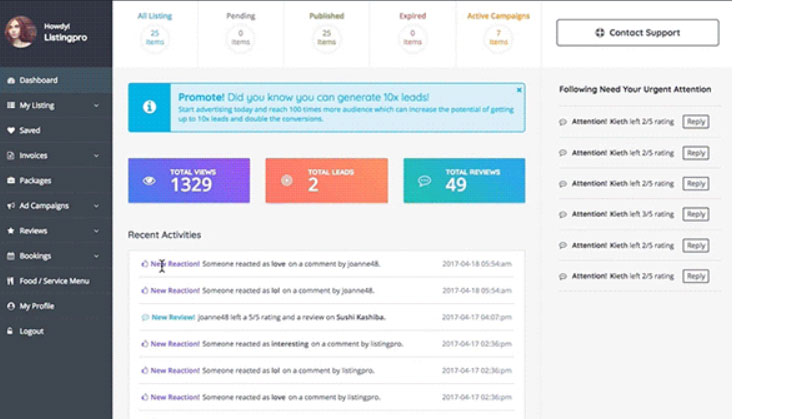
Our favorite section of this theme is the User Dashboard. It is very well thought out
Use of SEO best practices
ListingPro has the same flaws in this aspect that the previous two themes had. It doesn’t provide Search Engine friendly archives of categories filtered by location.
Not really suitable for a Directory covering multiple cities, it can be used for a hyper-local or city directory with a limited number of listings.
ListingPro doesn’t handle Rich Snippets.
Quality of support & documentation
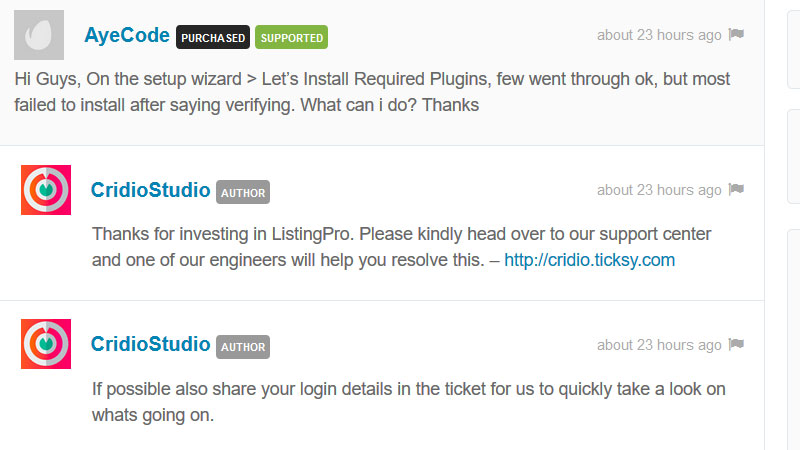
Documentation is not 100% complete and it can’t be searched. Support is extremely efficient, we posted 1 comment and received a reply within minutes. I was invited to use their ticketing system, which was a positive and user-friendly experience
Quality of code, use of WordPress best practices and scalability
The manner in which data is stored in the database makes ListingPro the worst theme so far, at least in terms of performance and scalability. Everything is saved as posts and post meta. Listings, Prices, Ads, Reviews, Invoices, and Claims are all post types.
With a total of 9 listings, I had 82 rows in the wp_post table and 1340 rows in the wp_postmeta table.
Building a directory with thousands of listings using this theme would be literally impossible without spending a fortune on hosting.
Code Comments: Very basic comments exist for some things but in general most things have no comments. I did not find any comments up to WP standards.
Actions & Filters: The theme has 14 do_action() and 31 apply_filters() (in general the more actions and filters the easier it is for developers to work with).
Escaping (security): Very poor escaping and we actually found an extremely serious XSS vulnerability during our basic checks (we have reported this to the author)
ListingPro conclusions
A great design with some very good ideas, but an overall immature product with too many major architectural flaws.
It reminds me of Templatic’s GeoPlaces.
It is obvious that the author studied the graphic side of this project in great detail. But it is also evident that whoever wrote the code had little to no experience building high-performance scalable applications.
They also need to learn how to make their code secure. Codewise this is the 3rd worst tested theme.
ListingPro is currently not suitable for a live application in our opinion.
MyListing by 27collective
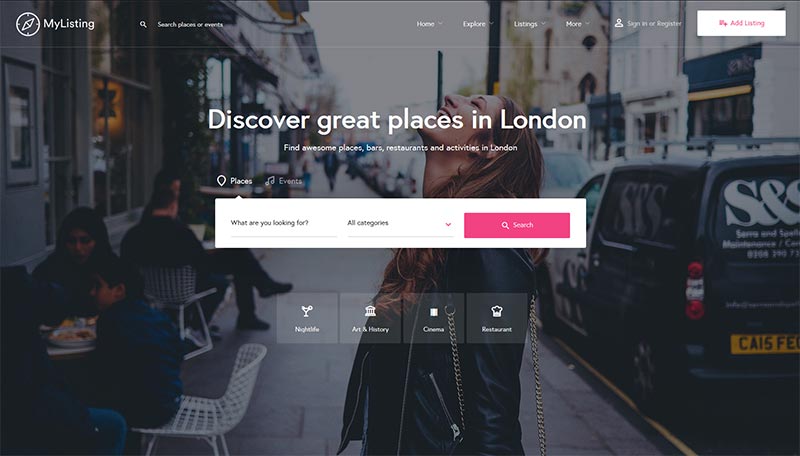
Ease of use
I started installing MyListing in a multisite network but had a hard time recreating a demo through WP All Import. That is their suggested tool to import dummy data and create a demo. I’m not sure if this is a known issue or if missed something.
When I tried on a standalone WordPress install the problem was no longer there and I was up and running with a demo very similar to their official demo in just a few seconds.
MyListing requires several plugins to be installed:
- Wp Job Manager
- WooCommerce
- Elementor
- All-in-One WP Migration
- Contact Form 7
Because of this, fast loading pages are to be expected on high-performance servers only.
Even their demo is not extremely fast and loads on average in 7.4 secs when tested from 20 locations.
On a live directory website that would result in a very high bounce rate.
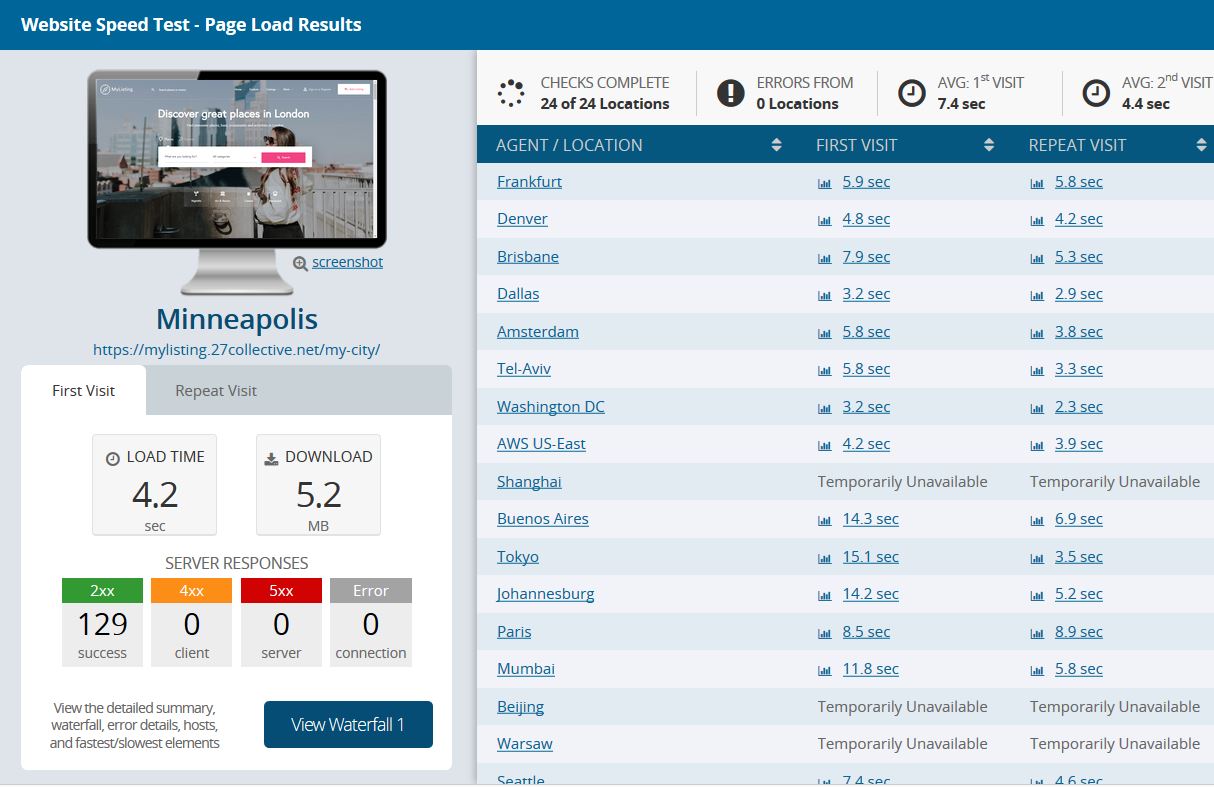
We used this speed loading test tool to get those statistics.
As with all previous themes tested MyListing won’t allow you to fetch the Maps API automatically.
Design quality
MyListing is highly integrated with the Elementor plugin and offers a lot of customization options. You can basically design most of it through the Elementor page builder.
You can customize the home page, the explore page (search), and a few other templates. You cannot edit the listing detail page.
The general design quality is outstanding, although I find the typography to be slightly too small for modern standards and hard on the eye.
MyListing is another theme that doesn’t follow WordPress standards and avoid using the Theme Customizer, for its styling and customization options.
Flexibility
MyListing uses WP Job Manager as a base for the directory and shares the same limitation of Listify and Listable. They integrated the Advanced Custom Fields plugin for some theme options, and also built their own custom fields system.
Prices are set through WooCommerce, as products and the payments are managed by WooCommerce too.
In our opinion, this is a bit too much. We developed a lightweight plugin called Invoicing plugin to manage payments for GeoDirectory because any other e-commerce system was adding an excessive amount of useless code to the directory.
For example, you’ll have a system to manage parcel shipping, on a website that doesn’t ship anything.
Use of SEO best practices
MyListing has the same flaws in this aspect that the previous 3 themes had. Custom Taxonomies are used for categories and locations, which means that it’s impossible to visit a page showing listings of 1 category for a specific location with a nice SEO optimized URL.
Mylisting handles Rich Snippets, but it presents few errors too.
Quality of support & documentation
The documentation appears to be complete and it can be browsed via the sticky menu on the left sidebar. We haven’t tested support, but I don’t see negative reviews for inefficient or substandard support, so they must be doing a good job.
Quality of code, use of WordPress best practices, and scalability
Because they used the default WordPress architecture for custom fields, scalability for MyListing will be a huge problem. I created 1 test listing with 5 images and that resulted in 7 rows in the wp_posts database table and 59 rows in the wp_postmeta database table.
MyListing conclusions
It’s definitely aesthetically pleasing, and, being easy to customize via Elementor, is a great tool for the beginner Directory Developers, but most of the projects built with this theme will have a very hard time scaling their business if the website starts getting traction.
This theme forces you to install:
Wp Job Manager, Wp Job Manager WC Paid Listings, Elementor, WooCommerce, and their own MyListing Add-on. It couldn’t get more bloated.
Someone may wonder why they have mostly 5-star reviews and no negative reviews at all. This struck me as suspicious, especially considering the flaws that we identified in this theme.
Apparently, people who leave negative reviews have been banned from getting support and updates.
That made me discover that Envato deletes reviews made by people who received a refund for any given product. I consider that an awful business practice by Envato.
While I’m not suggesting that this is MyListing authors standard behavior with customers, I can personally tell that they have a hard time dealing with negative feedback, because they also contacted me directly asking me to modify this review.
I’d suggest they take negative feedback as information to improve their product, rather than taking it as personal offenses and witch hunt anyone that dares to critique their product.
You can make a great-looking website with MyListing, but it will be slow to the point of becoming unusable if hit by a decent amount of traffic.
DirectoryEngine by EngineThemes
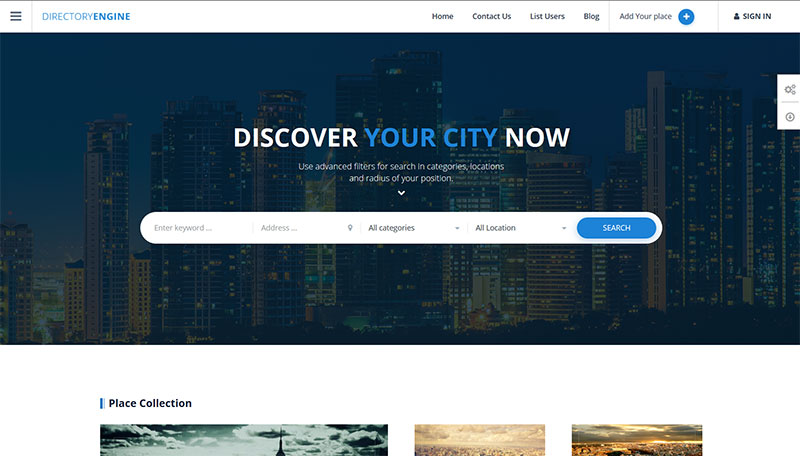
Ease of use
I’m not a fan of Themes that come with bundled plugins. Because most of the time the bundled plugins are out of date. You have to start the install by updating 1 or more plugins via FTP because the bundled plugin can’t be automatically updated (unless you buy a license for that too).
DirectoryEngine comes with 2 bundled plugins: Revolution Slider and Visual Composer, of course, both were outdated, and I had to update them via FTP.
The documentation tells to install the dummy data using the WP Importer plugin, and the theme provides a tool to automatically import it.
Like all 3 previous themes, the Google Maps API key must be generated manually.
All in all, it took me approx 15 minutes to get a staging site similar to their demo. That’s not too bad.
Design quality
The quality of the design is high, but not as pixel perfect and comparable to the previous 3 themes.
Customizer options allow to modify the sections of the home page and the general website colors only, and there are few really substantial design options.
Flexibility
DirectoryEngine is one more WordPress Directory Theme that doesn’t handle custom fields out of the box. They can be added, but only programmatically.
If you can’t create custom fields, you also cannot use them as search filters.
There are 4 custom post types: Places, Events, Packs, and Testimonials.
Places are used for listings.
Events are special offers that listings owners can add.
Packs are for listing prices.
Testimonials are not clearly defined and have no obvious use.
You can create unlimited listing prices, but all they do is limit the number of places and events that a user can enter and the length of their availability. There are settings to determine how many pictures or categories a listing can accept, but that will affect all prices.
Locations are items of a taxonomy.
Just like ListingPro, while adding a listing, you can select an address from a city and in the location field,m you can select a different city.
At the time of writing, DirectoryEngine is several years old, and I find this to be unacceptable. What’s worse, they describe this as a “feature” in the documentation:

Use of SEO best practice
DirectoryEngine has the same SEO flaws of all Themes tested so far.
Being location a taxonomy, there is no way to browse archives of listings of a given category filtered by a defined location. The only way to do it is via their search engine, which is not SEO friendly.
The way locations are handled is amateurish at best. You can rank a website made with DirectoryEngine on major Search Engines only if the directory accepts listings for 1 city or for a smaller geographical area.
DirectoryEngine uses rich snippets correctly.
Quality of support & documentation
The documentation seems to be slightly outdated, however it covers all features of the theme. Support replied within 24hrs the first time. The second time, when we reported a serious vulnerability in their theme, they didn’t reply at all.
Quality of code, use of WordPress best practices, and scalability
With 4 listings, 7 events, and 3 prices the post and postmeta tables have respectively 311 and 936 rows. I see here the same scalability problems that ListingPro has: insurmountable.
Code Comments: Most things have code comments and most are to WP standards though parameters, for the most part, lack descriptions, in general though, it is better than the vast majority.
Actions & Filters: The theme has 100 do_action() and 137 apply_filters() (in general the more actions and filters the easier it is for developers to work with).
Escaping (security): I started checking this code and the first 3 things I found had exploits such as XSS, login page spoofing, and the ability to view or delete content from the site.
DirectoryEngine conclusions
I had high expectations for this theme and after testing it, I can’t help but say that I’m disappointed. For a product that has been available for several years, it still has critical flaws, despite being widely used. I wouldn’t hesitate to ask for a refund if I had purchased it for my own personal use.
There is definitely a fine designer at work behind this theme, but the quality of the back-end application is rather unprofessional.
I would have to conclude the authors have very little knowledge of security and scalability. No one should ever install this theme on their site.
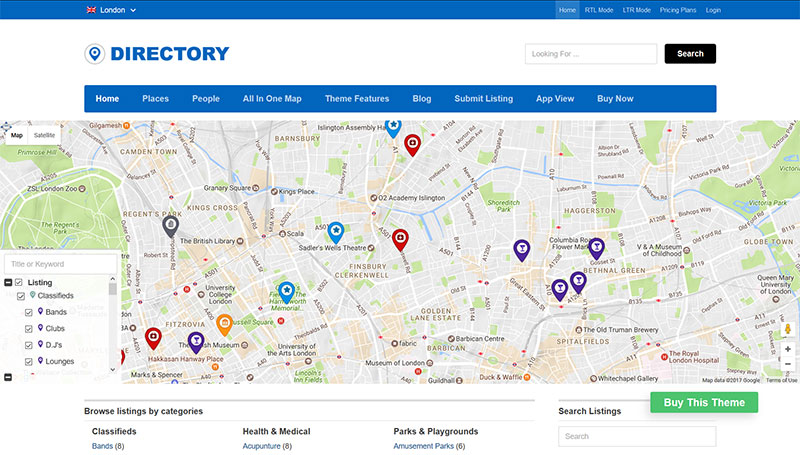
Vantage by AppThemes

Vantage has been around for several years, and as such it’s the most mature product on this list. It has been recently re-designed, and I have considered this a direct competitor for a long time. I was very curious to finally get my hands on it and properly evaluate it.
Ease of use
Installing and setting up Vantage was a very enjoyable experience. The setup guide is as good as the Install Wizard of Listify. I had a demo website that looked similar to the AppThemes original demo in less than 5 minutes.
The only weak point is the Google Maps API key requirement that could be streamlined, just like for the previous 4 themes.
Design quality
The new flat design is modern and clean, a huge step ahead compared to the old Vantage design.
The customizer options allow modifying the site identity elements like the logo and site icon. Color schemes, the color of individual items, background image, and layouts.
Flexibility
Out of the 5 themes tested so far, Vantage is the first that really handles custom fields. Because you can’t use them as an advanced search filter though, they are not as useful as they could be.
The location field is a text field. It calculates Latitude and longitude coordinates automatically from whatever the user input in it. The lack of validation on this field allows users to enter just about anything. Saving the form after inputting an invalid address returns PHP warnings.

The price option allows the setting of recurring and non-recurring prices. Limit the number of categories that a user can select for each listing. Set the listing duration period and featured status for search and category archives.
Available payment options out of the box are Paypal and Bank Transfer. There are extra payment gateways, child themes, and other premium extensions that come at an extra cost. We didn’t test any of them.
Use of SEO best practice
Just like the other themes, the Location part of Vantage is not ideal. It is not sufficient to create a decent Directory structure with listings submitted for more than 1 location.
You can rank the listing detail page and the category pages, but not by location. This because the only way to browse listings by location, is via the search engine that returns non SEO friendly results page, with URLs like this:
yoursite.com/listings/?ls=test&location=milan&st=listing&lat=0&lng=0
There is no way to assign a unique meta title and description to these search results pages. Because of that, it’s very improbable that Google or other search engines will rank them for relevant keywords and locations.
Vantage handles Rich Snippets, but it integrates them in the most basic way.
Quality of support & documentation
The documentation for this WordPress Directory Theme is extended and very well organized in 4 sections:
- Documentation – Install guides, release notes, and more.
- Tutorials – Our themes and plugins tutorial library.
- Developers – Our API documentation. Extend our products.
- Sellers – Documentation for our Marketplace sellers.
Support is very kind and helpful. I submitted a support request via their support forum and got an answer within 24 hours.

Quality of code, use of WordPress best practices, and scalability
Vantage doesn’t employ a database structure that is ideal for a directory. With only 3 listings, the wp_posts table had already 49 rows and the wp_postmeta 246. The use of extra custom fields would make the second figure grow exponentially.
Scalability problems could arise very soon without investing enough resources in high-end server infrastructure.
Code Comments: This is very well commented and most code comments are to WP standards, seeing so much quality code comments give a developer confidence.
Actions & Filters: The theme has 238 do_action() and 230 apply_filters() (in general the more actions and filters the easier it is for developers to work with).
Escaping (security): Security and WP standards were up to scratch. No major problems could be identified.
Vantage conclusion
Great design and excellent setup procedure. A directory can be set up and used within minutes. It is effective for use on a single-city directory.
However, it is unsuitable as a directory for a region, country or world-wide directory. It wouldn’t be SEO friendly.
Of the 7 themes tested, I would have to conclude that Vantage is definitely the best overall product.
Directory by Templatic
Ease of use
I tested this theme when it was first released, and I was unimpressed. However, the latest version left me pleasantly surprised. It’s fast, easily-installed, and makes import dummy data easy. I was able to set up a staging website identical to their demo in just a few minutes.
The level of improvement is impressive.
Design quality
When it was first released in early 2014, the design was modern and sleek, however now it starts to be a bit outdated, and while they provide several child themes with different designs, they all come at an extra cost.
Some of the design options are available in the customizer section, some in the theme setting. It’d be more convenient to have them all in the customizer.
Flexibility
Directory is by far the most flexible of all 7 tested themes in terms of features.
It handles Custom Post Types (Listing types), and for each Custom post type, you can create any kind of custom fields. Finally, you can use all custom fields as advanced search filters.
The theme database comes with all Countries listed and almost 4000 regions. The system creates cities when adding listings, but there is no tool to merge them, in case of typos or other database errors. This is something that shouldn’t be missed when users can add locations to the database.
Strangely, even though there are regions and countries, you are unable to browse listing by region or country, only by city. It’s a step forward compared to the other 5 themes, but still far from ideal. An ideal directory would include the option to browse by “All locations”, country, region, city, and neighborhood.
Money-making and business opportunities are very good. You can set prices with good flexibility. You can set Prices for “single submission” or for “subscription” including a set number of listings. Set them recurring or as one-time fee payments. Also, add an up-sell price for each category. Another option is the duration of the package and the featured placement of the listing.
Use of SEO best practices
Even though with Directory you can finally present archives filtered by category + location, the amount of flexibility in managing Titles and Metas is close to non-existent. You can create a category description, but that will be the same for all locations.
We are still very far from an ideally SEO optimized directory tool.
Directory handles Rich Snippets, but it integrates them in the most basic way.
Quality of support & documentation
The docs are very well organized and easy to search. Although their support team replied to my support request within 24hrs, they couldn’t understand my question, despite being pretty straight-forward.
Quality of code, use of WordPress best practices and scalability
Buggy code was what we best remember about Templatic’s themes. Directory is no different.
We found options that don’t save, security holes, and a deficient database structure.
The database structure is the worst of all Themes tested. With 13 listings, 15 pages, and 4 posts, the post table has 105 rows and the postmeta counts 1,308 rows.
Finally, the advance search widget queries are SQL killers. They JOIN the postmeta table once for each custom field that you filter.
Scaling this Directory Theme beyond a few hundred listings could be next to impossible.
Code Comments: Most things have some sort of code comments, somethings are to WP standards but not everything, maybe 50/50.
Actions & Filters: The theme has 487 do_action() and 319 apply_filters() (in general the more actions and filters the easier it is for developers to work with).
Escaping (security): Most things are escaped, but there are still lots of things that are not which could lead to XSS on the backend. In general, the code is sloppy with many PHP warnings and Notices and, in many places, lacks basic security checks for things like sending emails and SQL injection.
Considering the previous points, Directory isn’t something I would want to run on my server.
Directory conclusions
Compared to GeoPlaces of 4 years ago, the theme shows a lot of improvements. Especially in terms of new features and options, but the underlying structure is the same. Not scalable and buggy.
Final Conclusions
We were pretty shocked to discover that half of the themes tested were so poorly coded.
Similar products can undermine WordPress’s reputation in our opinion.
The quality of the backend application should always be equal or superior to the quality of the design.
If it’s unable to meet the standard of design then your customer is receiving a product that doesn’t match what was promised.
Obviously, we advised the Themes’ authors about the possible exploits and as far as we know the ListingPro authors already corrected its XSS vulnerability.
Apart from that, Vantage ranks #1, Listify #2, Listable #3, ListingPro, MyListing, and Directory tied #4 and DirectoryEngine is by far the worst.
The last four themes in our opinion are not suitable for a production website.
A message to the authors of Directory Themes
Why would you bother to build the directory features of your themes from scratch (or use a plugin that’s not made for it)?
If you had to develop an E-Commerce theme today, would you build the entire shopping cart or use WooCommerce for that?
Without a doubt, GeoDirectory is far superior to the Directory options included in all of the themes that we tested.
You are still in time to correct that mistake and let us handle probably 90% of the support requests that are sent your way.
Cooperating is better than competing 🙂
We hope you enjoyed this extended review and should you wish to add anything to it, please do so in the comments down below!
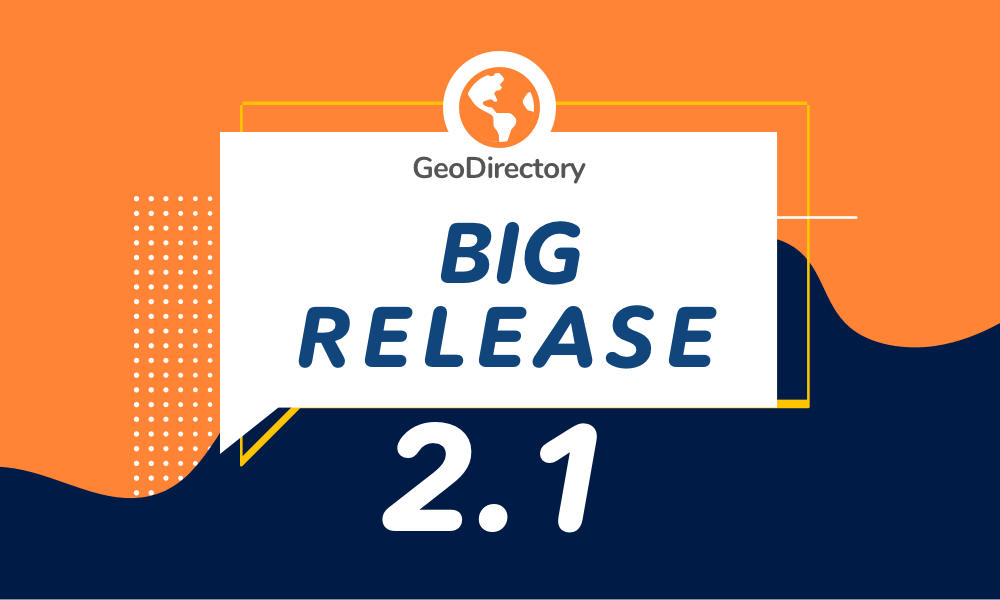
The first and most important new feature of GeoDirectory version 2.1 is the implementation of the AUI (AyeCode User Interface).
AyeCode User Interface
The AUI is based on the bootstrap framework, with our own features added on top of it.
This system allows us to load the minimum amount of CSS and JS whether you have one of our products installed or ALL of our products installed.
AyeCode User Interface is all about websites’ page speed and consistent beautiful design.
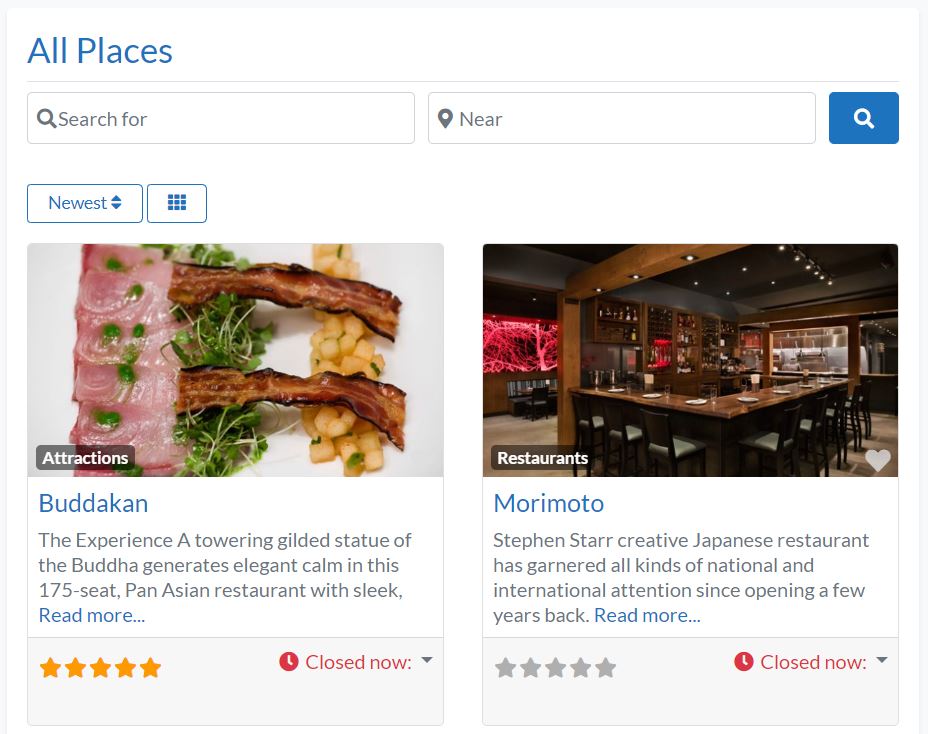
A vanilla install of GeoDirectory now looks simply outstanding on any theme, out of the box.
The AUI is now used by all of our products and themes.
We introduced it first in our WordPress user registration plugin called UsersWP in October 2019.
Finally, we were able to extend its use for GeoDirectory.
Both the core plugin, all its add-ons, and our WordPress Directory themes, like the Whoop theme, the Directory Starter, and its child theme the Supreme Directory.
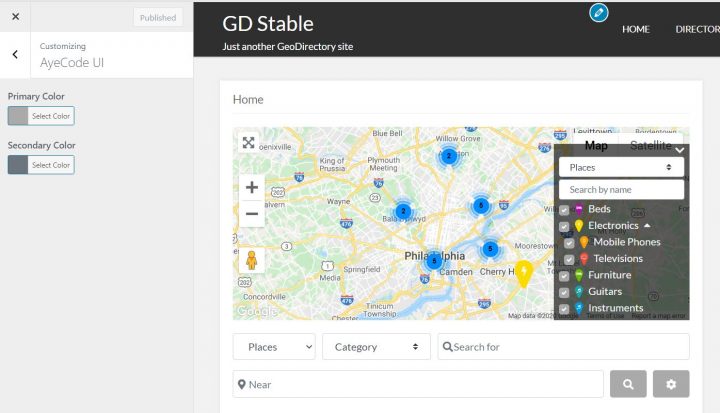
AUI Colors settings
Colors settings for the AyeCode UI can be found in Appearance > Customize > AyeCode UI
Switch from legacy styles to AUI
If you are updating from a previous version of GeoDirectory, the new styles are disabled to avoid messing with your current design. Switching from legacy style (old design) to the Bootstrap based AUI, is very easy.
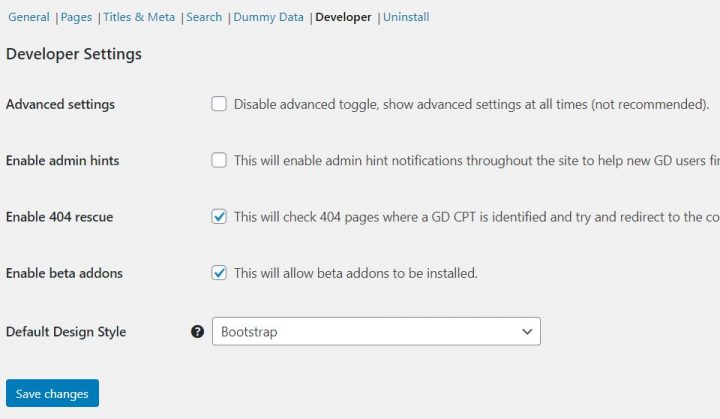
Go to GeoDirectory > Settings > General > Developer and select “Bootstrap” in Default Design Style.
For new installs, the new styles are set as default.
Important note for our theme users
If you are using one of these themes (Whoop, Starter, or Supreme) and you want to keep using the legacy styles, you should stick with the version you have installed right now.
Blocks in Templates
Until the last version of GeoDirectory, you would find shortcodes composing the templates’ pages.
From version 2.1, you will find Gutenberg blocks by default (if Gutenberg is used).
If you want to take full advantage of the new block-based templates when upgrading (new installs get them by default)
- Delete all GD page templates that you want to replace (they must also be deleted from the trash folder)
- Go to GeoDirectory > Status > Tools > Create default GeoDirectory pages.
The improved blocks, also feature a few new design options.
Maps lazy load
2 years ago, Google Maps started charging for calls made to their API.
Thankfully, the $200/month free usage was enough for most niche web directories.
However, with Google upgrading websites’ page speed as one of the most important ranking factors in 2021, loading the maps on all pages in no longer a good idea.
Lazy load maps is now an option in your general settings.
You can choose to load them when they scroll into view or load them on click.
Interactive maps are consistently one of the biggest bottlenecks for page speed scores.
Our solution will dramatically speed up load times for your site.
When maps are not displayed above the fold, both options will increase your site speed scores.
If the map is above the fold, we suggest using the click to load map option for optimal results.
Big directories with high traffic and page views, will be able to save a lot of money without compromising.
And if you are on a budget, you won’t have to downgrade your user experience by offering lower quality map providers.
Lazy Load Event Calendar
This was another bottleneck for page speed scores.
Other than providing a new skin thanks to the AUI, we also made sure its presence on any of your pages, will not impact your page loading time and thus your users’ experience.
Open now as Advanced Search Filter
If you are using our Advanced Search add-on, your visitors will be able to search for places that are open at the time of your search.
This is a feature that we introduced a few versions back, but we were still fine-tuning it and now we are ready to announce it officially.
A similar search feature, having to calculate users’ time zone and filter listings accordingly, would have an immense impact on your search loading times. if not done correctly.
However, thanks to our custom database structure and highly-optimized SQL queries we made this as scalable as possible, just like every GeoDirectory advanced search filters.
Pricing Table for GeoDirectory
The GeoDirectory pricing manager now includes a block (shortcode or widget) to output a pricing table, showing the feature of each of your prices.
Conclusions
We tested this new version extensively both internally and in our BETA testers Facebook group.
However, due to the nature of open-source software, it’s always possible to find new bugs or conflicts with some particular theme or plugin.
Should you find any issue on your install, please report it immediately and we will provide a patch ASAP.
We hope you enjoy GeoDirectory version 2.1 and it new UI. Let us know what you think of it! If you really like it, please don’t hesitate to leave a nice review on the wp.org plugin repository.
WordPress Add Class to Body
In many cases, the auto-generated classes are not sufficient and we may need to add some custom classes.
To add custom classes, we will use the WordPress filter:
- body_class
Below we will show you snippets of the most requested examples.
But first a little introduction to explain to beginners more about Body Classes.
WordPress Custom Body Classes are something any WordPress developer will need to deal with, sooner or later.
Using a plugin for this would be overkill because in most cases all we need are a couple of lines of code.
So, how do we add WordPress Custom Body classes?
WordPress has both a body_class function and a body_class filter (hook).
The body_class function is used in themes to add the classes autogenerated by WordPress, to the body tag of your website.
This is how it is added to the header.php file of your theme:
<body <?php body_class($class); ?>>Depending on which page is visited, WordPress will output specific classes.
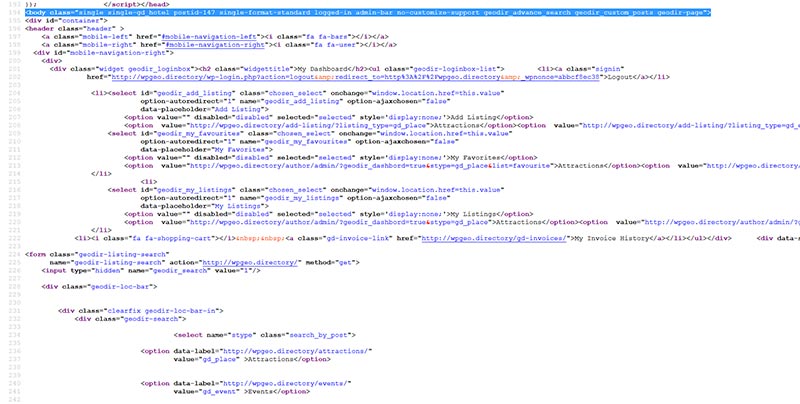
1) For the default “Hello World” post, the body classes are:
<body class="single single-post postid-1 single-format-standard logged-in admin-bar no-sidebar customize-support">2) The body classes of the sample page are:
<body class="page page-id-2 page-template-default logged-in admin-bar no-sidebar customize-support">3) The body classes of the category archive pages are:
<body class="archive category category-uncategorized category-1 logged-in admin-bar no-sidebar hfeed customize-support">4) The body classes of the author archive page are:
<body class="archive author author-admin author-1 logged-in admin-bar no-sidebar hfeed customize-support">5) The body class of the home page (assuming you have one)
<body class="home blog logged-in admin-bar no-sidebar hfeed customize-support">The 5 examples provided above, are common to most default themes when the admin user is logged in.
When logged out, the classes will be slightly different.
Classes in HTML are used to style a web page via CSS.
When copying the following snippets into your functions.php file, new custom body classes will appear on your website markup.
We will be using the body_class filter.
Adding a WordPress custom body class
function my_custom_body_class($classes) {<br />
// add 'my-class' to the default autogenerated classes, for this we need to modify the $classes array.<br />
$classes[] = 'my-class';<br />
// return the modified $classes array<br />
return $classes;<br />
}</p>
<p>// add my custom class via body_class filter<br />
add_filter('body_class','my_custom_body_class');
This will add the new class: “my-class” to the body tag of all pages of your website.
<body class="home blog logged-in admin-bar no-sidebar hfeed my-class customize-support">What if I need to add more than 1 class?
Adding 2 or more WordPress custom body classes
function my_custom_body_classes($classes) {<br />
// add 'my-class' and 'my-class-2' to the default autogenerated classes, for this we need to modify the $classes array.<br />
$classes[] = 'my-class';<br />
$classes[] = 'my-class-2';<br />
// return the modified $classes array<br />
return $classes;<br />
}</p>
<p>// add my custom classes via body_class filter<br />
add_filter('body_class','my_custom_body_classes');
This will be the result:
<body class="home blog logged-in admin-bar no-sidebar hfeed my-class my-class-2 customize-support">What if I want to add a body class only on one particular page where we want to add some custom style via CSS?
Adding a WordPress custom body class to a specific page
This can be done in several ways:
1) Add a custom body class using the page ID
function my_custom_body_class_id($classes) {<br />
// add 'my-class' only to page with ID 1.<br />
if ( is_page( '1' ) )<br />
$classes[] = 'my-class';<br />
// return the modified $classes array<br />
return $classes;<br />
}</p>
<p>// add my custom class via body_class filter<br />
add_filter('body_class','my_custom_body_class_id');
This will be the result on the page with id 2, while all other pages will not have the custom class.
<body class="page page-id-2 page-template-default logged-in admin-bar no-sidebar my-class customize-support">2) Add a custom body class using the page slug
function my_custom_body_class_slug($classes) {<br />
// add 'my-class' only to page with slug contact-form.<br />
if ( is_page( 'contact-form' ) )<br />
$classes[] = 'my-class';<br />
// return the modified $classes array<br />
return $classes;<br />
}</p>
<p>// add my custom class via body_class filter<br />
add_filter('body_class','my_custom_body_class_slug');
This will add the custom class “my-class” on the page with the slug contact-form, while all other pages will not have the custom class.
3) Add a custom body class using the page title
function my_custom_body_class_title($classes) {<br />
// add 'my-class' only to page with title Contact Form.<br />
if ( is_page( 'Contact Form' ) )<br />
$classes[] = 'my-class';<br />
// return the modified $classes array<br />
return $classes;<br />
}</p>
<p>// add my custom class via body_class filter<br />
add_filter('body_class','my_custom_body_class_title');
This will add the custom class “my-class” on the page with the title Contact Form, while all other pages will not have the custom class.
4) Add a custom body class using the page template
function my_custom_body_class_template($classes) {<br />
// add 'my-class' only to pages using my custom template.<br />
if ( is_page_template( 'my-custom-page-template' ) )<br />
$classes[] = 'my-class';<br />
// return the modified $classes array<br />
return $classes;<br />
}</p>
<p>// add my custom class via body_class filter<br />
add_filter('body_class','my_custom_body_class_template');
This will add the custom class “my-class” on the page using the template my-custom-page-template. All other pages will not have the custom class.
We can also add the custom class to a category or tag page, both via ID or category/tag slug.
Adding a WordPress custom body class to a category or tag archive
1) Categories
function my_custom_body_class_category($classes) {<br />
// add 'my-class' only to the my-category archive.<br />
if ( is_category( 'my-category' ) )<br />
$classes[] = 'my-class';<br />
// return the modified $classes array<br />
return $classes;<br />
}</p>
<p>// add my custom class via body_class filter<br />
add_filter('body_class','my_custom_body_class_category');
2) Tags
function my_custom_body_class_tag($classes) {<br />
// add 'my-class' only to the my-tag archive.<br />
if ( is_tag( 'my-tag' ) )<br />
$classes[] = 'my-class';<br />
// return the modified $classes array<br />
return $classes;<br />
}</p>
<p>// add my custom class via body_class filter<br />
add_filter('body_class','my_custom_body_class_tag');
This will only add the custom body class in the archive page of the category my-category and tag my-tag.
We can also add a custom body class to the single page of every post in the category my-category or with the tag my-tag.
We will use in_catgeory and has_tag functions.
1) Categories (both archive and single page)
function my_custom_body_class_in_category($classes) {<br />
// add 'my-class' to the my-category archive and single posts of the category.<br />
if ( in_category( 'my-category' ) )<br />
$classes[] = 'my-class';<br />
// return the modified $classes array<br />
return $classes;<br />
}</p>
<p>// add my custom class via body_class filter<br />
add_filter('body_class','my_custom_body_class_in_category');
2) Tags (both archive and single page)
function my_custom_body_class_has_tag($classes) {<br />
// add 'my-class' to the my-tag archive and single posts with that tag.<br />
if ( has_tag( 'my-tag' ) )<br />
$classes[] = 'my-class';<br />
// return the modified $classes array<br />
return $classes;<br />
}</p>
<p>// add my custom class via body_class filter<br />
add_filter('body_class','my_custom_body_class_has_tag');
These last 2 examples will add the custom class in both the archive page and the single page.
Adding the Category name as WordPress custom body class in each post
If you wish to add the category nice name as a custom body class to each post, you will need the following snippet:
function my_custom_body_class_category_in_single($classes) {<br />
     if (is_single() || is_category()) {<br />
       global $post;<br />
       foreach((get_the_category($post->ID)) as $category) {<br />
         $classes[] = $category->category_nicename;<br />
       }<br />
     }<br />
     return $classes;<br />
   }<br />
add_filter('body_class','my_custom_body_class_category_in_single');
For example, if you are visiting a post of the category “Travel” the above snippet will add the body class Travel so that you can style posts of each category differently.
Adding a WordPress custom body class when visited from a mobile device
We can easily do so using the wp_is_mobile function.
function my_custom_body_class_mobile( $classes ) {<br />
    if ( wp_is_mobile() ) {<br />
        $classes[] = 'mobile';<br />
    }<br />
    return $classes;<br />
}<br />
add_filter( 'body_class', 'my_custom_body_class_mobile' );
Custom body classes can also be added to 1 or all pages created by a plugin (depending on the plugin).
GeoDirectory
GeoDirectory adds its custom body classes. Every GeoDirectory page for example will have the body class: geodir-page.
If the advance search and/or the custom post type add-on are installed, the classes: geodir_advance_search and geodir_custom_posts will be added respectively.
Example of a GD Home page:
<body class="single single-post postid-1 single-format-standard logged-in admin-bar no-sidebar customize-support">In listings pages (custom post type or category archive) you will find a different class for each Custom Post Type.
For example in Places, there will be post-type-archive-gd_place.
In the listing details page you will also find a different class for each Custom Post Type used, for example in Places there will be: single-gd_place.
However, there could be a time when other custom body classes could be needed. Let’s give some examples:
1) Add a custom body class to the location page
// add extra class via body_class filter<br />
add_filter('body_class', 'gd_location_custom_body_class');</p>
<p>function gd_location_custom_body_class($classes)<br />
{<br />
if (geodir_is_page('location')) {<br />
$classes[] = 'gd-location';<br />
}<br />
// return the modified $classes array<br />
return $classes;<br />
}
the same conditional tag
geodir_is_page()2) Add a custom body class to the listing preview page
// add extra class via body_class filter<br />
add_filter('body_class', 'gd_preview_custom_body_class');</p>
<p>function gd_preview_custom_body_class($classes)<br />
{<br />
if (geodir_is_page('preview')) {<br />
$classes[] = 'gd-preview';<br />
}<br />
// return the modified $classes array<br />
return $classes;<br />
}
3) Add a custom body class on detail page for different price packages
 // add extra custom class via body_class filter<br />
add_filter('body_class','gd_price_custom_body_class');<br />
function gd_price_custom_body_class($classes) {<br />
global $post;<br />
if ( $post->package_id == 1) {<br />
$classes[] = 'price-1';<br />
}<br />
elseif ( $post->package_id == 2) {<br />
$classes[] = 'price-2';<br />
}<br />
else {}<br />
// return the modified $classes array<br />
return $classes;<br />
}
4) Add a custom body class in the search page for different CPT searched
add_filter('body_class','gd_search_cpt_custom_body_class');</p>
<p>function gd_search_cpt_custom_body_class($classes) {<br />
if (isset($_GET['stype']) == 'gd_place') {<br />
$classes[] = 'search_gd_place';<br />
}<br />
return $classes;<br />
}
WooCommerce
1) Add a custom body class to all WooCommerce pages
function my_custom_body_class_woo($classes) {<br />
// add 'my-class' to all woocom pages.<br />
if ( is_woocommerce() )<br />
$classes[] = 'my-class';<br />
// return the modified $classes array<br />
return $classes;<br />
}</p>
<p>// add my custom class via body_class filter<br />
add_filter('body_class','my_custom_body_class_woo');
2) Add a custom body class to the Shop page only
function my_custom_body_class_woo_shop($classes) {<br />
// add 'my-class' only to the shop page.<br />
if ( is_shop() )<br />
$classes[] = 'my-class';<br />
// return the modified $classes array<br />
return $classes;<br />
}</p>
<p>// add my custom class via body_class filter<br />
add_filter('body_class','my_custom_body_class_woo_shop');
3) Add a custom body class to the Product Category page
function my_custom_body_class_woo_cat($classes) {<br />
// add 'my-class' only to the product category archives.<br />
if ( is_product_category() )<br />
$classes[] = 'my-class';<br />
// return the modified $classes array<br />
return $classes;<br />
}</p>
<p>// add my custom class via body_class filter<br />
add_filter('body_class','my_custom_body_class_woo_cat');
4) Add a custom body class to a specific Product Category page
function my_custom_body_class_woo_cat_a($classes) {<br />
// add 'my-class' only to a specific product category archive.<br />
if ( is_product_category( 'my-category' ) )<br />
$classes[] = 'my-class';<br />
// return the modified $classes array<br />
return $classes;<br />
}</p>
<p>// add my custom class via body_class filter<br />
add_filter('body_class','my_custom_body_class_woo_cat_a');
5) Add a custom body class to the Product page
function my_custom_body_class_woo_prod($classes) {<br />
// add 'my-class' to product pages.<br />
if ( is_product() )<br />
$classes[] = 'my-class';<br />
// return the modified $classes array<br />
return $classes;<br />
}</p>
<p>// add my custom class via body_class filter<br />
add_filter('body_class','my_custom_body_class_woo_prod');
6) Add a custom body class to a specific Product page
function my_custom_body_class_woo_prod_a($classes) {<br />
// add 'my-class' only to the my-product single page.<br />
if ( is_product( 'my-product' ) )<br />
$classes[] = 'my-class';<br />
// return the modified $classes array<br />
return $classes;<br />
}</p>
<p>// add my custom class via body_class filter<br />
add_filter('body_class','my_custom_body_class_woo_prod_a');
There are plenty of other WooCommerce conditional tags such as
- is_product_tag() for tag archives
- is_cart() for the shopping cart page
- is_checkout() for the checkout page
- is_account_page() for the customer account pages
You can find them all here: https://docs.woothemes.com/document/conditional-tags/
Adding WordPress custom body classes to pages generated by other plugins
The same can be done for any plugin offering conditional tags.
For example, you can find the conditional tags of bbPress here: https://codex.bbpress.org/bbpress-conditional-tags/
an example?
1) add a custom body tag to all bbPress pages you will need this:
function my_custom_body_class_bbpress($classes) {<br />
// add 'my-class' only to bbpress page.<br />
if ( is_bbpress() )<br />
$classes[] = 'my-class';<br />
// return the modified $classes array<br />
return $classes;<br />
}</p>
<p>// add my custom class via body_class filter<br />
add_filter('body_class','my_custom_body_class_bbpress');
You will find conditional tags for BuddyPress too and most of the best plugins out there.
Removing Body Classes
While you can add something via filters, you can also remove it:
function remove_body_class( $classes ) {</p>
<p>foreach ( $classes as $key =&amp;gt; $value ) {<br />
if ( $value == 'my-class' ) unset( $classes[ $key ] );<br />
}</p>
<p>return $classes;</p>
<p>}<br />
add_filter( 'body_class', 'remove_body_class' );Are you having trouble adding or removing body classes from your WordPress website? Ask for a specific example in a comment down below and I will do my best to provide it!
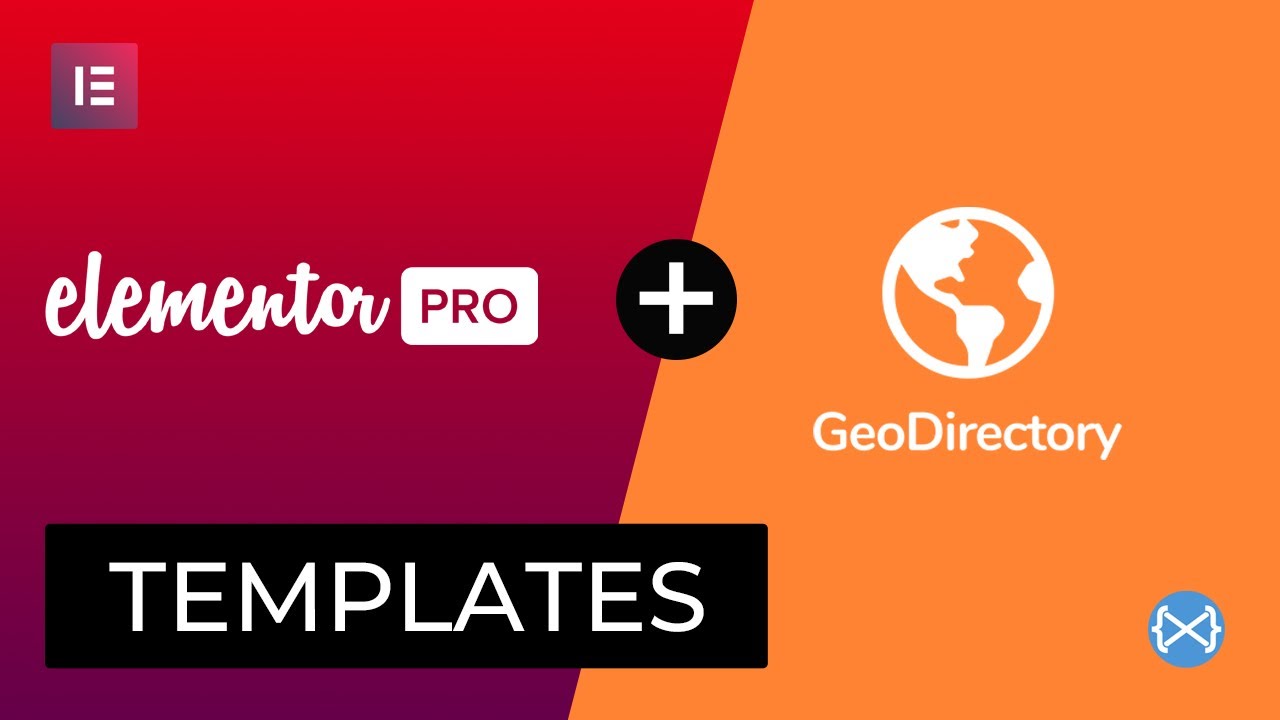
A Directory Plugin for Elementor pro
today we released GeoDirectory V 2.0.0.85.
In this version, the integration with Elementor is tighter than ever. Especially with Elementor Pro.
Now you can design all templates of GeoDirectory using Elementor Pro and Elementor’s dynamic widgets.
We also started creating ready-made templates for you to use on your site, as the starting point for more complex templates or simply to get familiar with the process.
We’ll add more templates in the coming weeks, and we hope you’ll enjoy this new version and its features.
In the video below, Stiofan, we’ll walk you through this new version’s features and how you can customize GeoDirectory templates with Elementor Pro and its dynamic widgets.
How to use Elementor Pro Contact Forms inside GeoDirectory listings
We didn’t stop there. Until this new version, you could only use Ninja Forms as a contact form for the listings.
Now you can use Elementor Pro forms too. The following video shows you how to add the contact form while designing the Listing single-page template.
If you use Elementor extensively, you probably noticed one thing that we added that we think to improve Elementor. The hide conditions in the CSS.
The new dynamic content conditions hide any element easily with CSS.
If you didn’t notice, Stiofan uses it at min 3.54 of the video.
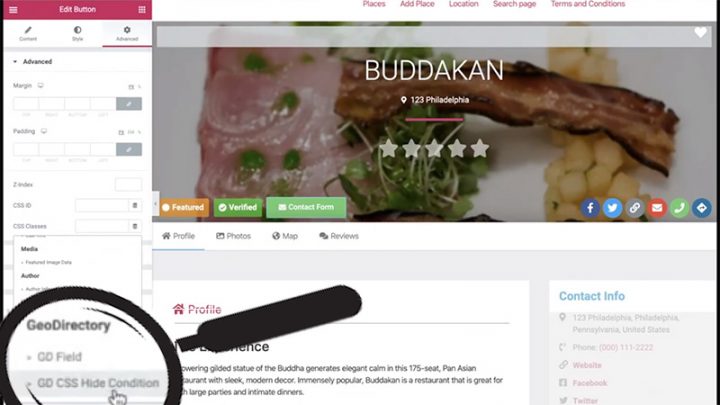
In this video about the integration with Elementor PRO Dynamic Content. you can see a more detailed explanation of this new feature.
Stiofan also explains in detail, how to use GeoDirectory data with the Elementor PRO widgets. For example, how to populate an Elementor Gallery with images from a listing. Or images added by used in the reviews.
He also shows us how to hide for example the rating stars, when there are no ratings.
Now that we have explored the integration between GeoDirectory and Elementor, let’s see how to:
Create an Elementor Directory Website by only using free plugins.
As usual, if you have any questions, don’t hesitate to comment below!
Google recently added some new schema properties to help with disrupted events. Our Events addon from version 2.0.0.17 now support these new properties.
We have added a new predefined field called “Event Disruption” if you have events that have been disrupted you should add this custom field. You can add this custom field under Events > Settings > Custom Fields > Predefined Fields

Adding the Field
ADVANCED NOTE: With the release of GD core 2.0.0.82 there is a new option when adding a field called “DB Default value“, this sets the value in the database for all listings when initially adding the field. It is highly recommended to leave this blank. However, if for example ALL your events have been canceled you could set this to cancelled (lower case and two L’s). It is not needed to set a value if your event is still running as normal but if you want to show a notice on each listing that it is still running as normal and be able to advanced filter events still running then you can set this to scheduled.
Adding the field is the same as all others. The options values should not be changed, these are specific for the event Schema.
Advanced Search Filtering
This field is filterable and can filter any type of disruptions. If you wish to be able to filter by “No Disruption” it is best to set the “DB Default ” value of the field to scheduled when adding the field so that all current listings inherit this status (this can also be done via export / re-import to update).

Showing an Event Status
By default, the event status will show in the archive item, details and map bubble templates.

You can also add your own badges to help inform users. A general badge to show users the status:
[gd_post_badge key="event_status" condition="is_not_empty" badge="Status: %%input%%" bg_color="#0073aa" txt_color="#ffffff" alignment="left"]Or even status specific badges such as once for cancelled:
[gd_post_badge key="event_status" condition="is_equal" search="cancelled" icon_class="fas fa-exclamation-circle" badge="%%input%%" bg_color="#ff0000" txt_color="#ffffff" alignment="left"]Schema Markup
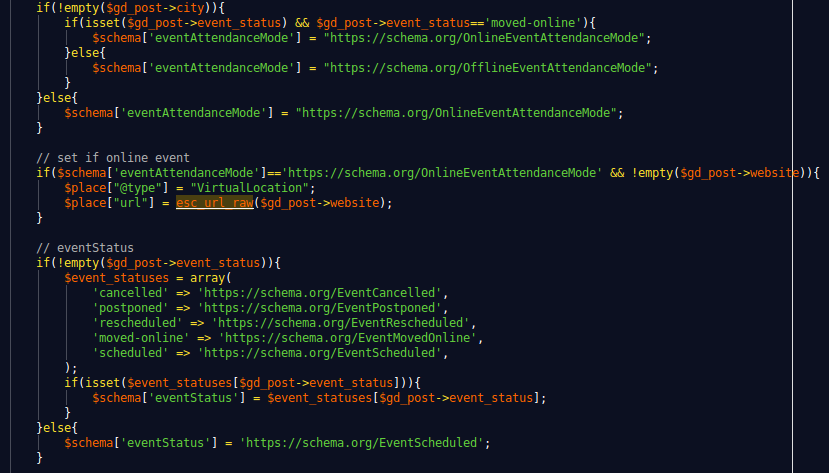
Both the Schema properties eventStatus and eventAttendanceMode have been implemented and markup is all automatic. If your event has been moved online then the website field will be used as the event URL in the schema.
The setting are explained to users when adding/editing a listing, but for reference;
- Cancelled – Set this when the event is cancelled.
- Postponed – If the event has been postponed to a later date, but the date isn’t known yet
- Rescheduled – If the event date has been changed from the original.
- Moved Online – If the event has been moved online, in this case the website URL will be used as the event attendance URL.
New features to manage the COVID-19 emergency
With the continuing world Covid-19 crisis, we are adding features to help directory owners. GeoDirectory 2.0.0.82 included new Google schemas for Event disruption and a pre-defined field to let event owners set a disruption status. Below we will go over two of the main features in this version:
Temporarily Closed Field
In your custom post type (CPT) settings page under custom fields, you will see a new pre-defined custom field called “Temporarily Closed” this field will;
- Dynamically set all business hours to closed. This means you can leave the current business hours as is and on the frontend, they will display as closed and the schema data will also show closed.
- Using the GD Notifications widget which is placed on the details page by default, this will show a message in a warning box stating that the business is closed. You can customize the message shown by editing the “placeholder” text in the custom field, %s can be used to show the CPT name. eg: “This %s is closed due to Government guidelines regarding Covid-19” the %s will be replaced with the CPT name.

As suggested in the Event disruption examples, this field can be used to filter businesses to show closed ones last or used to show custom badges.
150 New Schema Types
Note: Schema data is embedded data on your webpage that search engines can read to know specific information about a post. For example, when you see a rating or a price in a google search, this data is from schema data on the page.
Google recently added the new schema type CovidTestingFacility which can be used to list a Covid-19 testing center. We decided now was a good time to refresh our list of schema types. Our old list of 93 schemas was hand-picked to be most relevant to a directory. Now many years later, some new ones have been added and some are more fitting. We have also converted the select field into a search field so its easier to search the 243 schema types.


We can all help stop COVID-19 and if you are not a health care professional, the best way to do it is to stay at home.
At AyeCde we never had a central office, we all work remotely, and staying at home for us is just another day at the office.
It can be done and you should do an effort to make it the new normal for you too. At least until this emergency is over.
But what else can we do to help? As web and directories developers, there are a few things that we can do to help our communities.
Help spreading the correct information and not the virus
Every country, region, city, town, every single location has its own procedures to manage this emergency.
If you have a local directory, make sure to provide the right information for your local population and tourists.
Information about what people should and shouldn’t be doing during a complete shutdown is vital.
Especially about what to do in case someone suspects that they have contracted the virus. Who to call and or where to go and not to go.
Help your local businesses to survive
With cities in partial or complete shutdowns, local businesses may have a hard time surviving.
As a directory developer, they are all potentially your customers and if they disappear, you disappear.
This may not be possible for everyone, but for the most creative out there, it’s definitely an option and they should start selling some of their products and services online.
I’m not sure if deliveries are allowed everywhere, but they should still be possible in most countries. If customers can’t go to them, help them go to their customers.

Our Invoicing plugin can be of great help in a similar situation. Where a customer just needs to have a simple system to start receiving payments online.
Installing it is very easy and anyone can start accepting payments online with it, literally in a matter of minutes. If PayPal is enough, it’s also 100% free.
There are other solutions like WooCOmmerce or Easy Digital Downloads for those who need to manage more complex projects.
Make sure that business owners you are in contact with are aware of similar solutions and offer them your services to help them install and configure whatever they need to keep doing business.
Publish in your directories places providing delivery services
Because many will start providing delivery services, it is important to give them as much visibility as possible by listing them on your directory correctly.
Adding the “delivery” filter to your advance search setup will be important too.
Least but not last, think about sharing the info in the directory’s social media and everywhere. You’ll help your community members get what they want and your business to stay afloat.
Do you have other ideas?
Feel free to share what you are doing to help your community through your directory website, in the comment section down below.
You could provide inspiration to other fellow directory and web developers.
approximately 6 months ago we released V2 of GeoDirectory and we promised it would be a lot easier to customize your design with it.
Being compatible with most page builders and themes, you could already do fantastic template designs with GeoDirectory V2, but now that we are fine-tuning it, you will be able to do even more awesome stuff with it.
We decided to start with Avada and the Fusion Builder.
With the current version of GeoDirectory, you had to :
- add new widget areas in Avada
- add the GD widgets needed to complete the design
- finally, use these widgets areas through the Fusion Builder
You could achieve almost anything with that and CSS later, but it wasn’t intuitive nor as easy as customizing a design with the default elements of Fusion Builder.
GeoDirectory Elements will be within the Fusion Builder
From the next version of GeoDirectory which will be 2.0.0.68 (beta available on GitHub now), all GeoDirectory Widgets / Shortcodes / Blocks, will also be available as Elements of the Fusion Builder.
This makes it a lot easier to design, and we can now dig into the tutorial on how to create a page to look similar to Airbnb’s listings page or search results page.
Assuming you have installed Avada and GeoDirectory, this is how I made it.
Disclaimer: It was not possible to design a page that looks like Airbnb ONLY with GeoDirectory and Fusion Builder. I had to write a few lines of CSS. 11 new rules, 5 for the archive page template (the listings page) and 6 for the archive item page template (each listing inside the listings page).
That said, I’m not really an Avada expert, and there are so many options that probably what I did, could be done without as much CSS. Maybe even none.
I’ll leave that to Fusion Builder Masters to tell. If you know of solutions to avoid my custom CSS, I’d appreciate you letting me know via a comment down below, and I’ll update the tutorial.
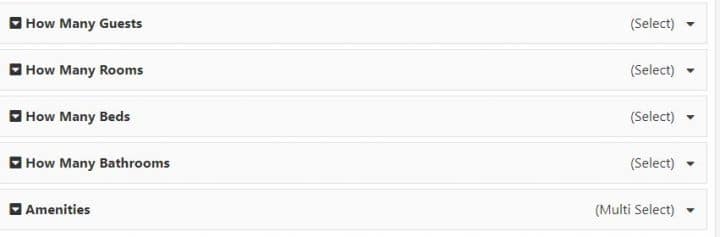
1 Create the needed Custom Fields
I started adding the custom fields that AirBnB uses through Place > Settings. I only added the exact one I needed to replicate the design and save time, but everything can be done.
We needed four selects for :
- Guests
- Bedrooms
- Beds
- Bathrooms
and one multisect for amenities like:
- Kitchen
- Pool
- Air Conditioning
2 Editing the Archive Page Template
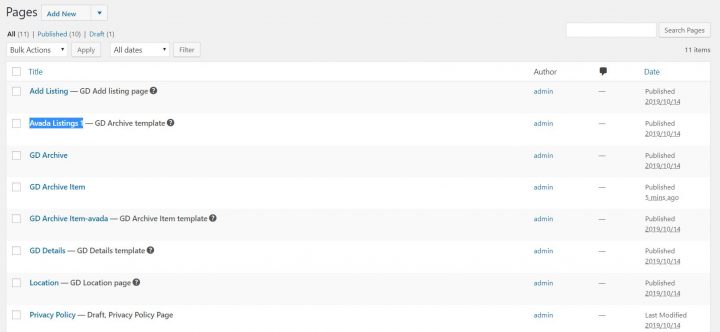
After publishing a few dummy listings, I needed a new Archive Page template. I called the page Avada Listings 1 and assigned it via GeoDirectory settings as the new Archive page template.
Then I needed to prepare the page and make it use the entire screen. I know there is an option to make Avada pages use the full-width of the screen, but that affects the whole site, so I used CSS to do that.
.geodir-archive #main .fusion-row {max-width:100%}
html:not(.avada-has-site-width-percent) .geodir-archive #main {padding:0}
.geodir-archive #main  {padding:0}
.geodir-archive .post-content .fusion_builder_column_1_2.fusion-column-first > .fusion-column-wrapper {padding-left: 8% !important;}
.geodir-archive .avada-page-titlebar-wrapper {display:none}
What the above does is simple. Makes the area below the header and above the footer using the full width of the screen, removes general padding, and adds padding only to the left of the listings list. It also hides the Avada title bar that, on a similar page, is not necessary. The page will look like this:
Now we can edit the page with Fusion Builder. You can use both Front End and Back End, but the preview of the Front End won’t be 100% accurate, the reason why I used the back end builder.
We need two columns, and in the right column, we will add the GD > Map element, while in the left column, we will add :
- GD > Search
- GD > Loop Actions
- GD > Loop
- GD > Loop Paging
The only options that we need to tweak are for the Map, where we need to set the height at 85vh. To obtain the fixed map effect on scroll, I used a plugin called: Sticky Menu (or Anything!) on Scroll by Mark Senff.
We could have written our own custom JS, but this plugin is lightweight and if you only have 1 element to stick to, it works like a charm.
If you set it up correctly, it also pushes the map when the footer appears.
As options for this plugin, I set the following:
- Sticky Element = .geodir-archive-map-wrap
- Push-up element = .fusion-footer
The Push-up Element option can be found in Advanced Settings.
That’s it for now.
The page now will look like this:
3 Editing the Archive Item Page Template
Now I need to customize the design of each listing, and that can be done by editing the Archive Item Page template.
I created a new Archive Item Page template, and I called it: GD Archive Item-avada

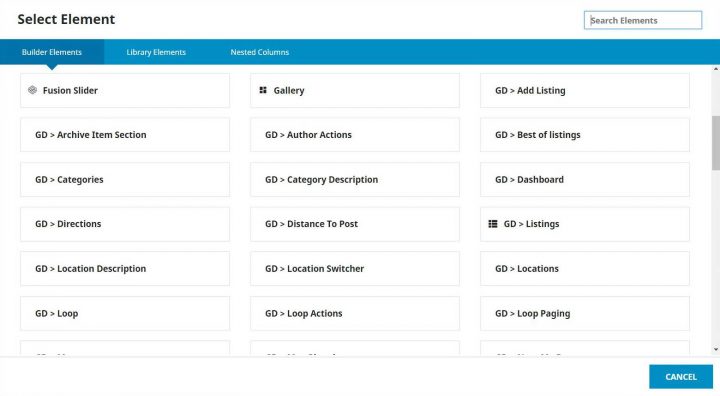
I opened it with the Fusion Builder back-end editor, and I added the following GD Elements:
- GD > archive item section set as open left
- GD > post images set as a slideshow
- GD > archive item section set as close left
- GD > archive item section set as open right
- GD > post meta with key=”post_category” and show=”value”
- GD > post favorite with show=”icon” and alignment=”right”
- GD > post title
- GD > post meta with key=”how_many_guests” and show=”value” and alignment=”left”
- GD > post meta with key=”how_many_rooms” and show=”value” and alignment=”left”
- GD > post meta with key=”how_many_beds” and show=”value” and alignment=”left”
- GD > post meta with key=”how_many_bathrooms” and show=”value”
- GD > post meta with key=”amenities” show=”value”
- GD > post badge key=”post_date” condition=”is_less_than” search=”+30″ badge=”NEW” bg_color=”#008489″ txt_color=”#ffffff” size=”small”
- GD > post rating show=”stars” alignment=”left”
- GD archive item section set as “close right”
4 Adding some more custom CSS
Last thing I needed some CSS to make things look pretty and organized, like on the Airbnb page:
.geodir-post-title, .geodir-post-rating {clear: left;}
.geodir-field-amenities li::after,.geodir-field-how_many_guests::after,.geodir-field-how_many_rooms::after,.geodir-field-how_many_beds::after {content:" - ";}
.geodir-field-amenities ul {margin:0;padding:0}
.geodir-field-amenities li:last-child::after {content:"";}
.geodir-field-amenities li {list-style: none;float: left;}
.gd-badge-meta {display: block;margin-left: 0;clear: both;}
The above CSS will only work if you have the exact same custom fields and does the following:
- adjust the position of the title and rating stars
- adds the ” – ” separator between the custom fields
- adjust the amenity multi-select, that by default is presented as a list
- adjust the positioning of the “NEW” badge
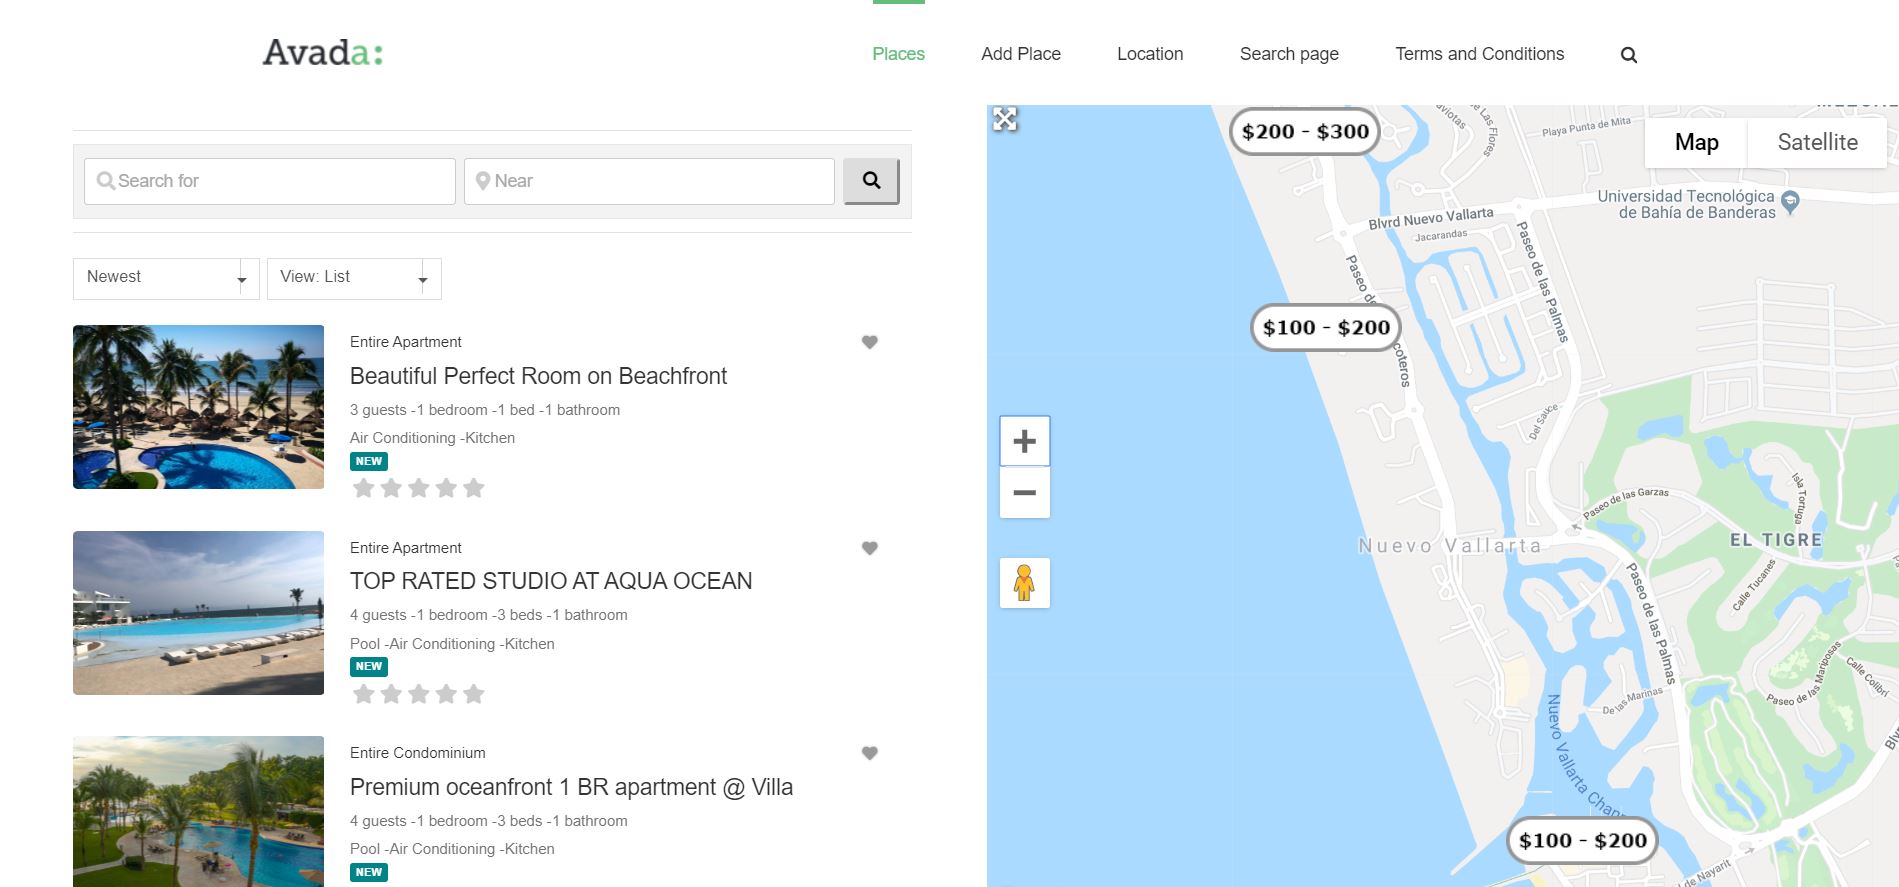
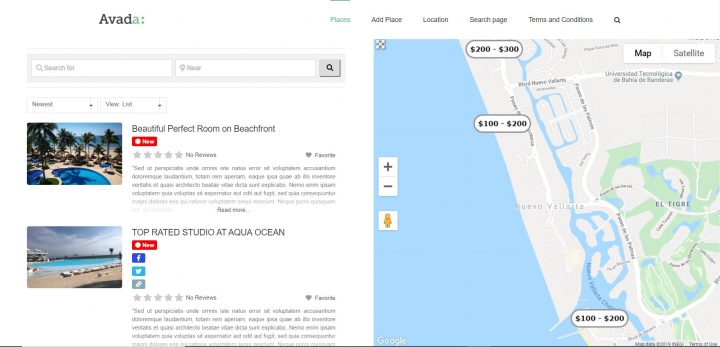
That’s it. The result is what you see here:

I know it is not 100% identical to Airbnb, but hey, it took me 2 hours, I barely knew how to use Avada.
I just wanted to show you the level of customization that is possible with GeoDirectory and Fusion Builder.
For us, this is pretty impressive, but if it’s not for you, would you please tell us what would make it impressive in your opinion?
If you leave a comment, we’d love to hear your feedback.
I’m sure someone will ask, so I will answer directly here.
How I created the markers with prices? That’s simple. I used categories like:
-Apartment (Parent)
–100 – 200 (sub)
–200 – 300 (sub)
I designed the markers with each price fork with Photopea.com, and uploaded the marker for each sub-category.
When adding listings, I assigned the sub-category as the default category so that the marker with prices would be used in all maps.
I hope you enjoyed this tutorial.
Let me know if you have any questions regarding this in the comments down below!
today we released V2.0.0.65 with several fixes and 1 exciting new feature:
Rank Math Compatibility
untill today, the only SEO plugin fully compatible with GeoDirectory was Yoast SEO plugin.
Rank Math is the new WordPress plugin for on-site SEO.
Given that it is creating a lot of buzz in the WordPress community and we rarely or ever heard anything negative about it, we worked with its developers and made it fully compatible with GeoDirectory.
Most of those who tried it fell in love with it and swear they’ll never go back.
One of the main perks is that currently, it is 100% free.
The features are outstanding and put all other SEO plugin to shame, in some cases even their premium versions.
This is what you’ll get:
- SEO Analysis
- Advanced SEO Optimization
- 5 Keyword Optimization
- Rich Snippets
- XML Sitemaps
- AMP SEO
- Breadcrumb Navigation
- 404 Monitor
- Redirection Manager
- Google Search Console Integration
- External/Internal Link Counter
- OpenGraph Mark-Up
- Local SEO
- Role Manager
- Advanced WooCommerce SEO
- and much more…
Have you tried Rank Math already?
Do you intend to install it on your GeoDirectory powered website?
We would be thrilled to hear your experience with it and know what their PROS and CONS are in your opinion.
Another news is about the GeoDirectory Google Analitycs add-on.
We repurpose it and changed its name to:
Google Analytics Block plugin

It is now a standalone plugin and no longer a GeoDirectory dedicated plugin.
This means it can be used on any WordPress website and of course, it remains 100% free.
Probably we’ll release it through the WordPress.org plugin repository next.
The plugin now allows you to add the Google Analytics block on any page or blog post.
You can show the statistics for any page to all visitors, or restrict who can see the widget.
For example, if you have guest posts, you could show it to the author of the post only.
We hope you enjoy this new release! Let us know your feedback in the comment down below!
the possibility to compare listings is a feature that many of you requested in the past.
A way to compare listings displaying them side by side, showing the most important information and custom fields.
Introducing the :
Compare Listings Add-on
this new add-on allows adding up to 5 listings to the “compare” page.
Where they appear side by side horizontally, with all relevant information and custom fields needed, in bullet point lists, below the main image.
You can use it for things like comparing:
Prices and details of Classified Listings.
For example, users could compare the features and prices of used TV sets for sale on your classified portal.
Learn how to Create Classified Website with this tutorial.

Characteristics of Real Estate Listings.

Ratings of Directory Listings.

Adding the compare button to listings is as easy as adding a shortcode in a page.
Colors, Icons, and text of the compare button can be edited as needed via shortcode, block, or widget options.
Existing members can download the Compare Add-ons now.
We are generating the licenses and adding them to existing members, they should be visible to everyone by Monday, July 8th.
Hoping you like the Compare Listings Add-on, we are looking forward to hearing your feedback and making it even better!
We always tried to attract theme developers. We wanted them to build Directory themes for WordPress, using GeoDirectory as their engine.
Since we decided to stop developing GeoTheme and we built GeoDirectory as a WordPress Directory plugin. That was one of our original goals.
We have a fairly large user-base that have been waiting for an elegant and professional looking theme for a long time. It is very hard to build something as feature-rich as GeoDirectory from scratch. So building themes for GeoDirectory could be a good business for everyone.
In addition, we are delighted to promote whoever contributes to improving GeoDirectory and making it a better, bigger project.
We were not able to succeed with V1 For a number of reasons, mainly because of a templating system that was hard to customize.
Very few themes adopted it. It took a long time before we saw the 1st theme using GeoDirectory V1 to serve its directory section.
GeoDIrectory V2 appears to start with the right foot.
Introducing Listimia
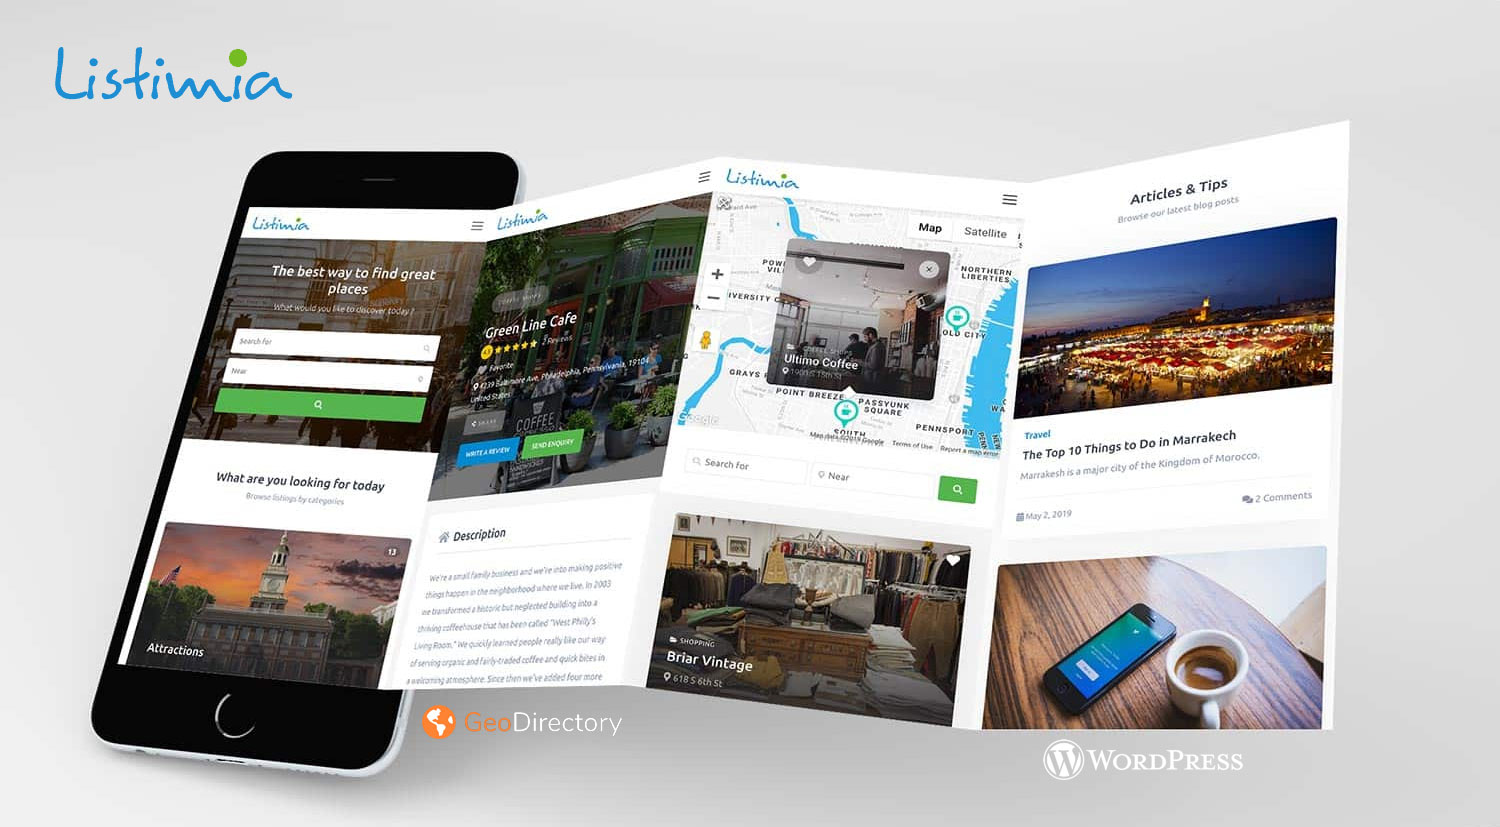
Listimia is a sleek and pixel perfect WordPress Directory theme by Addicted2web. Originally built for the script phpmydirectory. It is now introduced in its WordPress version, powered by GeoDirectory.
By the way, soon we’ll release the phpmydirectory to GeoDirectory converting tool too.
Listimia uses the Bootstrap framework as its foundation.
It is fully responsive and looks gorgeous on Mobile and Tablets too.
Customizable in terms of colors and headings, Listimia is also fully translatable.
Just like GeoDirectory v2, it is compatible with the most popular s.

Listimia comes with excellent documentation and support by the Addicted2web staff.
You can use it to build any kind of Directory / Listings site.
Real Estate portals, a Classified website or your local Yelp, Listimia has got you covered!
Plus, at $39 it is very reasonably priced.