On this page:
Special icons
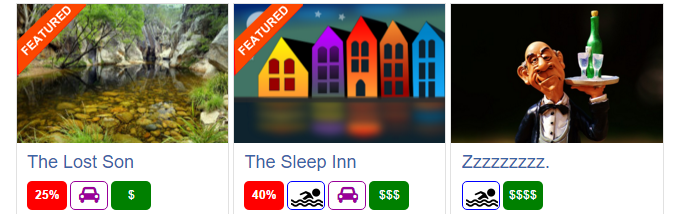
The icons you see above are created using custom fields and some CSS styling.
 is created using a checkbox custom field and an image background.
 is created using a select custom field.
 is created using a text custom field.
 is created using a checkbox custom field and a FontAwesome background.
Creating the custom fields
The above examples all use these settings:
- Is active: Yes
- Show on listing page: Yes
- Complete any other fields as you wish
Custom field settings:
- Choose a Checkbox field
- HTML variable name: pool (example only – needs to be a unique name)
Custom field settings:
- Choose a Select field
- HTML variable name: range (example only – needs to be a unique name)
- Option values: Cheap/$,Modest/$$,Expensive/$$$,Rip-Off/$$$$
- Example only
- The text before the / is the choice your users will see, and the text after the / is the text displayed on your site.
Custom field settings:
- Choose a Text field
- Field data type: NUMBER
- HTML variable name: discount (example only – needs to be a unique name)
Custom field settings:
- Choose a Checkbox field
- HTML variable name: parking (example only – needs to be a unique name)
Styling your custom field output
To style the result of your custom fields on your website, add the following to your child theme’s style.css file:
[css].geodir-entry-meta {clear: both;}[/css]
Then also add the relevant codes below:
- Examples only.
- Adjust to suit your site etc.
- Every custom field automatically is asigned a CSS class like geo_HTML variable name
CSS code:
[css]
/* Pool label style */
.geodir_pool {
float: left;
display: inline;
clear:none !important;
margin: 3px 3px 3px 0px;
border-radius: 5px;
border: 1px solid blue;
background: white;
background-image: url("/img/pool.png");
background-repeat: no-repeat;
color: transparent;
font-weight: 400;
width: 38px;
text-align: center;
background-position: 3px;
}
.geodir_pool .geodir-i-checkbox {
display: none;
}
[/css]
CSS code:
[css]/* Range label style */
.geodir_range {
float: left;
display: inline;
clear:none !important;
margin: 3px 3px 3px 0px;
border-radius: 5px;
background: none repeat scroll 0 0 green;
color: #fff;
font-weight: 400;
width: 40px;
text-align: center;
padding: 6px 0 !important;
}
.geodir_range .geodir-i-select {
display: none;
}[/css]
CSS code:
[css]/* Discount label style */
.geodir_discount:after {
content: "%";
}
.geodir-i-text {
display: none;
}
.geodir_discount {
background: none repeat scroll 0 0 red;
border-radius: 5px;
color: #fff;
font-weight: bold;
text-align: center;
padding: 6px 0 !important;
width: 40px;
float: left;
display: inline;
clear:none!important;
margin: 3px 3px 3px 0px;
}[/css]
CSS code:
- This button uses FontAwesome to create the images.
- If you look at the code below, you’ll see content: “\f1b9”
- That is the FontAwesome code for the image of the car.
- To find the CSS code for any FontAwesome “letter”, have a look at the FontAwesome cheatsheet.
- There you will find all FontAwesome “letters”, and to get the CSS code, remove &#x from the beginning of the code, and ; from the end of the code, and add a \ in front.
- For example the CSS code for fa-car [] is \f1b9
[css]/* Parking label style */
.geodir_parking {
float: left;
display: inline;
clear:none !important;
margin: 3px 3px 3px 0px;
border-radius: 5px;
border: 1px solid #990099;
background: white;
color: transparent;
width: 38px;
text-align: center;
background-position: 3px;
height: 29px;
}
.geodir_parking:before {
font-family: FontAwesome;
content: "\f1b9";
color: #990099;
font-size: 18px;
padding-left: 8px;
}
.geodir_parking .geodir-i-checkbox {
display: none;
}[/css]
Adding customer logos
Creating the custom field
- Create a File Upload custom field
- For the HTML variable name, the below example uses logo (example only – needs to be a unique name)
- For this example we have added it to the sidebar
Styling your custom field output
If you now upload a file as a logo, it will look like this, so we will need to add some CSS to make it look a bit better:

Removing “Logo:”
Adding this CSS will remove the label:
[css].geodir_logo .geodir-i-select span { display: none !important;}[/css]
Adding this CSS will resize the logo:
[css].geodir_logo .geodir-custom-post-gallery .geodir_thumbnail {background-size: initial;}
.geodir_logo .geodir-custom-post-gallery {width: 100% !important;}
.geodir_logo .geodir-custom-post-gallery {
border: none;
margin-bottom: -10px;
margin-top: -10px;
}[/css]
And this is the result: