Translation

Introduction | What you need to know
Translation Files | Core | Addons | Themes | Download
Translation process | Setup | Edit | PoEdit
More information | Resources | FAQ

Introduction

WordPress and GeoDirectory both are configured with English by default, but can easily be translated into other languages. In this document we will introduce the how translated strings are stored, edited, and loaded to a site to display a new translation.

The goal of this guide is not just to help you become familiar with translation. Once the new translations are setup in the GD site, you can edit and update your translation files any time. Once you start translating, and even changing the default text, you will probably find many ways to make the text ‘speak’ to your community of users.

What you need to know

  1. .po and .mo files are the standard method for storing “translated strings”.
  2. .po files are for doing translations.
  3. .mo files are for showing translations on your site.
  4. .po files can be edited with PoEdit, the free cross-platform desktop translation app.
  5. When you edit a .po file in PoEdit, and then save the file, PoEdit will also create/update a matching .mo file.
  6. Store BOTH the .po and the .mo files in the the proper site folder.
  7. GeoDirectory Core Translations are maintained at https://translate.wordpress.org/projects/wp-plugins/geodirectory, so go there if you want to download existing translations of GD Core.
  8. GeoDirectory Addon Translations are maintained at https://wpgeodirectory.com/translate/projects, so go there if you want to download existing translations of GD Addons.
  9. Finished translation files for plugins are stored in wp-content/languages/plugins/
  10. Finished translations for themes are stored in wp-content/languages/themes/


Core Translation Files

GeoDirectory Core plugin translations are maintained at https://translate.wordpress.org/projects/wp-plugins/geodirectory. If you are looking for existing translations of the GeoDirectory Core plugin in additional languages, you can go there to see which languages are available.

If your language is not currently available or at less than “100%” then consider joining the GeoDirectory translation team where members work together to make excellent, accurate translations available in every language. Visit the Translators Handbook to find out more.

GeoDirectory Core Languages Folder Location

Once you have completed your translation of GeoDirectory core plugin into a new language, the .po and .mo files must be transferred to your GD Site, usually by FTP. On your GD Site, the translation files for GeoDirectory core are stored in “wp-content/languages/plugins/”.

Use the following table to “check your work”. The most common reasons that a translation file won’t load is because it is named incorrectly or because it is stored in an improper folder.

Name .po/.mo folder path and file name (text domain)
GeoDirectory Core /wp-content/languages/plugins/geodirectory-en_US.mo


Addon Translation Files

GeoDirectory Addon translations are maintained https://wpgeodirectory.com/translate/projects. If you are looking for existing translations of addons you should go there to see if your desired language is available.

If your language is not currently available or at less than “100%” then consider joining the GeoDirectory translation team where members work together to make excellent, accurate translations available in every language. Visit the Translators Handbook to find out more.

GeoDirectory Addons Languages Folder Location

Translated files for GeoDirectory Addons are stored in “wp-content/languages/plugins/”. Use the following table to “check your work”. The most common reasons that a translation file won’t load is because it is incorrectly named or because it is stored in an improper folder.

Addon/Theme name .po/.mo folder path (text domain)
Advance Search Filters /wp-content/languages/plugins/geodiradvancesearch-en_US.mo
Ajax Duplicate Alert /wp-content/languages/plugins/geodir_duplicatealert-en_US.mo
BuddyPress Integration /wp-content/languages/plugins/gdbuddypress-en_US.mo
Claim Listing /wp-content/languages/plugins/geodirclaim-en_US.mo
Custom Google Maps /wp-content/languages/plugins/geodir_customgmaps-en_US.mo
Custom Post Types /wp-content/languages/plugins/geodir_custom_posts-en_US.mo
Event Manager /wp-content/languages/plugins/geodirevents-en_US.mo
Franchise Manager /wp-content/languages/plugins/geodir-franchise-en_US.mo
Location Manager /wp-content/languages/plugins/geodirlocation-en_US.mo
Markercluster /wp-content/languages/plugins/geodir_markercluster-en_US.mo
Payment Manager /wp-content/languages/plugins/geodir_payments-en_US.mo
Review Rating Manager /wp-content/languages/plugins/geodir_reviewratings-en_US.mo
Name /wp-content/languages/plugins/geodir_sagepay-en_US.mo
Social Importer /wp-content/languages/plugins/geodir_socialimporter-en_US.mo


Theme Translation Files

Only the default English translation is available for AyeCode’s GeoDirectory themes. You can find the default file inside the languages folder of the theme.

GeoDirectory Themes Language Folder Location

Translated files for GeoDirectory themes are stored in “wp-content/languages/themes/”. Use the following table to “check your work”. The most common reasons that a translation file won’t load is because it is incorrectly named or because it is stored in an improper folder.

Addon/Theme name .po/.mo folder path (text domain)
Directory Starter Theme /wp-content/languages/themes/directory-starter-en_US.mo
Supreme Directory Child Theme /wp-content/languages/themes/supreme-directory-en_US.mo


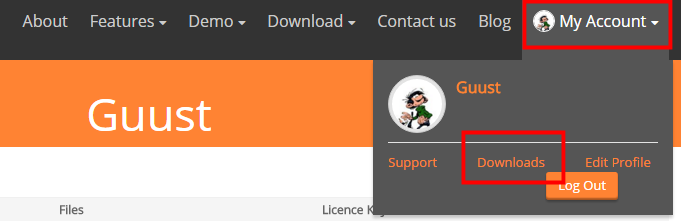
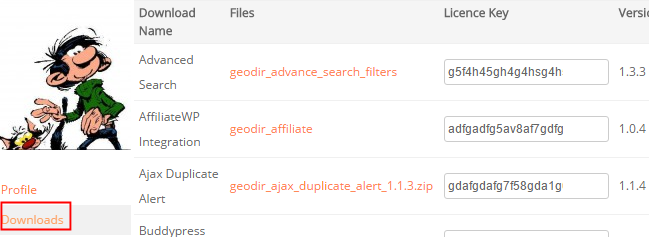
Download Existing Translations for a Plugin

Here we provide an example of how to download an existing translation.

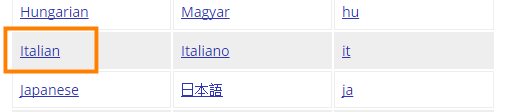
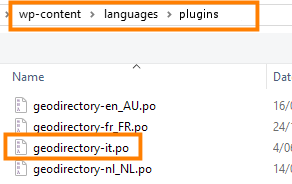
In the example below, we will download an Italian translation of GeoDirectory Core, and then add the translation file to the GD site.

  1. Navigate to the GeoDirectory language project pages.
  2. Select the language and addon of your choice.
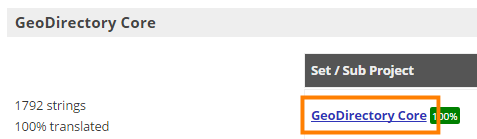
  3. Example: Italian:
  4. Select the language file you want:
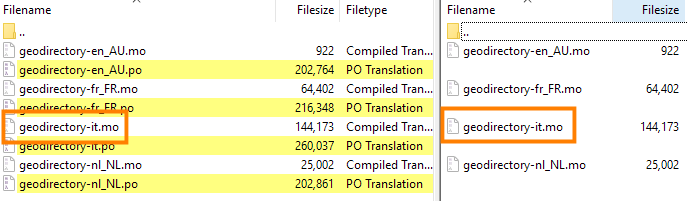
  5. Scroll to the bottom of the page and Export the file (accept the defaults so you download the whole PO file):
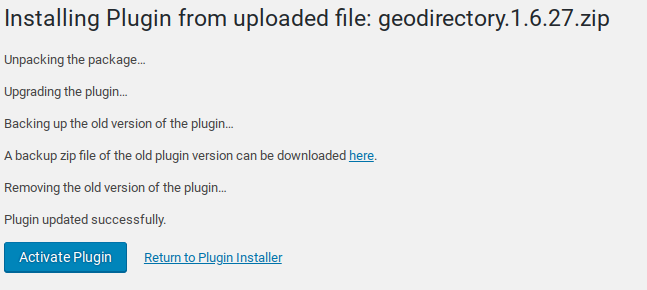
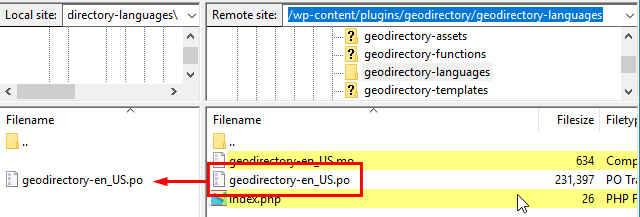
  6. Load the file to the proper folder (See Translating Addons for more information).
    Change the file extension, if necessary, for your locale. Example: -it to -it_IT.
  7. Create the MO file using PoEdit or download from the same page where you downloaded the PO file:
  8. Review the translations on your site. If you find untranslated strings, continue to the next section for information about how to edit the translation files.


Translation Process

Setup New Language Translation Files on the Site

First, the translations need to be setup on the site. Here is the overview of that process:

  • Download an existing translation or create a new file. In either case, save the translation .po file to the desktop.
  • Open the file with PoEdit and select the new language.
  • Save the file with PoEdit on to the desktop with the new locale.
  • Find the .po and .mo files on the desktop.
  • Transfer the .mo and .po files via FTP to the proper site folder.

Edit an existing language translation

Once your translation files are setup, then you can edit them any time you want with this process:

  • Login to the site with FTP and navigate to the appropriate languages folder.
  • Download the appropriate .po file from the site folder, and save a backup copy in another location.
  • Open with PoEdit, Translate with PoEdit, Save with PoEdit.
  • Identify the new .po and .mo files in your local save location.
  • Transfer the .mo and .po files via FTP to the proper site folder.


Translating with PoEdit

This example is for translation of the core plugin. The process is the same for any plugin or theme, with the notable exception that the files are stored in the site in different folders.

  1. Download POedit and install the free program.
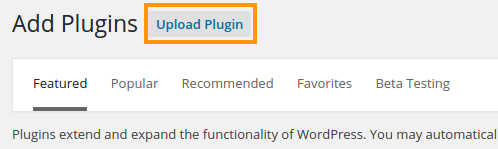
  2. Download the default translation. Each plugin or theme comes with English language .po and .mo files. Use FTP or cPanel to download the default language .po file to your local machine. You only need the .po file. PoEdit will create a new .mo file upon save.
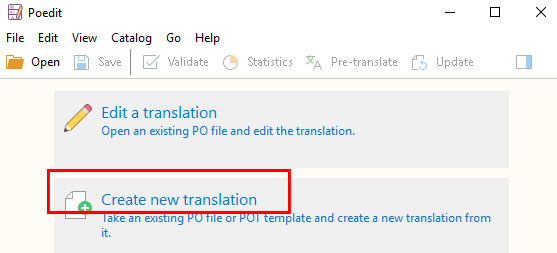
  3. Open Poedit and select Create new translation:
  4. Navigate to the .po file and open it:
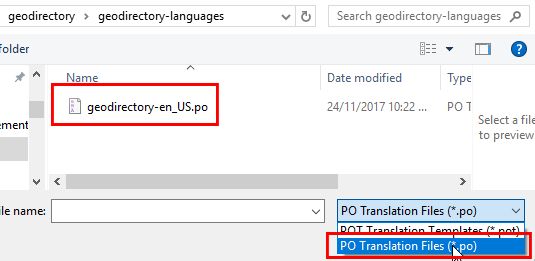
  5. Select the new language:
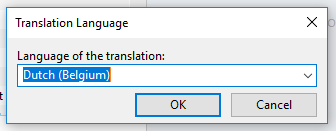
  6. Make sure to select exactly the same language you have at WP > Settings > General:
  7. Now save the file:
    1. Poedit will give you the correct extension, in our example that will be nl_BE.po.
    2. Make sure the filename matches the default translation filename. Example: geodirectory-nl_BE.po.
    3. PoEdit saves the .po and the .mo files: geodirectory-nl_BE.po and geodirectory-nl_BE.mo
    4. transfer BOTH the .po and the .mo files via FTP to the proper folder on the site.
    5. Save a backup of the files on your desktop and in your personal cloud, just in case of emergency.
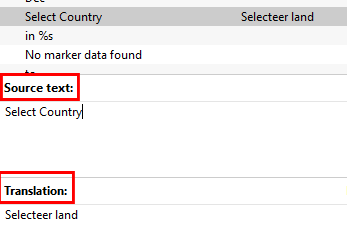
  8. Translate the remaining strings. Now that the workflow is setup, you can Now translate any language string you want, and save the file once finished:
  9. When you are ready, upload both the .mo and .po file to the /wp-content/languages/plugins/ folder on the server.
    Create the folder if it does not exist yet:
  10. Go to your website and refresh to see your changes 🙂


Resources

  1.  GeoDirectory Addons Translation Project
  2. Translators Handbook


FAQ – Frequently Asked Questions about Translation

  • Can I change “Place Title” and “Place Description”?
  • To change Place Title and Place Description on the Add Listing page, you need to use the language file and look for %s Title and %s Description.
    %s refers to the singular name of the custom post type, which you can set using the Custom Post Types addon, or by translating Place and Places in the language file.
    For example to change Place Title to Business Name, you would translate %s Title to %s Name, and change Place to Business.
  • How do I translate the “New” and “Featured” banners.
  • To translate the “New” and “Featured” banners used for GD listings, you can copy and paste the blank images below, adjust them as required and upload to your website. Then add the following CSS:
    [css].geodir_new_listing {
    background: url(‘http://reference to your new image’) no-repeat scroll left top transparent;
    }
    ul li .geodir_featured_img {
    background: url(‘http://reference to your featured image’) no-repeat;
    }[/css]

    Right-click to download and save:


  • Translating the days in the Events Calendar
  • When adding the Events Calendar Widget, you will have 4 options for the format of the day:

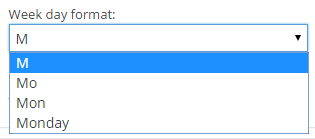
    If you want to translate the days on the calendar, you will have to choose another option than the first option.
    In the translation file for the Events Manager, you can then translate the strings that match the option you have chosen.

GD Translator’s Handbook

GeoDirectory Translator's Handbook
Welcome to our Translator’s Handbook. This is where we collect the resources we need to translate GeoDirectory into all the different languages of the world. My name is Ismi and I’m here to help.

Who translates? (Everyone!)
Find your Language Team
Setup
Say Hi/Bonjour/Selamat
Translate some strings
Request Validation
Become a PTE
GD Locale Topics
GD Lead Translators
Additional Resources

Who does translations? Everyone! All the plugin users together!

In 2017 WordPress translations changed completely. First there was a change in where translations are stored, and now the responsibility for who creates the translations has changed, too. Instead of plugin authors, it is now all of us, the plugin users and site managers and everyone together who are responsible for translating plugins into our own language.

It’s a big job, but luckily both WordPress.org and AyeCode are providing us with tools and support to help us get organized. Join us to reach the goal of making GeoDirectory available in 20+ languages in 2018! Read on to find out more about how to join us #polyglots to #makewordpress.

Find Your Language Translation Team on WordPress.org

Every language has a team. If you want to be a translator, you should go find out how to join the team for your language: https://make.wordpress.org/polyglots/teams/

Setup your accounts

Most translation team leaders are on WordPress slack. Here are the steps to quickly setup your WordPress and WordPress Slack accounts.

  1. Login/Register at http://wordpress.org
  2. Login/Register (same account) at https://translate.wordpress.org
  3. Visit https://make.wordpress.org/chat and use the same account to register for Slack
  4. Visit https://gravatar.com to set an image for your new
    @chat.wordpress.com address
  5. Visit https://make.wordpress.org/polyglots/teams/ and find your language, then click on “View Team”

Say Hi and ask to how to join your language team

Once you know where to find your language team, and you have all your accounts setup, it’s time to say hello to your language team.
Introduce yourself on #polyglots
Start with saying “Hi” in the #polyglots channel on WordPress Slack.

  1. Open WordPress Slack
  2. Click the + next to channel
  3. Search for #polyglots
  4. Join the channel
  5. Say “Hello” (or something like it). Introduce yourself, and mention which language team you want to join. For example: “Hello, everyone @here ! I am new, and want to join the language team. @ismiaini @alexrollin”

Say hi to your language team leaders
Next, you can message some of the leaders of the team, to let them know. Visit your language team page, or look through the requests or the GD Translations to find other WordPress users who have validated in the past. Then make a direct message in Slack to say hello to them also:

  1. Open WordPress Slack
  2. Click the plus next to Direct Message
  3. Search for the people from your translation team and add them to the message.
  4. Also add @ismiaini and @alexrollin to share the joy
  5. Enter a message and say “Hi” again and introduce yourself, like you did in the #polyglots channel.

Ask your team at these questions
There are, at least, two (2) questions that you want to ask your language team leaders before you submit a request for help with validation:

  1. “How do I join the team?”
  2. “Is there anything you can tell me before I make a request for validation?”

Note: Be nice to these folks, as they have worked hard at what they do and obviously care a great deal about translation into your own language. They are your new collaborators, and you are their new team member. Enjoy the opportunity to meet these new colleagues and to work together on this great project called WordPress.

Translate some strings

Visit the GeoDirectory page for your language: https://translate.wordpress.org/projects/wp-plugins/geodirectory
The best way to get started is to click on one of the incomplete projects and then click on “untranslated”. This gives you a list of strings that need translation. Double click and add a translation. Easy!

Request Validation

Once you have translated some strings, you can ask your language team for help with validation. You can make your request here: https://make.wordpress.org/polyglots/?resolved=unresolved

Here is a template you can use to make your request. All the users tagged in the request will receive a notification.

Hello #polyglots! I translated some strings with our project language team and we need your help with validation.

o fr_FR @MyUsername @ismiaini @alexrollin

Pleased to answer comments and questions below in the comments.

CAUTION: Your language team will be happier if you contact them by WordPress Slack to say hi, first, BEFORE you request help. Your team may also have additional suggestions or rules about joining their team. Be sure to ask “How do I join the team?” before you ask “Is there anything you can tell me before I make a request for validation?”.

What’s a PTE?

Once you translate some strings, the strings must be validated by someone who is a member of your language team. Remember the person you said “hi” to above? Someone like them. Once you join your language team, and then complete a translation for GeoDirectory, you can ask a leader of your language team to set you up as a PTE for GeoDirectory for your language. A “PTE”, which is an acronym for “Project Translation Editor”. PTEs can validate strings. PTEs are assigned by the WordPress language team to to projects in their language. For example, a person who translates GD into Russian would go and talk to the Russian team members and ask them to validate the new translations. Then, when they finish, the translation team might make them a PTE for the GeoDirectory Russian translation. Being a PTE means that your strings are automatically validated, and you can validate the contributions of others, too.

GD Translation Leads

Are you committed to keeping up GeoDirectory translations for your native language? Here’s the rundown of what goes with the territory:

  • Join the WordPress language team for your native language.
  • Complete and continuously update the translation of GeoDirectory core and readme.txt on WordPress.org for your langage.
  • Complete and continuously update the translations of the GD Addons here.
  • Follow your own WordPress language team’s guidelines for translations and collaboration with other translators.

One lead translator from each language will receive a GeoDirectory membership that will remain active as long as they remain a translation lead on the GD Translation Team.

GD Translation Topics

Join up with others here on GD that speak your language. Some languages have a forum topic they call “home”; if your language doesn’t have one, go ahead and create it in the transations forum.

Existing Locale Forum Topics

Locale (English) Locale (Native) WP Locale Team Topic
Indonesian Bahasa Indonesia id_ID https://wpgeodirectory.com/support/topic/indonesian-locale/
French (France) Français fr_FR https://wpgeodirectory.com/support/topic/french-locale/

Additional Resources

Add Google API KEY

  1. You can find the setting in GeoDirectory under GeoDirectory > Design > Map > Google Maps API KEY:
  2. Log into your Google account in another tab or window.
  3. Click on Generate API Key.
  4. In the popup, select Create a new project:
  5. When the popup shows the New Project, change the name if you like, and then click Create and enable API:
  6. Copy the key from the next screen:
  7. Close the popup.
  8. Paste the key in the API key field:
  9. Scroll to the bottom of the page and Save.
  10. Once you have it up and running, you may want to restrict the API to your website domain by clicking on Generate API Key, selecting the project you created earlier and go to the API console:
  11. Under credentials for the key created, select HTTP referrers, and then add *.mysite.com/* (change to your domain) in the HTTP referrers field, and then Save:


Versions 1.6.10 of the GD core plugin and earlier:

You can find the setting in GeoDirectory under GeoDirectory > Design > Map > Google Maps API KEY

  1. Go to this link to start (you will need a google account)
  2. Click Continue to add a new project (or you can select a current one)
  3. If you see this message: “You don’t have permission to create an API key” follow this step, if not skip to the next step.
    permissions

    It means exactly what it says.
    You’ll need to create new credentials before an API key can be generated.

    Click on the “Credentials” link in the left hand sidebar
    Click the “Create credentials” button
    Select the “API Key” option
    Then click the “Browser key” button from the pop-up
    Now you’ll be taken back to the create a browser key step above and can proceed.

  4. It is important you follow this step exactly:
    You will need to add two urls here,enter the name of your project and the url of your site, add one as: *.yoursite.com/*
    AND one as
    yoursite.com

    as shown below:gkey2
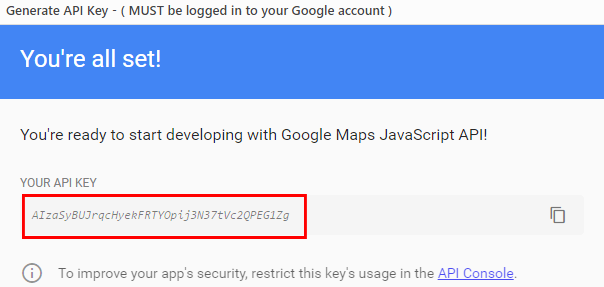
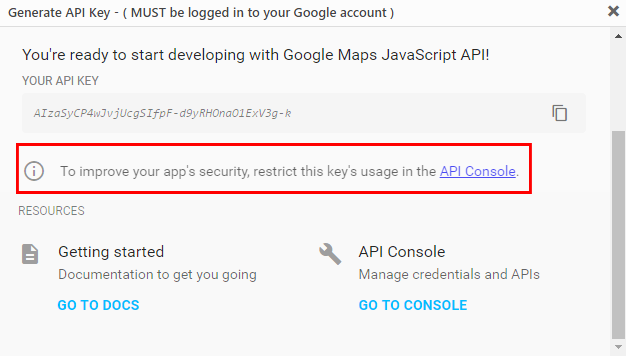
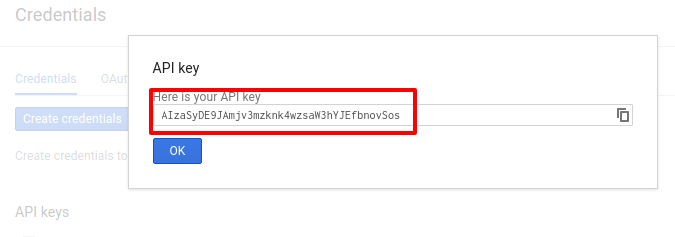
You will then be presented with your API KEY:

    If you already have a project with a verified domain, you might be presented with a different screen, in that case select those settings to get your API key:
  5. Copy and paste your API KEY into your GeoDirectory Settings and click save:
  6. Wait for a while before checking, Google says this can take 5 minutes but we have found it to take up to 15 minutes in some cases.

Once that is all done, you can happily use google maps 🙂

If you did not use our tutorial link or you already have a current project:

…If you did not use the link we provided to create a new API key they you will have to manually activate several API’s:

  1. In your API project click “Overview” and then “Enabled API’s”
    overview
  2. Make sure the below APIs are enabled:
    apis
  3. If they are not all enabled then click “Google API’s” and search for them and enable them.

Server requirements

On this page:

Introduction Managed WordPress Hosting Suggested Hosts

Introduction

WordPress in general requires more than shared hosting for anything bigger than a tiny blog or a static website.

GeoDirectory will not perform very well on shared hosting servers, even if only a few other plugins are installed.

The optimal server solution will depend on several factors, such as:

  1. Theme used (there are some themes that are so resource heavy that even without extra plugins they will choke on shared servers)
  2. Number of plugins
  3. Number of listings
  4. Amount of visitors

We normally suggest to start at least with a decent VPS (virtual private server), with 2GB of RAM.

The best performances for a GD site are to be expected on dedicated servers with 8GB of RAM or more.

Managed WordPress Hosting

All managed WordPress hosting uses caching systems that are not compatible with GD’s geolocation features.
Managed WordPress hosting is good only for blogs or static websites.

The only caching system that works with GD is GD Booster or WP Super Cache, and all other caching needs to be disabled. (this will no longer be valid starting from V2 of GeoDirectory that will be compatible with all caching systems)

Suggested Hosts

We have our demos installed on Spectrum Technologies Group LLC. Spectrum Technologies Group LLC is managed by one of our most faithful customers and we are satisfied with performances and we do highly recommend them.

Understanding hooks, actions and filters

Introduction

Your website pages are the result of WordPress and GD (and your theme and other plugins) checking your server files and your database to create the code that renders the page in your browser.

Actions and Filters are functions that can be modified to change the default functionality of GD and WordPress.

Actions or Filters are “hooked” into your pages by “hooking” them to action or filter hooks provided.

Action Hooks

Action hooks are special points in the WordPress or GD code that enable you to insert additional code and therefore customize the code to do some additional function.

For example, if you want to add a favicon to all your pages, you could hook into the wp_head action hook, a hook provided to add extra coding between your  <head> and </head> tags of your web pages. You would add the following code to your functions.php file:

[php]
function myplugin_favicon_head_code() {
echo ‘<link rel="icon" type="image/png" href="/images/favicon.ico">’;
}
add_action(‘wp_head’, ‘myplugin_favicon_head_code’);
[/php]

Actions make things happen.

Filter Hooks

Filter hooks are used to change the behavior of the default code.

For example, if you want to change the date format of the Events plugin, you can filter the default code to change the output. You would add the following code to your functions.php file:

[php]
function geodir_add_event_calendar_date_format_change($format){
return ‘d/m/Y’;
}
add_filter(‘geodir_add_event_calendar_date_format’, ‘geodir_add_event_calendar_date_format_change’,10,1);

[/php]

Filters change how things happen.

For a list of all Actions and Filters used by GeoDirectory, please refer to the GeoDIrectory Codex

Known issues

This page lists some conflicts with other plugins or themes.

Note that the below problems were correct at the time of writing, and that either GD or the third party plugins or themes may have been modified in the meantime to correct the problem.

Let us know if anything on this page is no longer valid. Thank you.


Plugins

Themes

Other

Cache Plugins

Plugins

Advanced Access Manager

  1. This plugin is not compatible with the GD Search functions without the following setting:
  2. AAM > Settings > Content Settings > Check Post Visibility – UNCHECK this setting

Advanced Custom Fields

  1. Hide WP Custom Fields – This plugin will hide the normal WordPress custom fields in the backend editor for posts. Some themes like Supreme make use of WP custom fields, so, disable the plugin to view and edit the custom fields.
  2. Incompatibility – Geodirectory does not have any integration with ACF for listing custom fields. Adding fields through ACF will not add fields to all GD listings; use GD custom fields instead.

BuddyPress Docs

  1. This plugin is not compatible with the GD Search functions.

BuddyBoss Wall

  1. This plugin is not compatible with the GD Search functions.

BuddyPress Global Search

  1. This plugin is not compatible with the GD Search functions.

Edit Flow

  1. Edit Flow adds a custom taxonomy (category) to all post type following_user and adding the author automatically to the post as a new category.
  2. Edit Flow also partially breaks the dashboard for GD posts.

EventOn

  1. EventOn breaks the GD Add Listing forms.

Express Curate

  1. This plugin creates duplicate WP posts of any new GD listing.

Hide My WP

  1. This plugin rewrites the path of your folders and files using .htaccess.
  2. Your searches etc will no longer work.

Loco Translate

  1. Loco Translate is not compatible with Geodirectory. Only WPML is compatible with Geodirectory for multilingual sites.
  2. Geodirectory translation should be done with PoEdit as described here.
  3. Local Translate will overwrite .PO files placed at wp-content/languages/plugins
  4. Loco Translate will automatically create language files with incorrect names so that the files are not loaded.
  5. Loco Translate does not recognize all GD language strings, so you will not be able to translate everything.
  6. Check the file names of the .PO files to make sure they are correct, see Translating Addons for the correct file names.

TranslatePresss

  1. Stores additional copies of strings found in language files.
  2. Can result in changes to PO files ‘not working’ because TranslatePress versions will override PO string values.
  3. TranslatePress must be de-activated to diagnose issues with PO file strings.
  4. Only WPML is fully compatible with GD.

Polylang

  1. Only WPML is fully compatible with GD.

Relevanssi

  1. This plugin is not compatible with the GD Search functions.

Scripts n Styles

  1. This plugin introduces a jQuery chosen conflict that can cause GD forms to not function.
  2. The plugin can cause isues on any add/edit post pages or anywhere in the backend..

Scroll To Anchor

  1. This plugin breaks the menus of the Supreme theme in mobile view.

Sidebar & Widget Manager for WordPress

  1. If your drop-down menus in GD admin area don’t work, then this premium plugin from OTWthemes might be the reason.
  2. Reported by a user on 3 August 2015.

Simple Custom CSS and JS

  1. Breaks JS.

Theme My Login

  1. This plugin is not compatible with the GD Search functions.

The SEO Framework

  1. The SEO Framework breaks GeoDirectory queries, we suggest to use Yoast that is 100% compatible with GD, or GD’s Titles and Meta options.

Ubermenu

  1. This plugin calls the Google Map API (and also fontawesome), just like GD does.
    The result is that your page tries to load the Google API twice.
    Therefore your maps will not work.
  2. You can fix this by disabling both the Google Map API  and fontawesome in the Ubermenu settings > General Settings > Assets.

WP Places

  1. This plugin causes backend editor google map to fail to load.
  2. The plugin loads another copy of the GMaps API causing all maps to fail on the page.
  3. The plugin loads on every backend post edit page, even if the post types are disabled.

WP-SpamShield

  1. This plugin stops your GD registration and login process.
  2. This plugin is not compatible with the WPaffiliate plugin required with the GD WPaffiliate Integration addon.  .
  3. We suggest using GD Recaptcha.

Yoast SEO

  1. Specific settings for redirects may conflict with GD “Near” Search.
  2. The Yoast setting comes with a warning: “May cause conflicts!”.
  3. Check “No Redirect” at SEO > Advanced > Permalinks > “Redirect ugly URLs to clean permalinks”.
  4. “Disable author archives” will make the GD profile pages disappear.
  5. Yoast sitemaps regenerate automatically. If changes are made to Permalinks it may take some time for Yoast to regenerate the pages with the new URL structure.

Themes

Braxton

  1. You will not be able to add some GD widgets to your pages.

Langwitch

  1. The multilingual features do not work with custom post types like GD listings.

Sky

  1. This theme replaces some GD options with their own, for example the sorting options for the Place Settings.

Kleo

  1. Broken URLs – Past versions of Kleo have included a filter for wp_redirect that breaks redirects across the site. If you are experiencing that issue, you should contact Kleo support and reference this information. Past fix was to comment lines 99-103 in file kleo\lib\importer\import.php (see the following code)
    [php]
    if ( defined( ‘DOING_AJAX’ ) && DOING_AJAX ) {
    add_filter( ‘wp_redirect’, function () {
    return false;
    } );
    }[/php]

AviaBuilder

AviaBuilder is included with several popular themes including Enfold.

  1. Unable to edit/save listing in frontend or backend – See this topic for a fix: https://wpgeodirectory.com/support/topic/listing-description-not-visible-after-saving/page/2/#post-420413
  2. Maps not loading – See https://wpgeodirectory.com/support/topic/unable-to-make-changes-to-records-places-even-as-admin/#post-436922

Thrive

  1. The builder strips inline CSS from the header.
  2. Add CSS to GD > Scripts > Footer instead of header

Other

Flexslider

  1. You can only use one Flexslider on a page, and because GD and some other plugins and themes use the same Flexslider, there often is a conflict resulting in only one of the two flexsliders on the page working.
  2. You can add this line to your theme functions.php and it should solve it for you:

    [php]wp_enqueue_script(‘geodirectory-jquery-flexslider-js’);[/php]

Cache Plugins

General Compatibility with Cache Plugins

  1. GeoDirectory is only fully compatible with GD Booster and WP Super Cache.
  2. Please see settings for Autoptimize here
  3. If you use WP Super Cache, you need to review the settings here.
  4. If you use GD Booster, it is recommended that you do not use any other cache plugins with it (including WP Super Cache).

Image Opitmizers

GeoDirectory is designed with several optimizations for images. Listings images are stored outside the media library to keep the media library uncluttered. Therefore, some plugins that claim to optimize images are not compatible with GD and can lead to unexpected behavior. Here are a couple of the ones we have heard of so far.

  1. WP Smushit – not compatible, results in images not being displayed
  2. EWWW Image Optimizer – not compatible, may result in blank pages for Add listing process

Bluehost

  1. Bluehost plugin caching is incompative with GD.

Jetpack

  1. GeoDirectory listings are not available to be indexed by Jetpack Search at Admin > Jetpack > Settings > Traffic > Search
  2. ‘Speed up images and photos’ setting will cause images to ‘disappear’, with or without GD Booster.
  3. ‘Social networks sharing’ may cause duplicate graph metadata and create difficulty with sharing to social networks.
  4. ‘Widget Visibility’ jetpack plugin can interfere with adding some GD widgets [reported 14 September 2015].
  5. Automattic adds new features to Jetpack regularly; report new issues as you find them.

Jetpack – Comments

  1. When enabling Jetpack Comments, your comments on your listings will not be counted by GD.
  2. Do NOT enable Show a ‘follow comments’ option in the comment form at Settings > Discussion for the Jetpack settings.
  3. Do NOT enable GD Recaptcha for comments if you are using Jetpack comments with social login.

Cloudflare Rocket Loader

  1. Cloudflare Rocket Loader is not compatible with GD.
  2. The only compatible tool to minify and concatenate scripts and css files is GD Booster.
  3. In some cases may be the cause of Google Map’s failure to load.

Scripts to Footer

  1. Causes JQuery errors visible in console, resulting in breaking search and maps.

W3Cache

  1. GD and GD Booster are not compatible with W3Cache.

Themes – GeoDirectory

GeoDirectory Framework

The GeoDirectory Framework is specially designed to be used with the GeoDirectory plugin, but it can be used without it. You can enable and disable widget areas and also style almost any area of your website from within the Framework Options Page.

There are also GeoDirectory Framework child themes available:

  • GDF modern child theme
  • GDF child theme

Compatibility for popular themes

Compatibility for some popular themes is included in the core plugin and new themes compatibility can be both imported or exported.

Themes compatibility currently included for:

  • Avada
  • Enfold
  • Divi
  • Genesis
  • Jupiter
  • MultiNews
  • X

To use these themes with GeoDirectory, follow these steps:

  1. Upload to your server:
    1. Main theme
    2. Optional but strongly recommended: a child theme for your theme
    3. GeoDirectory plugin
  2. Then go to GeoDirectory > Theme Compability > Select your theme

Avada

To use the Avada theme, follow further instructions here.

Buying addons and support

On this page:

Buying addons and support  Downloading addons  Third party GD addons

Buying addons and support

Buying a GeoDirectory membership

If you buy a GD membership here then you get access to all GeoDirectory addons and themes listed on these pages, and any new ones we release while your membership is active.
If you decide not to continue your membership then you can continue to use the versions you have but you will not be entitled to paid support or updates of the addons.
You will still get support for the free GD core plugin available from WordPress.

Buying separate addons or themes

You can also buy addons or themes individually. Licenses for individual add-ons provide auto-updates for 1, 5 or unlimited websites depending on the option selected. We no longer sell licenses providing lifetime support and updates.

Downloading addons

  1. If you have a current GD membership or have bought individual addons or themes, you can download the ZIP files from https://wpgeodirectory.com/your-account/
  2. In your download area, you will find a link to download the files, the licence key to activate the addon or theme, and the current version.
  3. Download the add-on from there and install it normally by uploading it via your WordPress admin, see Installing addons for more information.


Third party GD addons

There are some addons listed here that are by 3rd party developers, such as “GD Business Hours” and “GD Vouchers“. You will be buying these addons directly from those 3rd party developers, and they will provide you support directly. These addons and their support are not included in the GD membership.

Understanding navigation, searching and browsing …

On this page:

Introduction

As explained here, the main directory pages created are the GD Home/location, Listings (archive or category) pages, the search page and detail pages.

Your website can be navigated using two different ways, browsing and searching. These terms are not interchangeable: browsing is not the same as searching, and searching is not the same as browsing.

Browsing

Browsing is when a visitor or you follow the links as presented in menus, or on maps, or anywhere on a page, for example

  1. If your site uses the Location Manager, you can navigate locations by selecting a location from the location switcher in the menu:
  2. You can follow links from the Popular Categories widget:

Searching

Searching is when a visitor uses the GD Search to find one or more listings in your directory:

The basic GD Search function

Using the “Search for” field only

  1. GD will check the entry titles, description and taxonomies (tags and categories) of the listings.
  2. The results will be listed in order of relevance depending on the keyword(s) entered.
  3. For example, if you only search for “hotel, the results will be returned with listings that have hotel in the title first, etc:
    1. Search:
    2. Results:
  4. If a visitor clicks Search without adding any keywords, the results will be ordered based on the settings at GD > Place [or other CPT] Settings > Sorting Options tab.

Using the “Near” field only

  1. When you enter a location in the Near field, GD will calculate the center of that location.
  2. GD then will look for all listings within an area with a default that match the Search for criteria.
  3. Your default search area is set at GD > General > Search.
  4. The default GD search is not an IN search, but a search NEAR THE CENTER OF.
  5. For example, assuming your site has listings in New York, and you enter “World Trade Center” in the Near field, the results will return all listings in order of proximity to the World Trade Center:
    1. Search:

    2. Results:

Using both the “Search for” and the “Near” field

  1. When using both fields for searching, all relevant results will be returned in order of proximity:
    1. Search:
    2. Results:

Tips and tricks

Adding featured listings to the search page

  1. Because search results will always be ordered by relevance to the search criteria, any featured listings will be included in the search results using the same relevance to the visitors keywords used.
  2. But you can add a Popular Post widget, filtered for featured listings only in the top section or sidebar etc.

More information

The GD Search is explained in more detail here, and includes all the Advanced Search options etc.

Installing Addons

When you finished installing your GD core plugin, you can extend your GeoDirectory site by adding any of the Addons.
1. Download your new Addon ZIP file to your computer
2. Login to your WordPress Admin
3. Upload your Addon
4. Activate your Addon
5. Review the Addon settings
6. Auto Updates
7. Manual Updates
8. Frequently Asked Questions

1. Download your new Addon ZIP file to your computer.

You can buy individual Addons of your choice here, or you can buy a membership that includes all Addons and themes here.

2. Login to your WordPress Admin

  1. Log in to the WordPress Admin area of your website.
  2. Navigate to PluginsAdd New > and click on Upload

3. Upload your Addon

  1. Browse for the Addon ZIP file on your computer.
  2. Once you selected the ZIP file, click install.

4. Activate your Addon

  1. Wait for the upload to happen and then activate your Addon.

5. Review the Addon settings

As soon the Addon is activated, you will be taken to the Settings page of the new plugin:

6. Auto Updates / Licensing

  1. To keep your plugins up to date, you need to install the WP Easy Updates plugin.
  2. Follow steps 3 and 4 above to activate the WP Easy Updates plugin.
  3. You now will be able to add your license for your addon:
  4. Click on Licence key and add your licence:
  5. Click on Activate:
  6. To get your licences, go to your download area at https://wpgeodirectory.com/your-account/
  7. In future, your Addons will be able to be updated with a single click, just like any other WordPress plugins.

7. Manual Updates

    WordPress has a built-in feature to install themes and plugins by supplying a zip file. Unfortunately, you cannot upgrade a theme or plugin using the same process. Instead, WordPress will say “destination already exists” when trying to upgrade using a zip file and will fail to upgrade the theme or plugin.

    Easy Theme and Plugin Upgrades fixes this limitation in WordPress by automatically upgrading the GeoDirectory theme or plugin if it already exists.

    To perform a manual upgrade of an addon:

    1. Install and activate Easy Theme and Plugin Upgrades
    2. Download the addon you want to update from https://wpgeodirectory.com/your-account/.
    3. Visit the plugin page of your site and choose “Add New” and then “Upload Plugin”.
    4. Find the addon file, and choose “Install”
    5. Next you should see a confirmation like the following:

    8. Frequently Asked Questions

    Why do my automatic updates fail?

    Incorrect/Updated License/Key
    If you purchased a new subscription after your old one expired, your keys will have changed.
    Get your license key from https://wpgeodirectory.com/your-account/.
    Carefully copy and paste into the appropriate license field.

    Page Cache Issue
    If you copied and pasted the key, but the update still fails, try:
    1. Deactivate the key
    2. Refresh the plugin page
    3. Copy and paste the key again, then Activate
    4. After activation, refresh the page again and try the update.

    If that still doesn’t work, you can try a manual update.

    Review Setup of Automatic Updates
    Find the setup guide for autoupdates here: https://wpgeodirectory.com/docs/installing-addons/#updates

    Double Check Licensing and Membership
    Make sure your licenses are added at WordPress > Installed Plugins and that your membership is active.

    Update Single Site Licenses when Changing Site URL
    If you have a single site license, then whenever your site domain changes you will need to update the license for each plugin. For example, you might have been working on a development site at one URL, and now you have moved the site to a new URL. Follow these steps to deactivate the license at the old URL and activate the license at the new URL.

    1. Visit the old site at the old URL.
    2. Visit the old site plugin page.
    3. Find the addon license and click “Deactivate”.
    4. Visit the new site at the new URL and go to the plugins page.
    5. Find the addon license and paste your license code, then press Activate.

    Update Single Site License for a decommissioned site
    It may be that you started working on a site, then changed the URL or deleted or otherwise decommissioned the site. In this case, follow these steps:

    1. Visit https://wpgeodirectory.com/your-account/purchase-history/
    2. Select “View Licences” for the product.
    3. Select “Manage Sites”
    4. Select the sites where you want to deactivate the license.

    [qa cat=wp-easy-updates search=none title=none homelink=none]