How to build your own theme compatibility plugin

The GD core plugin now has a theme compatibility section where you can build any special settings for any theme.
The information below is not required anymore to make your theme compatible, but still contains useful information, so we have not deleted it.

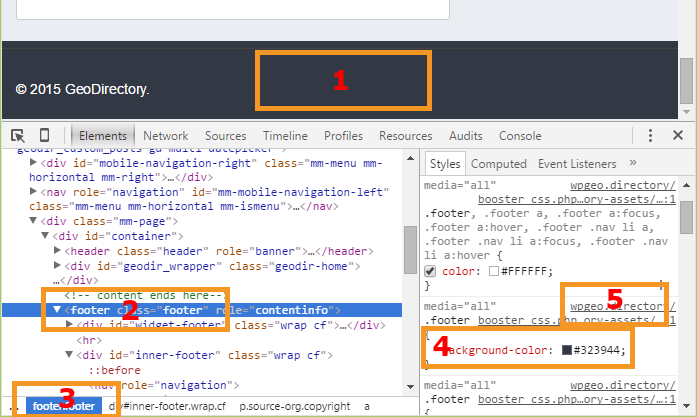
GeoDirectory will integrate nicely into many themes, but there are occasions where things appear to be out of place. This is usually because your theme has declared extra content areas which GD doesn’t recognise, or because your theme’s css rules are overriding those declared by GeoDirectory.

The best way to address these issues is to build a compatibility plugin to modify the behaviour of GeoDirectory and force it to output content into your desired areas.

This isn’t as scary as it sounds, so let’s walk through the process…

Requirements for this project

For this project you will need a text editor to write your code and an FTP program to upload the files to your website. It doesn’t matter which programs you use, but my preferences are Sublime Text and FileZilla

Step 1 – Creating the plugin

All the files you will be creating will be stored in a folder, so let’s create that first. For the purpose of this tutorial i’ve named the folder my-gd-plugin. Now open up your favourite text editor and create a new file within your new folder called mygdplugin.php (you can use your own name, but make sure to save it as a .php file)

Add the following to your new file:

https://gist.github.com/PoshJohn/fe8d902f9e0097e5a3d7

Congratulations – you’ve just created your first plugin! Now let’s make it actually do something…

Step 2 – Adding & Removing Actions

What we will be trying to do here is remove the actions that GeoDirectory uses to output the HTML wrappers of the main content and sidebar areas, and replace them with new ones we create.

GeoDirectory template files are a series of action hooks which run functions. We can change the behaviour of the plugin’s output by “unhooking” functions from their positions, and replacing them with our own functions.

Consider the steps necessary when you make yourself a coffee:

  1. Add coffee powder to cup
  2. Add boiling water to cup
  3. Add milk to cup
  4. Add sugar to cup
  5. Stir.

What if you wanted a black coffee? You would remove action number 3. If you fancied a hot chocolate you would remove action 1 and add a new action in it’s place (1. Add chocolate powder to cup)

This is exactly what we are going to be doing with our plugin.

Depending on the complexity of your theme, there may be many actions you need to look at. For the purposes of this tutorial we will look at the main three elements:

  1. The outer wrapper which contains both the content and sidebar areas
  2. The wrapper which contains the content area
  3. The wrapper which contains the sidebar

Here are the actions we will be replacing.

https://gist.github.com/PoshJohn/37460fa990f836bb768a

So what is happening here? Let’s take the first remove/add example:

We are saying in hook position geodir_wrapper_open remove the function geodir_action_wrapper_open and replace it with a new function called geodir_mytheme_action_wrapper_open

This means that every time a GeoDirectory template gets to that hook position, it will run our function instead of the in-built function. You can give your functions any name you like, as long as you use the same names in the next step.
I typically use the original function name and add the name of my theme into it
e.g. : geodir_action_wrapper_open becomes geodir_mytheme_action_wrapper_open

Step 3 – Adding Our New Functions

At this stage our plugin won’t work because we are telling GeoDirectory to run functions that don’t exist – so let’s start creating them!

Taking the first example again, let’s build the function to replace the output wrapper of the main content/sidebar area.
We told GeoDirectory to run a function called geodir_mytheme_action_wrapper_open, so let’s create that function now.

https://gist.github.com/PoshJohn/f32f2c7f7414f3db05d9

We simply need to continue that process for our remaining functions. Here is the finished plugin which replaces the output wrappers of the 3 main elements:

https://gist.github.com/PoshJohn/e83a32f3cfbcec4b91d4

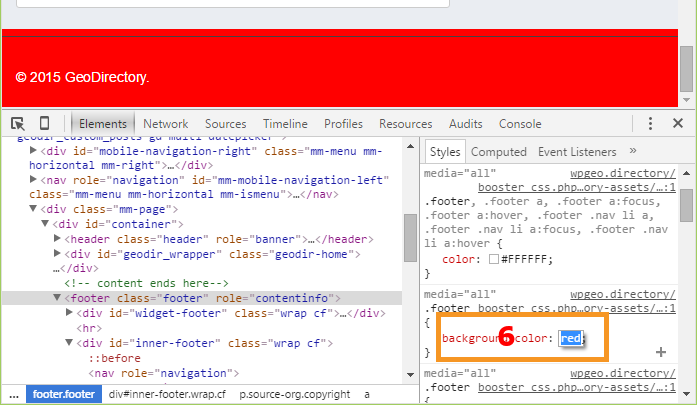
Step 4 – Styling The Elements

Since you will be creating this plugin to work with a specific theme, it doesn’t really make sense to load a new stylesheet. Styles therefore will be added to your theme’s style.css file as usual. For helpful tips on styling, take a look at this post on customising your style.

Important Things To Note

When we replace a function, it is important to note the structure of the original function. Did you notice the numbers at the end of the actions? The first number is the priority of the action and the second is the number of arguments passed. These should stay the same as the original function in most cases.

For more information on actions & functions, a great place to start is the WordPress Codex:

Conclusion

Congratulations on building your first GeoDirectory compatibility plugin!

There are many other functions that can be overridden, plus filters that can be utilised to modify the output of existing functions.

For working examples of these, you can download one of the existing compatibility plugins.

Hopefully the information provided in this tutorial will enable you to seamlessly integrate GeoDirectory into your theme. If however you are overwhelmed and would rather have someone else create the plugin for you, I am available for a small fee. Please feel free to contact me for a quote.

Translating themes (including GeoDirectory themes)

This article is about translating your theme, and making sure that your translations are not lost when there is an update to your theme.
The example used is the GeoDirectory Framework Theme, but the instructions apply for all themes.

The first thing you should have done after deciding to use the GDF theme is to use a child theme, this way you won’t lose your changes when the main theme is updated.
You can download both the GeoDirectory Framework Theme and its child theme, and the GDF Modern child theme from your download area.

Let’s get started:

1. Download poedit or check here for alternatives

2. Download the main theme’s  language file to your computer using FTP. For the GDF theme that file is at
/wp-content/themes/GeoDirectory_framework/languages/en_US.po.

3. Open poedit and choose

  1. Edit a translation (if you want to keep your site in US English)
  2. Create a new translation (if you are using any other language for your site)

4. Select the en_US.po from your computer.
You might have to change the type of file displayed from .POT to .PO.

Skip step 5 and 6 if you are not translating to another language, but only editing the US English version.

5. If you are translating to another language, then poedit will ask you what language you want to use for your translation.
For example if you are translating to French you would choose French from the list provided:

6. Save your translated file in the same format as the original language file:
In our example that would be fr_FR.po.

7. Change any of the language strings you want to translate or change.
When you then save the .po file, a .mo file will automatically be created.

8. Upload the .mo file (in our case en_US.mo or fr_FR.mo) to your child theme languages folder.
If there is no languages folder in your child theme just create one.
The result should look like this /wp-content/themes/GDF_child/languages/en_US.mo or /wp-content/themes/GDF_child/languages/fr_FR.mo.

9. If you have not set the language of your website yet, you do that by going to your wp-admin area, and then go to Settings > General > Site language and select your language there.
If your language is not available there, then you can download your WordPress language file here.

10. Go to your homepage and refresh to see your changes :).

Protect your files during theme updates
WordPress 4.6 introduced a new option to all you to store your theme translation in the following location:

/wp-content/languages/themes/my-theme-en_US.mo

When you store your translation in this folder, it will not be overwritten. The file should be named the same as the theme folder name.

Customizing your style

This article explains how you can create new CSS rules to change the style of your site.

Most browsers have a built-in code inspector, for example FireFox has Firebug, Internet Explorer and Chrome have Developer Tools.

For the example below, we will use Chrome’s Developer Tools to change the footer background color on the GeoDirectory Demo.

  1. Open the Chrome browser to the web page where we want to change the style of an element.
  2. Right click on the footer area element we want to change [Step 1 in the image below – we are right clicking on the footer].
  3. From the pop-up menu, choose Inspect element. If the code inspector is not open yet, it will open.
  4. If the element is not highlighted yet, we click on it to make sure it is [Step 2 and 3 – highlight the footer style].
  5. We can continue to select ‘Inspect’ until the element we want is highlighted in the code[Step 4 – in this case it shows that the footer class has a background color specified].
  6. The code inspector will also show you in which file you can find the code [Step 5].
    Turn off GD Booster before checking your CSS.
  7. The CSS code is displayed, and we click on the rule to change the background color; double click starts the editing. In this case we will change the background color to red [Step 6 in the second image].
  8. If the CSS code is correct, the web page will adjust to show your change [The footer is now red].
  9. Use the mouse to highlight the CSS code and copy it to your clipboard; proceed to add it to your site. You can add custom CSS to GeoDirectory at GeoDirectory > Design > Scripts > CSS Custom Code, or use anotherplugin or even add that code to the stylesheet of your child theme at WP Admin > Appearance > Editor and locate style.css in your child theme.
  10. Add the code .footer {background-color:red;}, and save. That will update your site.

Hints

  • You can add “!important” if your style rule doesn’t seem to have an effect. ‘!important’ will raise the priority of the rule if it conflicts with other rules. Example:
    [css]
    .footer {background-color:red !important;}
    [/css]
  • The code inspector will provide you with valid auto-complete suggestions as you type. Choose one, or two, and try them out until you become comfortable with the editor.
  • See it in action on Youtbe by WPBeginner.
  • Set a reminder on your calendar to backup your custom styles by copy/paste into a file every month. If you need to uninstall GD temporarily, don’t forget to make a copy of the Scripts you store in this location.

How to add CSS, PHP, and Javascript Snippets to your site

  • CSS – Add CSS to the GeoDirectory Design Admin Panel called Scripts. Navigate to YourSite > GeoDirectory > Design > Scripts > Custom Style CSS Code
  • PHP – Add PHP Snippets to your site with the Code Snippets plugin, a Very lightweight plugin that makes it easy to manage your custom code, and keeps it all in one place even if your plugins or themes get updated. There is a special case for ‘constants’, values that apply sitewide. These are PHP Snippets that start with ‘define’ like define(‘SD_DEFAULT_FEATURED_IMAGE’, “http://yourdomain.com/images/featured.jpg”). Constants should be added to your site’s wp-config.php file.
  • Javascript – You may never need this, but if you do need to add a Javascript snippet, add it to YourSite > GeoDirectory > Design > Scripts > Header Script Code or Footer Script Code, depending on the instructions you receive with the snippet.

Useful resources

Using child themes http://codex.wordpress.org/Child_Themes
CSS tutorial http://www.w3schools.com/css/
Using FireFox Page Inspector https://developer.mozilla.org/en-US/docs/Tools/Page_Inspector
Using Chrome Dev Tools https://developer.chrome.com/devtools/docs/elements-styles
Using Internet Explorer F12 developer tools http://msdn.microsoft.com/library/ie/bg182326
SiteOrigin CSS Plugin https://wordpress.org/plugins/so-css/

Installing Addons

When you finished installing your GD core plugin, you can extend your GeoDirectory site by adding any of the Addons.
1. Download your new Addon ZIP file to your computer
2. Login to your WordPress Admin
3. Upload your Addon
4. Activate your Addon
5. Review the Addon settings
6. Auto Updates
7. Manual Updates
8. Frequently Asked Questions

1. Download your new Addon ZIP file to your computer.

You can buy individual Addons of your choice here, or you can buy a membership that includes all Addons and themes here.

2. Login to your WordPress Admin

  1. Log in to the WordPress Admin area of your website.
  2. Navigate to PluginsAdd New > and click on Upload

3. Upload your Addon

  1. Browse for the Addon ZIP file on your computer.
  2. Once you selected the ZIP file, click install.

4. Activate your Addon

  1. Wait for the upload to happen and then activate your Addon.

5. Review the Addon settings

As soon the Addon is activated, you will be taken to the Settings page of the new plugin:

6. Auto Updates / Licensing

  1. To keep your plugins up to date, you need to install the WP Easy Updates plugin.
  2. Follow steps 3 and 4 above to activate the WP Easy Updates plugin.
  3. You now will be able to add your license for your addon:
  4. Click on Licence key and add your licence:
  5. Click on Activate:
  6. To get your licences, go to your download area at https://wpgeodirectory.com/your-account/
  7. In future, your Addons will be able to be updated with a single click, just like any other WordPress plugins.

7. Manual Updates

    WordPress has a built-in feature to install themes and plugins by supplying a zip file. Unfortunately, you cannot upgrade a theme or plugin using the same process. Instead, WordPress will say “destination already exists” when trying to upgrade using a zip file and will fail to upgrade the theme or plugin.

    Easy Theme and Plugin Upgrades fixes this limitation in WordPress by automatically upgrading the GeoDirectory theme or plugin if it already exists.

    To perform a manual upgrade of an addon:

    1. Install and activate Easy Theme and Plugin Upgrades
    2. Download the addon you want to update from https://wpgeodirectory.com/your-account/.
    3. Visit the plugin page of your site and choose “Add New” and then “Upload Plugin”.
    4. Find the addon file, and choose “Install”
    5. Next you should see a confirmation like the following:

    8. Frequently Asked Questions

    Why do my automatic updates fail?

    Incorrect/Updated License/Key
    If you purchased a new subscription after your old one expired, your keys will have changed.
    Get your license key from https://wpgeodirectory.com/your-account/.
    Carefully copy and paste into the appropriate license field.

    Page Cache Issue
    If you copied and pasted the key, but the update still fails, try:
    1. Deactivate the key
    2. Refresh the plugin page
    3. Copy and paste the key again, then Activate
    4. After activation, refresh the page again and try the update.

    If that still doesn’t work, you can try a manual update.

    Review Setup of Automatic Updates
    Find the setup guide for autoupdates here: https://wpgeodirectory.com/docs/installing-addons/#updates

    Double Check Licensing and Membership
    Make sure your licenses are added at WordPress > Installed Plugins and that your membership is active.

    Update Single Site Licenses when Changing Site URL
    If you have a single site license, then whenever your site domain changes you will need to update the license for each plugin. For example, you might have been working on a development site at one URL, and now you have moved the site to a new URL. Follow these steps to deactivate the license at the old URL and activate the license at the new URL.

    1. Visit the old site at the old URL.
    2. Visit the old site plugin page.
    3. Find the addon license and click “Deactivate”.
    4. Visit the new site at the new URL and go to the plugins page.
    5. Find the addon license and paste your license code, then press Activate.

    Update Single Site License for a decommissioned site
    It may be that you started working on a site, then changed the URL or deleted or otherwise decommissioned the site. In this case, follow these steps:

    1. Visit https://wpgeodirectory.com/your-account/purchase-history/
    2. Select “View Licences” for the product.
    3. Select “Manage Sites”
    4. Select the sites where you want to deactivate the license.

    [qa cat=wp-easy-updates search=none title=none homelink=none]

Location Manager – Location Settings

These are the sections you will find when you install the Location Manager:

Introduction and Location Settings tabManage Location tab – SEO Settings tab – Add/Edit Location tab – Translate Countries tab

On this page:

Introduction – Installation – Location Settings – Home URL SettingsMain Navigation SettingsGeo Directory Location SettingsAdd Listing Form Settings

Introduction

  1. With our MultiLocations Manager you can turn your GeoDirectory into a global directory. As standard, GeoDirectory can be setup from a single location and listings can be added only for that location, but with our Location Manager plugin, you can let users set the location of their listings and the location will be stored in your locations database. This means visitors can then select any added location and browse listings only from that area (you can also browse from “Everywhere”).
  2. The areas you can filter listings by are: Countries, regions, city or neighborhoods. Apart from neighborhoods all other areas can be added by a user when they add their listing. So the location does not have to be in your database for a user to be able to add a listing.
  3. If a duplicate city is added with slightly different spelling, there is a tool to merge the two cities. Locations can also be edited/added by the admin from the backend.

Installation

After uploading and activating the Addon, you will be taken to the Settings page:

Location Settings

Home URL Settings

  1. This setting allows you to choose the URL of the Home link in your breadcrumb, either clicking Home in the breadcrumb will take you to the homepage of your website, or clicking Home in the breadcrumb will take you to the location page for the selected location.
  2. Home page should go to Site root (ex: mysite.com/) will take you to your homepage:
  3. Home page should go to Current location page (ex: mysite.com/location/glasgow/) will take you to the start page for the selected location:

Main Navigation Settings

Show location switcher in menu

This setting will add a navigation tool to your main menu:

  • It will allow your visitors to easily choose a city, region or country on your site
  • It highlights the location your visitors has browsed to


It is highly recommended to use the location switcher, it makes life a lot easier for your visitors.
Make sure you have selected a menu to be used for your GeoDirectory links at GD > Design > Navigation

List drilled-down Regions, Cities or List all Countries, Regions, Cities
  1. The first option (List drilled-down Regions, Cities) will narrow the list of regions or cities, depending of the choices made by your visitors.
    1. For example if a visitor has selected United States as country, then only US states and cities will be available in the Region and Cities filter.
    2. If the user then chooses Florida from the Region filter, then only Florida cities will be shown in the Cities filter.
  2. The second option (List all Countries, Regions, Cities) will always list all regions and cities in your database, regardless of any other filter already applied.
    1. For example, if a visitor has selected United States as country, all regions and cities in other countries will still be available in the Region and Cities filters.

Geo Directory Location Settings

Country – Region – City
  1. The settings for countries, regions and cities are basically the same:
    1. Choose to accept listings for every country, region or city
    2. Or restrict to particular countries, regions and cities.
  2. If you tick the Everywhere box, Everywhere will be listed as an option for countries, regions or cities.This allows your visitors to zoom out.
    1. For example if a visitor has browsed to Orlando, they can choose to see all the listings for Florida by either choosing the Everywhere option for Cities, or they can choose Florida from the Region filter.
Wish to enable neighborhoods?

Refer to City Neighborhoods.

Examples:

Directory for the United Kingdom and Ireland:
Country > enable selected countries > select United Kingdom and Ireland
Region > enable Multi Regions
City > enable Multi Cities
Note: you would need at least one location in the United Kingdom and one in Ireland before the countries will be available for selection

Directory for Japan:
Country > enable default country
Region > enable Multi Regions
City > enable Multi Cities

Add Listing Form Settings

The following settings affect how users add addresses and locations for their listings in the Add Listing forms.

Disable Google address autocomplete?

This will stop the address suggestions when you start typing in the address box on the Add Listing page:

Show all locations in dropdown?

Rather than showing a few locations only and then searching as the user types a location, you can choose to present all current locations in your database at once. This can be useful if you have a small directory but can break your site if you have many locations.

Disable set address on map from changing address fields

By default after selecting your location from the dropdowns, clicking on Set address on map will move the marker to that location. You can disable, this may be useful if you have a small directory and you have custom locations or your locations are not known by the Google API and they break the address.
Highly recommended not to enable this.

Disable move map pin from changing address fields

By default, dragging the marker on the map will change the location fields to match. Similar to the previous option, you can disable this, it might be useful if you have a small directory and you have custom locations or your locations are not known by the Google API and they break the address.
Highly recommended not to enable this.

Redirecting the login or registration page


On this page we’ll explain how to integrate your GeoDirectory with some other plugins that use the WordPress user accounts.

Introduction

  1. By default GD will add its own registration and login page.
  2. But you may want to redirect either the login and/or registration links to other pages, for example because you are using a membershipp plugin.
  3. You can add the following code snippets to your child theme’s functions.php or use the code snippets plugin.

1. Redirecting your login

[php]add_filter(‘geodir_login_url’,’change_geodir_login_url’,10,3);
function change_geodir_login_url($login_url,$args,$gd_page_id){
//change the url to whatever you want.
$login_url = ‘http://your-site.com/my-login-page’;
return $login_url;
}[/php]

2. Redirecting your registration

[php]add_filter(‘geodir_login_url’,’_my_geodir_login_url’,10,3);
function _my_geodir_login_url($login_url,$args,$gd_page_id){
if(isset($args[‘signup’])){
//change the url to whatever you want.
$login_url = ‘http://your-site.com/my-rego-page’;
}
return $login_url;
}[/php]

3. Adjust for your particular integration

In the code above you’ll see we are redirecting geodir_signup to /wp-login.php

The page it is redirecting to might have to be adjusted for your situation.

WooCommerce

A standard installation of WooCommerce creates a shopper’s account page at /my-account.

You would change the above code to

[php]$login_url = ‘http://your-site.com/my-account’;[/php]

bbPress, s2Member etc

The code above will work to by-pass GD’s registration and login process for all plugins that use the standard WP login, like:

  • bbPress
  • s2Member