This table lists some important things you should never do, and some things you definitely should do.
It is a good checklist to make sure you don’t break your site, and that you get the most out of your setup.
Do NOT do this !
Do this
Page caching plugins do not work well with GD, GD creates page dynamically. GD Booster is specifically designed to cache GD pages and your normal WordPress pages. Another option is to use WP Super Cache. READ MORE
Tick Organize my uploads into month- and year-based folders in the WordPress Media settings READ MORE
Do NOT delete a location in the list of locations at Multilocations, because that will also delete any listings in that location! READ MORE
Create at least one category for your Custom Post Types like Places or Events, AND each listing has to be in at least one category, or your listings will not show on the frontend of your site READ MORE
Do NOT use any parent page for any of the GD pages. READ MORE
Backup your database and files before trying customizations. You will be able to restore your site if you break something.
Do NOT import CSV files with post IDs unless you want to over-write/update existing listings. If you add post IDs that refer to an existing WP page or WP post, or another GD listing, they will be over-written. READ MORE
If using GD for the homepage of your site, make sure to set WP Admin > Settings > Reading > Front page displays > Your latest posts > YES.
When using the MultiLocation addon, make sure to enable the location switcher at GD > Multilocations > Location Settings tab > Main navigation settings.
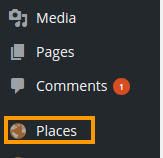
The free GD plugin will automatically create a new custom type of WordPress posts, which allows you to add content to your directory. The GD plugin calls these custom posts Places, and you will find them in the main WP admin menu.
In the GeoDirectory context, these posts are called listings.
Every listing will need to be in a category, or the listing will not be added to the GD maps.
GD will work with one level of sub-category as well:
Places > Category > Sub-category > Listing
Examples using GD core
One example is a local directory, and this could be your setup:
Category
Sub-category
Listing
OR
Category
Listings
Restaurants
French
L’escargot
Restaurants
L’escargot
La Baguette
La Baguette
Italian
Mario
Mario
The Pizza Dude
The Pizza Dude
Accommodation
Hotels
The Sleep Inn
Accommodation
The Sleep Inn
The Rich
The Rich
Bed and Breakfast
Chez Nous
Chez Nous
The Rooster
The Rooster
Extending your directory
The above examples are based an the standard free GD plugin installation: All your listings and categories will need to be of the same custom post type Places.
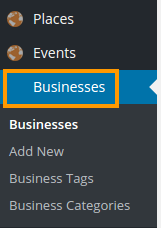
As standard, GeoDirectory comes with one CPT called Places (see above), new CPTs will have their own dedicated sidebar menu and management system just like Places.
Why and when to use Custom Post Types?
The advantages of this plugin are that instead of trying to manage a large diverse directory with many categories all under the one post type, you can split these into more manageable CPTs.
Factors worth considering whether you want to organise your site with different CPTs:
you can add different custom fields to each Custom Post Type
it is easier to manage different pricing levels with CPTs than categories
a listing can only be submitted to one CPT at the time, but it is possible to submit the same listing to more than one category
Some widgets can only be filtered on one CPT at the time.
Maps can only show one CPT at the time but can show multiple categories at the same time.
Events Addon
The Events Addon is a custom post type specifically designed for the way events are prioritized by dates.
With this plugin you can let users add their events to your site. Events are ordered by upcoming date by default. Users can enter recurring dates for their events instead of having to create lots of separate events. As this is also a custom post type you have the usual ability to add custom fields and sort options.
Here are links to more details of the different templates further down the page: Home | Listings | Search | Detail | Author
Typical layout
Below is a standard layout of a WordPress site, using the GeoDirectory plugin.
All the GD directory pages are based on this layout.
The default Design settings only use the GD Right Section and not the GD Left Section, because that is the most common layout.
Also, the GD Bottom Section is not enabled by default, although this section allows you to add content to the bottom of your GD pages you maybe do not want in the footer section of your non-GD pages.
Header section Part of your theme: logo, header menu etc
GD Top section Use GD widgets here like map, popular categories etc
GD Left section Used for sidebar widgets
GD Content section This content will vary depending on whether this is your GD home page, GD Listings page, GD Detail page or GD Search page
GD Right section Used for sidebar widgets
GD Bottom section
Footer section Part of your theme: footer menus, copyright text etc
GD Home page
This is the home page for your GeoDirectory. You tell GeoDirectory which page is the GD Home at GD > Permalinks > GD Home.
Some GeoDirectory themes with links to “home” will redirect users to this page, even if it is not set as your WordPress static home page.
You can set WordPress > Reading > Static Front Page to this same page, if you want your GeoDirectory page to also be the front page of your site. You can also use a different pages for your WordPress Front Page and the GD Home. Some members choose to use different pages so they can create a customized Front Page with a builder and add specific widgets or shortcodes that are not display on the GD Home and Location pages.
The GD Home page is a WordPress page, but any content added to the page content area is ignored by GeoDirectory. To add content to GD Home, you will need to add Widgets at WP > Appearance > Widgets.
GD Home is also the template used for each of the locations in your GD installation (including countries, regions and cities).
Normally, you’d want the map in the top section, as you see at the GD demo.
Without the Location Manager addon, you will only have one location.
Examples:
yoursite.com/location will show all listings
yoursite.com/location/belgium will show all listings in Belgium
yoursite.com/location/united-kingdon/greater-london will show all listings in Greater London
yoursite.com/location/italy/lombardia/milano will show all listings in Milan
GD Home
Location Page Layout Options (using the GD Home Template)
The location page is used to display listings for each location.
Each location, whether it is a country, region, city or neighborhood will display using the location page.
GD Home is actually the location “everywhere” and so sorts and shows all the listings.
The Location page uses the same widget settings as the GD Home Page. When you add widgets to your home page, they will also be displayed on the Location page.
When you add widgets or shortcodes to your Home/Location page, you should consider checking “filter results for location” when available, so only the listings for the particular location will be shown.”
This is the template that will display a list of all listings in a particular category or custom post type, and will show different listings depending on location and category requested.
Examples:
yoursite.com/attractions will show all listed attractions
yoursite.com/hotels/finland will show all listed hotels in Finland
GD Search page
You guessed it, this is the page displaying the result of a GD search.
GD Detail page
The detail template is used to display all the detail of each of your listings.
It will display all the information one of your users has submitted about their place, business, organisation or event etc.
GD Author page
This is the page displaying content specific to your users when they are logged in; it is your users’ dashboard.
It will list their favorite listings and/or events, and the listings they have submitted themselves.
Go to WP Settings > Permalinks and make sure they are set to Post name.
Often re-saving this settings will fix “page not found” errors, by forcing WordPress to update any changes you made in the URL structure at GD > Permalinks or in the Location Manager settings.
Adding these shortcodes to any WP page will give you a good overview of what GD pages have been created and their correct URL:
[gd_advanced_search]
[gd_login_box]
[gd_cpt_categories]
[gd_location_switcher]
Note that the last shortcode will only work if you have the Location Manager installed.
Detail page goes to “page not found”
Make sure the listing is in at least one category.
Review the WP Permalink comments above.
Maps
Check Google Map API.
Make sure that you added a key at GD > Design > Map.
Make sure the key is valid for your domain.
Do NOT hide the maps.
Check that there are no boxes ticked at GD > Design > Map > SHOW / HIDE POST TYPE AND CATEGORY ON MAP
Redirect to homepage when submitting listing
An error regularly reported is that when a listing is submitted from the frontend, instead of going to the checkout page, the site redirects to the homepage instead.
This is because either the session directory on your server is not writable or it does not exists, and you will have to talk to your host to get it fixed.
You can add this as a temporary fix to your wp-config.php file:
[php]
if ( !defined( ‘GEODIR_USE_PHP_SESSIONS’ ) ) {
define( ‘GEODIR_USE_PHP_SESSIONS’, false );
}
if ( !defined( ‘WPINV_USE_PHP_SESSIONS’ ) ) {
define( ‘WPINV_USE_PHP_SESSIONS’, false );
}
[/php]
Conflict Test
You can review a list of known issue here, but if your issue isn’t listed, then proceed with the conflict test here.
The test:
Identify the ‘problem page’ where the issue can be seen, and leave this open in a browser tab.
In another browser tab, open up the plugins page – WordPress – Plugins.
Deactivate all non-GD plugins.
In ‘problem page’ tab, refresh and verify if the issue is still present.
If you have a lot of plugins running on your site, here is a priority ordering:
Cache related plugins. (Good idea to leave cache related plugins disabled while doing any work on the site.)
Page builder plugins (Divi).
Plugins with ‘heavy’ javascript or those that alter the page output.
Plugins that are listed in errors in the chrome inspector.
Plugins that are listed in errors in the chrome inspector.
Last but not least, try switching themes. Switch to a theme like twentyseventeen (default) to see if the issue is still present.
Advanced: It is also possible to disable all plugins via FTP. This can be ‘faster’ but requires care and precision. See this tut for more info.
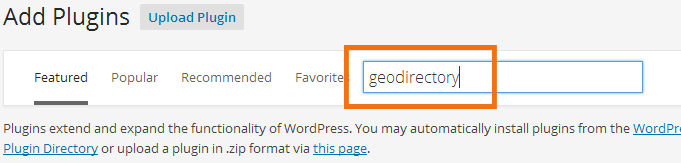
Automatic installation is the easiest option. To do an automatic install of GeoDirectory, log in to your WordPress dashboard, navigate to the Plugins menu and click Add New.
In the search field type GeoDirectory and Enter. Once you’ve found our Directory plugin you install it by simply clicking Install Now.
Manual installation
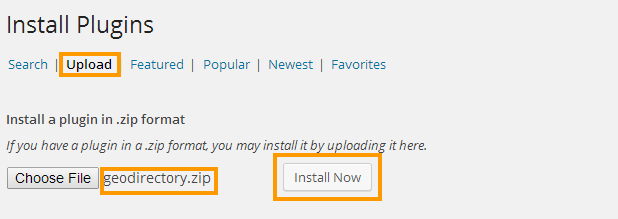
The manual installation method involves downloading our Directory plugin and uploading it to your web server via your favourite FTP application. The WordPress codex will tell you more here.
Then in your WordPress Dashboard, go to Plugins > Add New, then select Upload and browse to the GeoDirectory zip file you downloaded from WordPress.org. Click Install Now.
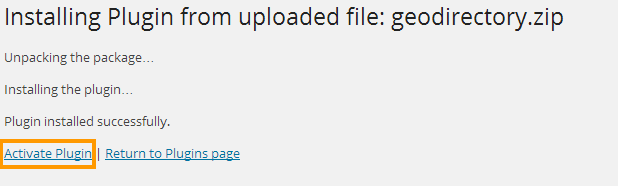
2. Activate the plugin:
This might take a few seconds while the plugin installs the required database tables.
3. Map settings:
After activation you will see a message asking you if you want to set a Google Maps API KEY, and another message to set your default location.
3A. Setting a Google Maps API KEY
Clicking on the click here link will take you to GD > Design > Map.
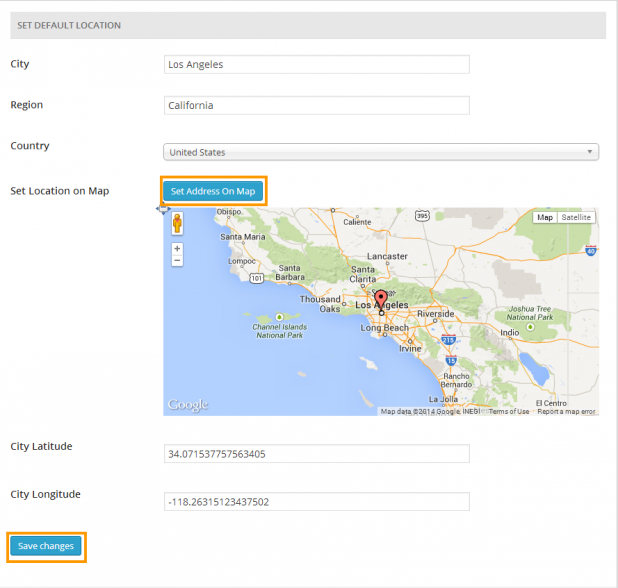
#1 Enter a city, region and country for your default location and then click Set Address On Map, this will set the GPS info as required and move the map marker to the correct location. Note: If you set the lat/lon manually, it should be in the format 32.715738, -117.16108380000003, not 117.1611° W, 32.7157° N.
Then click Save changes.
There is no need to enter the latitude or longitude.
#2 You can drag the map marker to the location you wish to use as a default location and we will try to fill in the location details, you should check the location details and make any corrections as required.
Then click Save changesto set the default location.
There is no need to enter the latitude or longitude.
4. Change WordPress settings:
For GeoDirectory to work correctly, you need to set WordPress permalinks to use Post name
From the main WordPress Dashboard menu, choose Settings > Permalinks > Tick Post name, and Save changes.
For GeoDirectory to work correctly, you also need to allow Anyone to register.
From the main WordPress Dashboard menu, choose Settings > General > Tick Anyone can register, and Save changes.
For GeoDirectory to work correctly, you also need to Organize my uploads into month- and year-based folders.
From the main WordPress Dashboard menu, choose Settings > Media > Tick Organise my uploads into month- and year-based folders, and Save changes. Note:The default folder for uploaded images is wp-content/uploads. Do not change this folder.
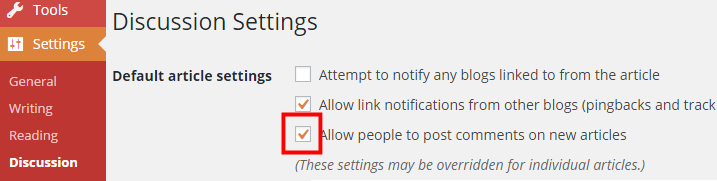
If you want visitors to leave reviews, you need to
From the main WordPress Dashboard menu, choose Settings > Discussion > Default article settings > Tick Allow people to post comments on new articles, and Save changes.
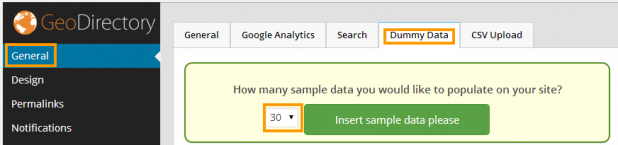
5. Install dummy data (optional but recommended):
This step will add a few categories and listings to your site, so you can get a feel of what is possible with your GeoDirectory site. You will be able to delete them later.
If you do not install the dummy data or you delete the dummy data, you will have to make sure that you create at least one category for your Custom Post Types like Places or Events, or you will not be able to add any listings.
Click on the General tab under the GeoDirectory logo and then select the dummy data tab. You can select how many listings you would like to install, 10 is the default but you can install up to 30. After clicking Insert Sample Data there will be a short wait while the dummy images are downloaded and the dummy address info created for your default location. You will see an ajax counter displaying the progress and it will let you know when the installation of the dummy data is finished.
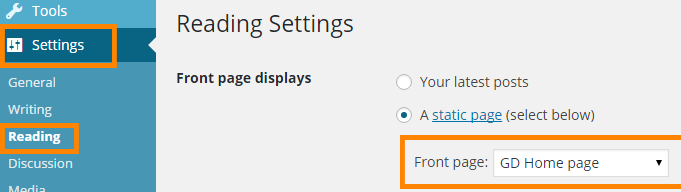
6. Setting your home page:
Navigate to GD > Permalinks, and under GeoDirectory Pages, you’ll see GD Home Page.
Choose your directory start page here:
If you want to use your directory start page for the homepage of your website, make sure you choose the same page at Settings > Reading > Front page displays > Front Page:
If you want to use one of your normal WordPress pages for the homepage of your website, then at GD Home Page select GD Home Page, but choose your normal WordPress page at Settings > Reading > Front page displays > Front Page.
You will find a lot of terms and abbreviation throughout the documentation and the admin area of GeoDirectory, and the meaning of some of them might not directly be clear. The table below might help you find what you’re looking for.
The public part of your website, where users can add their listings and visitors can browse the site
InfoWindow
An InfoWindow displays content (address and an image) in a popup window on the maps, at a given location. The info window attached to a specified location on the map.
Sometimes also called a bubble or a map pop-up.
Listings page
This is the template that will display a list of all listings in a particular category or custom post type, and will show different listings depending on location and category requested.
Location
Refers to cities (towns or villages etc), regions (states or provinces etc) and countries
For every location in your database there will be a separate page created automatically
These locations are based on the Google Maps API, and the size of cities (towns, suburbs or villages etc depending on the country) can vary greatly from country to country.
Your locations need to be therefore always city > region > country, exactly like Google suggests when you add a listing from the frontend.
For example Los Angeles > California > Unites States [not LA > CA > US].
If your site is not in English, change the map languagebefore checking location format on your Add Listing page.
Non-GD page
A page on your website created without using a GD template, for example a normal WordPress page, or a BuddyPress page etc
Places
Places is the default name for the default Custom Posts created by the basic GD plugin.
Places does not refer to locations like cities etc, but refers to businesses etc
Users
People that have registered a user account on your WordPress website
Visitors
People that are visiting your website but do not have a user account on your WordPress website, or are not logged in
You can always switch themes later, but you will have to re-do some work like menus and widgets.
Before switching themes, make a note of any changes you made to your child theme’s style.css and functions.php files.
Another choice would be to use plugins that keep your customizations separate from your theme, like the Code Snippets plugin and the SiteOrigin CSS plugin.
If you want to enable reviews of listings, you need to allow comments.
Create at least one category and one listing
Without at least one category and one listing, there is nothing to show in your directory, and maps and widgets will not display anything.
The easiest is to import at least one dummy listing. Go to GD > General > Dummy data and import one or more listings.
Alternatively, create a category at Places > Categories, and then add a listing to it at Places > Add New.
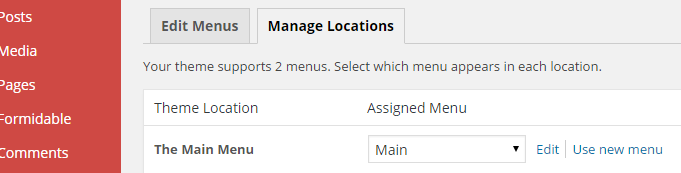
Connect your menu
Make sure you have created a menu at Appearance > Menus, and then you have assigned your menu to a theme location. Here is an example, this will be different depending on your theme:
You now should have a working site. Congratulations !
Do you need any addons?
Consider if need any addons – do this before finishing the look and feel of your site, like adding widgets etc, because some addons will add additional widgets, extra content and you might also have to adjust your menu.
Keep reading below to see which addons would complete your site.
Expand your directory to more than one city
As standard, GeoDirectory can be setup for a single location and listings can be added only for that location, but with our Location Manager plugin, you can let users set the location of their listings and the location will be stored in your locations database.
The default Custom Post Type (CPT) is called Places. You can rename Places to anything else that suits your site by using the translation file, but using the Custom Post Type addon makes it even simpler.
The Events addon is similar to an extra Custom Post Type, but with the extra capability of setting times and dates of the event listings, together with a calendar widget.