
Introduction:
If you are planning to create a location-based directory site, then you’re on the right track.
Directory Starter is a theme specifically designed for GeoDirectory plugin. Please note that GeoDirectory plugin is Optional. If you need just a simple WordPress theme for your blog, you can use Directory Starter theme without GeoDirectory plugin.
But if you would like to unleash the full potential of this theme, then you should definitely use this theme with GeoDirectory Plugin.
Note: This documentation assumes that you have a fresh WordPress installation.
GeoDirectory:
GeoDirectory is a free WordPress plugin that offers all the basic features you need to create a location based directory site. With its premium addons you can get additional features like “Paid Listing”, “Multiple Ratings” etc, but addons are not mandatory.
GeoDirectory has been downloaded more than 75000 times and its the best Directory plugin available for WordPress. GeoDirectory is in this Geolocation business for a long time and it has dedicated support staffs.
If your website is gonna be a serious business for you, then you need serious people who can back you up. So GeoDirectory plugin will be your perfect choice.
Links
- Download
- Installation
- Documentation
Demo:
We have created a demo site to show you the demo of Directory Starter theme. Demo uses our GeoDirectory plugin and its addons.
http://wpgeo.directory/starter/
Directory Theme Installation:
- Navigate to Appearance > Themes > Add New
- Enter “Directory Starter” in search box
- Install it
- Activate it
Menus:
- Go to Appearance > menus
- Create 2 menus. Name it “Primary Menu” and “Footer Links”.
- Make sure you assign those 2 menus to the theme menu locations using checkbox.
Settings:
Heads Up: Directory Theme uses wordpress built-in customizer feature for settings. So it doesn’t have a different settings page.
For example, To upload logo navigate to Appearance > Customize > Header > Logo
Here are the list of settings available
- General
- Site Identity
- Contains settings like Site Title, Tagline and Favicon
- Spacing
- Contains setting like Desktop Container Width and Padding
- Static Front Page
- Same setting you found in Settings -> Reading
- Alert Colors
- Alert box color settings available here. These settings will be useful when BuddyPress installed. ( Oh yes.. Did we say that our theme is compatible with BuddyPress plugin? )
- Button Colors
- The primary button color settings available here
- Site Identity
- Header
- Logo
- As you might have guessed, you can upload your site logo from here
- Header Image
- If you need an image as header background you can use this setting.
- Text Colors
- All header text color settings available here
- Background Colors
- All header background color settings available here
- Spacing
- All header height, padding, margin settings available here
- Logo
- Body
- Background Image
- If you need an image as main content background you can use this setting.
- Text Colors
- All main content text color settings available here
- Background Colors
- All main content background color settings available here
- Typography
- Font settings like font family, font size available here
- Background Image
- Footer
- Background Colors
- All footer background color settings available here
- Background Colors
- Spacing
- All footer related padding setting available here
- Copyright text
- You can change your site’s copyright text here
- Menus
- Menu Locations
- Primary Menu
- This is the menu you found in header
- Footer Links
- This is the menu you want to display near copyright text. When this menu not available copyright text will be centered. Else copyright text will be float left
- Primary Menu
- Menu Locations
- Widgets
- Contains your widget list
Using it with GeoDirectory:
Installation:
- Navigate to Plugins > Add New
- Search for GeoDirectory – Ultimate Business Directory
- Install it
Links
Configuration:
- GeoDirectory needs at least one location in order to work. So Set a default location first.
- To set default location, navigate to Geodirectory > Set Default Location
- Enter a city. Ex: New York, then click “Set Address on Map” button
- Save it
- If you would like to install our dummy data, navigate to Geodirectory > General > Dummy Data
- Choose the number of listings you need, then click “Insert Sample Data Please” button
- Set the home page to display “GD Home Page”
- To set home page, navigate to Settings > Reading
- “Front page displays” should set to “A static page”. Select “GD Home Page” for “Front Page”
- All widgets are automatically created by GD plugin. But we need to reorder home map and popular category widget for “Directory Starter” theme.
- So navigate to Appearance > Widgets
- Expand “GD Home Top Section”
- Re-Order the widgets in the following order. Just drag.
- GD > GMap Home Page
- GD > Popular Post Category
- GD > Search
- Would you like to add Add listing ( Ex. Add Hotel ) and View Listing ( Ex. Hotels ) links to the Main Menu? If Yes Navigate to Geodirectory > Design > Navigation > Show geodirectory navigation in selected menu locations > Select Primary Menu (This is the menu you created earlier)
Optional GeoDirectory Addons:
- GeoDirectory Custom Post Types
- GeoDirectory Advance Search Filters
- GeoDirectory Review Rating Manager
- GeoDirectory Location Manager
- GeoDirectory Marker Cluster
- GeoDirectory Payment Manager
- GeoDirectory Claim Manager
- GeoDirectory Events
- GeoDirectory AffiliateWP Integration
- GeoDirectory Ajax Duplicate Alert
- GeoDirectory BuddyPress Integration
- GD Booster
- GeoDirectory ReCaptcha
- GeoDirectory Social Importer
- Stripe Payment GeoDirectory Add On
Heads Up!
We have given small description, simple configuration and usage info for each plugin. Please note the configuration explained here is the minimal configuration your plugin requires in order to work. So not all settings explained in this documentation. You can visit individual plugin documentation page for full configuration information.
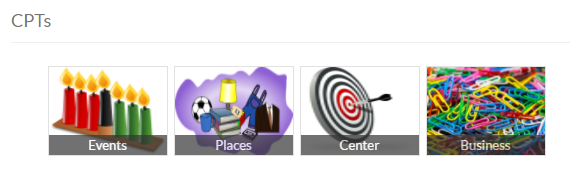
Geodirectory Custom Post Types:
By default Geodirectory ships with only one generic post type called Places. But there are situations where you would like separate the listings by post type. An example would be, you have a automobile listing website where you list cars and bikes. It would make sense if you have a separate post type for Cars and separate post type for Bikes. In such cases, this plugin will help you.
Installation:
- Visit wpgeodirectory.com ( Buy a subscription if Required )
- Navigate to My Account > Downloads ( Login if Required )
- Download Geodir Custom Posts zip file.
- Go to your WordPress site dashboard, Navigate to Plugins > Add New > Upload Plugin
- Browse and Upload the zip file you downloaded from wpgeodirectory.com
- Activate the plugin.
Links
Configuration:
If you want the new post type links to appear in homepage navigation menu, then make sure to check the settings in Geodirectory > Design > Navigation after creating the post type.
Usage:
- Navigate to Geodirectory > Custom Post Types > Add Post Type
- You can keep the default fields as it as, but make sure you fill the following fields
- Post type
- Lowercase, Singular. Ex: hotel
- Listing slug
- Lowercase, Plural. Ex: hotels
- Order in post type list
- Integer. Ex: 10
- Name
- Title Case, Plural. Ex: Hotels
- Singular name
- Title Case, Singular. Ex: Hotel
- Post type
- Save it.
- If you don’t need any location support for this post type, navigate to GeoDirectory > General
- Select the post types for this setting. Select CPT to disable physical location
Geodirectory Advance Search Filters:
With this addon you can create unlimited search filters. When activated, this plugin adds a button called “Advanced” near “search” button. When you click “Advanced” button, it will display all search filters. A practical example would be, you have a job website and you would like to offer users some option to filter the search results with option like “Min Experience”, “Min Salary” etc. So they can narrow the search results.
Installation:
- Visit wpgeodirectory.com ( Buy a subscription if Required )
- Navigate to My Account > Downloads ( Login if Required )
- Download Geodir Advance Search Filters zip file.
- Go to your WordPress site dashboard, Navigate to Plugins > Add New > Upload Plugin
- Browse and Upload the zip file you downloaded from wpgeodirectory.com
- Activate the plugin.
Links
Configuration:
No configuration needed.
Usage:
- Navigate to Geodirectory > Place Settings -> Custom Fields
- You can add existing custom fields in advanced search or you can create a new custom field and then include in advanced search.
- To add existing custom field (Ex: Category), just expand the field by double clicking it and then make sure you checked “Include this field in filter” option, which is available under “Advanced sort & filters options” section.
- To add a new custom field, just click the type of field you would like to add from the left side, fill the necessary options and then save it.
- Once you checked “Include this field in filter” option, that field will be available on the next tab (Advance Search)
- Click the field, you would like to display in advance filters, enter the front end title and then save it.
- Repeat the steps to add more fields.
- The fields you created so far can be displayed using GD > Search widget.
Geodirectory Review Rating Manager:
By default GeoDirectory ships with only one rating type. if you need multi rating, then you should install this plugin. With this plugin you can create unlimited rating fields. For example you can split your ratings like Performance, Speed, Price, reliability, Support, Overall etc.
Installation:
- Visit wpgeodirectory.com ( Buy a subscription if Required )
- Navigate to My Account > Downloads ( Login if Required )
- Download Geodir Review Rating Manager zip file.
- Go to your WordPress site dashboard, Navigate to Plugins > Add New > Upload Plugin
- Browse and Upload the zip file you downloaded from wpgeodirectory.com
- Activate the plugin.
Links
Configuration:
- To enable Multi Rating manager, navigate to Geodirectory > MuiltiRatings
- Make sure you checked Enable multirating option.
- If you need Font Awesome rating icon support, navigate to Geodirectory > MultiRatings > Font Awesome Tab
- Check Enable Font Awesome checkbox
- If you need different color, for font-awesome rating icon, then enter the preferred color in Rating Icon Color text box.
Usage:
- Overall rating will be available by default. So you have to create only individual ratings.
- Let’s say you are planning to create individual ratings like Performance, Speed, Price, Reliability, Support.
- For each and every rating, navigate to Geodirectory > MultiRatings > Rating Styles Tab
- Enter Rating Title. Ex: Performance
- Enter Rating Text
- 1 Star Text ( Ex: Terrible )
- 2 Star Text ( Ex: Poor )
- 3 Star Text ( Ex: Average )
- 4 Star Text ( Ex: Very Good )
- 5 Star Text ( Ex: Excellent )
- Upload a Rating off image. If you don’t have a rating image just download and upload this rating icon. http://your-domain.com/wp-content/plugins/geodir_review_rating_manager/icons/stars.png
- Note this rating icon will not be used when font awesome rating icon option enabled.
- Save Style
- Repeat steps for all other individual ratings.
- For each and every rating styles you have created, navigate to Geodirectory > MultiRatings > Create Ratings Tab
- For Select multirating style field select the rating style you created. Ex: Performance
- Enter Rating title. Ex: Performance
- Select Showing method. If you want the ratings displayed as a dropdown, then select dropdown option. Else leave that field as it is.
- Select post types where you want the ratings to appear.
- Save Changes
- Repeat steps for all other individual ratings
GeoDirectory Location Manager:
By default, you can set only one default location. But if you would like to support more than one location, then you need this plugin. You can create unlimited locations and your users can switch to any location using “location switcher”. You can easily create craigslist type site, with this add-on
Installation:
- Visit wpgeodirectory.com ( Buy a subscription if Required )
- Navigate to My Account > Downloads ( Login if Required )
- Download Geodir Location Manager zip file.
- Go to your WordPress site dashboard, Navigate to Plugins > Add New > Upload Plugin
- Browse and Upload the zip file you downloaded from wpgeodirectory.com
- Activate the plugin
Links
Configuration:
- Navigate to Geodirectory > MultiLocations
- Check Show location switcher in menu option.
- Make sure you have your Main Menu selected in Geodirectory > Design > Navigation > Show geodirectory navigation in selected menu locations
Usage:
- To add a new location, navigate to Geodirectory > MultiLocations > Add/Edit Location Tab
- Enter the city you want to add. Ex: Texas
- Enter the region. This is optional. So you can leave it blank.
- Click Set City on Map button.
- Save it.
- Repeat steps to add more locations.
- When location switcher enabled, you can switch locations from your website front end.
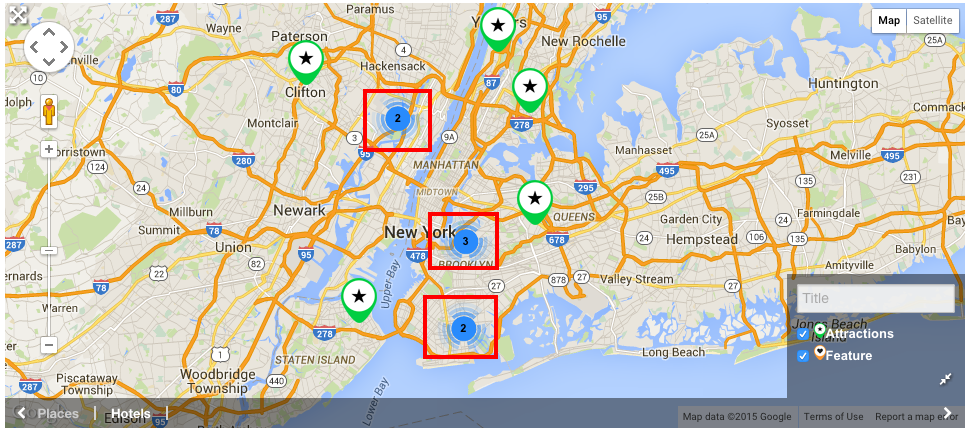
GeoDirectory Marker Cluster:
If you have too many listings, then it won’t look pretty to display all of them in a map. With marker cluster addon, you can display the count when too many listing available for particular area. When the use click the count, it will zoom the map and then display the listings.
Installation:
- Visit wpgeodirectory.com ( Buy a subscription if Required )
- Navigate to My Account > Downloads ( Login if Required )
- Download Geodir Marker Cluster zip file.
- Go to your WordPress site dashboard, Navigate to Plugins > Add New > Upload Plugin
- Browse and Upload the zip file you downloaded from wpgeodirectory.com
- Activate the plugin
Links
Configuration:
- Navigate to Geodirectory > Design > Marker Cluster Tab
- Select the home map in Show marker cluster on selected maps field.
Usage:
- Visit your site’s home page.
- When you have more listings you will see numbers in your home map.
- Click any of those numbers
- Map will be zoomed and display listings from that particular area.
GeoDirectory Payment Manager:
You can monetize your website by having paid listings with this addon. Just ask the user to pay a small fee to list on your website. Or offer free listing with limited options and then ask user to upgrade the listing if they need full options. PayPal and Stripe supports recurring payment feature.
Installation:
- Visit wpgeodirectory.com ( Buy a subscription if Required )
- Navigate to My Account > Downloads ( Login if Required )
- Download Geodir Payment Manager zip file.
- Go to your WordPress site dashboard, Navigate to Plugins > Add New > Upload Plugin
- Browse and Upload the zip file you downloaded from wpgeodirectory.com
- Activate the plugin
Links
Configuration:
- Navigate to Geodirectory > Prices and Payments > Prices Tab
- Click Add Price link
- Enter Price title Ex: Premium
- Select Post type
- Enter Price amount ( $ ) Ex: 5
- Enter Number of Days. Ex: 30 (set to 0 to never expire)
- Set Status to Active
- Click Submit
- Configure your payment gateways in Geodirectory > Prices and Payments > Payments Tab
Usage:
- Go to any listing detail page you created.
- Click Upgrade Listing from the sidebar.
- Set Select Package option to Premium
- Check Please accept our terms and conditions checkbox
- Click Review Your Listing button
- Click Checkout to Upgrade Now button
- Select Payment Method
- Complete Payment
- Note: If the payment method Pre Bank Transfer is selected, listing will be in draft mode after hitting success page. Admin may have to approve it manually.
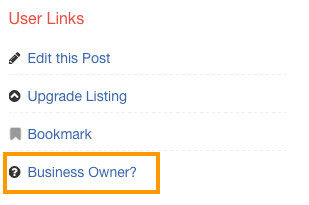
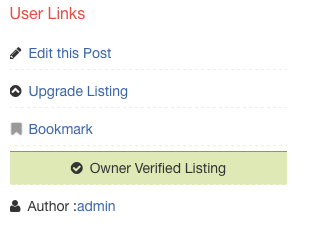
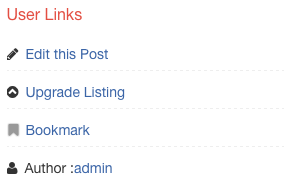
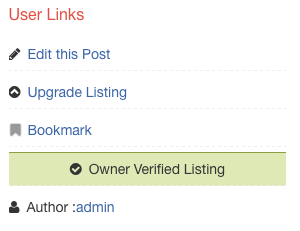
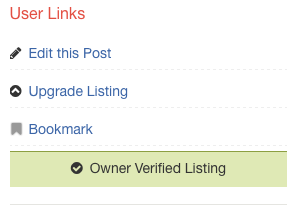
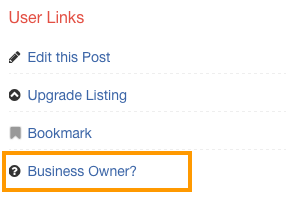
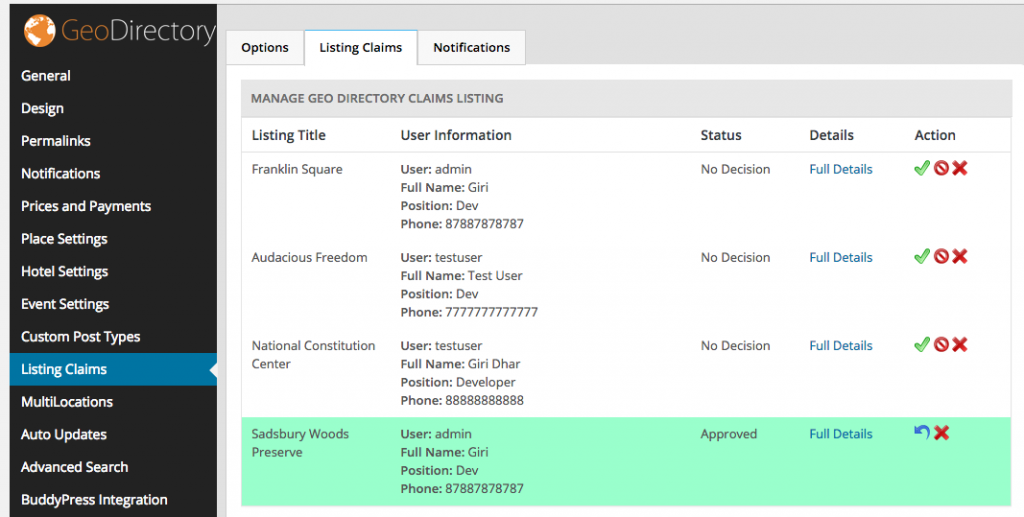
GeoDirectory Claim Manager:
With this add-on, business owners can literally “claim” their listings, identify themselves as the business owner and get verified.
Installation:
- Visit wpgeodirectory.com ( Buy a subscription if Required )
- Navigate to My Account > Downloads ( Login if Required )
- Download Geodir Claim Listing zip file.
- Go to your WordPress site dashboard, Navigate to Plugins > Add New > Upload Plugin
- Browse and Upload the zip file you downloaded from wpgeodirectory.com
- Activate the plugin
Links
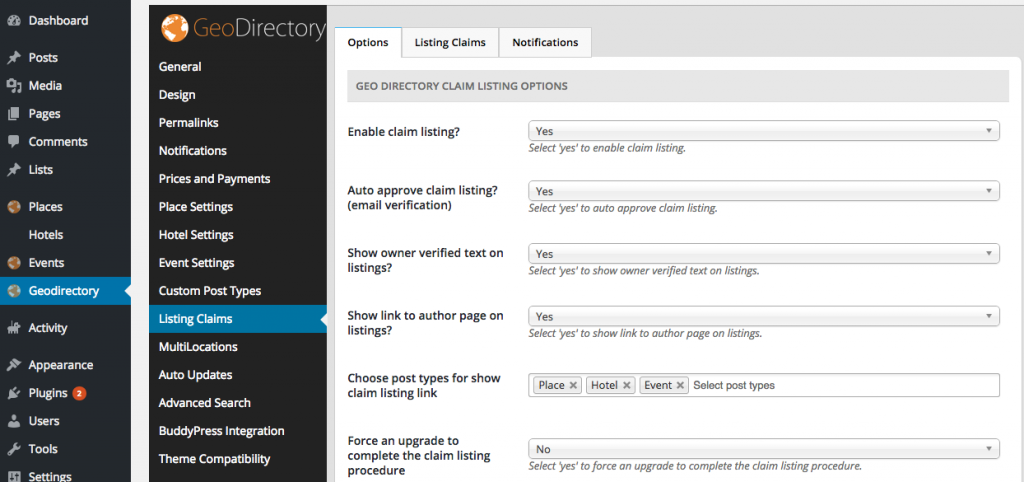
Configuration:
- Navigate to Geodirectory > Listing Claims
- Set Enable claim listing? to Yes
- Set Auto approve claim listing? (email verification) to Yes
- Set Show owner verified text on listings? to Yes
- Set Show link to author page on listings? to Yes
- Make sure you selected post types in Choose post types for show claim listing link
- Set Yes or No for Force an upgrade to complete the claim listing procedure
- Save Changes
Usage:
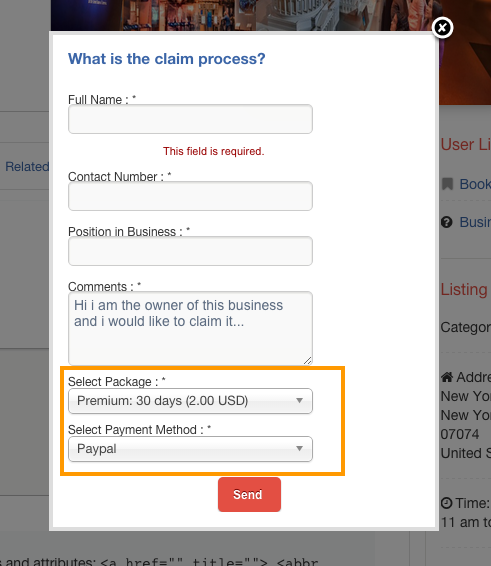
- Go to any listing detail page you created.
- Click Business Owner? link from the sidebar.
- Fill the Claim Form and then submit it.
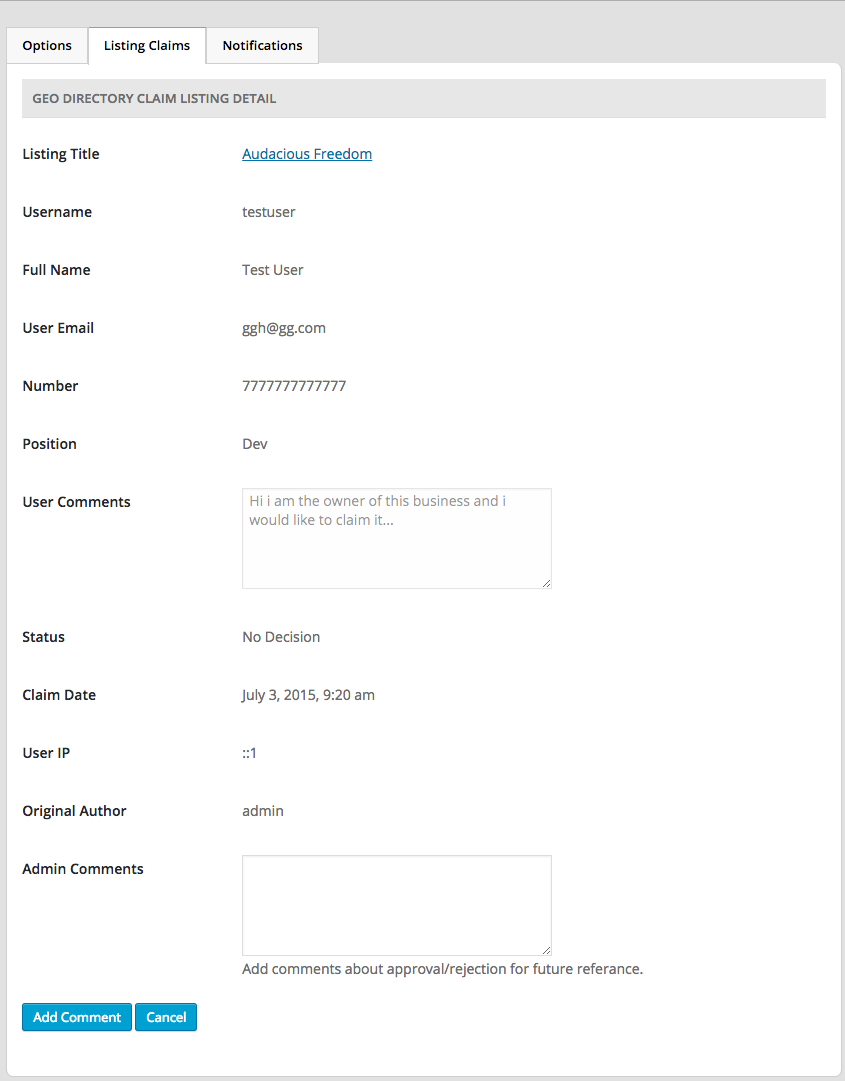
- All listing claims will be available under Geodirectory > Listing Claims > Listing Claims Tab
- You can Approve, Reject or Delete Listing Claim requests from there.
GeoDirectory Events:
If you are planning to list events on your website, then this plugin will be a big help to you. This plugin supports one time event, recurring events etc. You can also link listings to an event.
Installation:
- Visit wpgeodirectory.com ( Buy a subscription if Required )
- Navigate to My Account > Downloads ( Login if Required )
- Download Geodir Event Manager zip file.
- Go to your WordPress site dashboard, Navigate to Plugins > Add New > Upload Plugin
- Browse and Upload the zip file you downloaded from wpgeodirectory.com
- Activate the plugin
Links
Configuration:
- Navigate to Geodirectory > Design > Navigation and add Event to all the instances where Place already selected.
- Additional configuration available in Geodirectory > Event Settings
- If you don’t want recurring feature, disable it from there.
- To link a business follow these steps.
- Let’s say you would like to link Places in Events.
- Navigate to Geodirectory > Prices and Payments > Prices
- You have edit both Place package and Event package and then Set Link business to Yes
- Now if you visit Add Place page, you can see a new section called BUSINESSES where you can link your Places
Usage:
Visit Add Event page. You can see a section called EVENT SCHEDULE
GeoDirectory AffiliateWP Integration:
AffiliateWP is a affiliate marketing plugin. This addon helps you to integrate AffiliateWP with GeoDirectory
Installation:
- Visit wpgeodirectory.com ( Buy a subscription if Required )
- Navigate to My Account > Downloads ( Login if Required )
- Download Geodir AffiliateWP Integration zip file.
- Go to your WordPress site dashboard, Navigate to Plugins > Add New > Upload Plugin
- Browse and Upload the zip file you downloaded from wpgeodirectory.com
- Activate the plugin
Links
Configuration:
- Make sure AffiliateWP wordpress plugin is active.
- When GeoDirectory AffiliateWP Integration plugin is active a new checkbox (GeoDirectory) will be available in Affiliates > Settings > Integrations
- Check it
- Save Changes
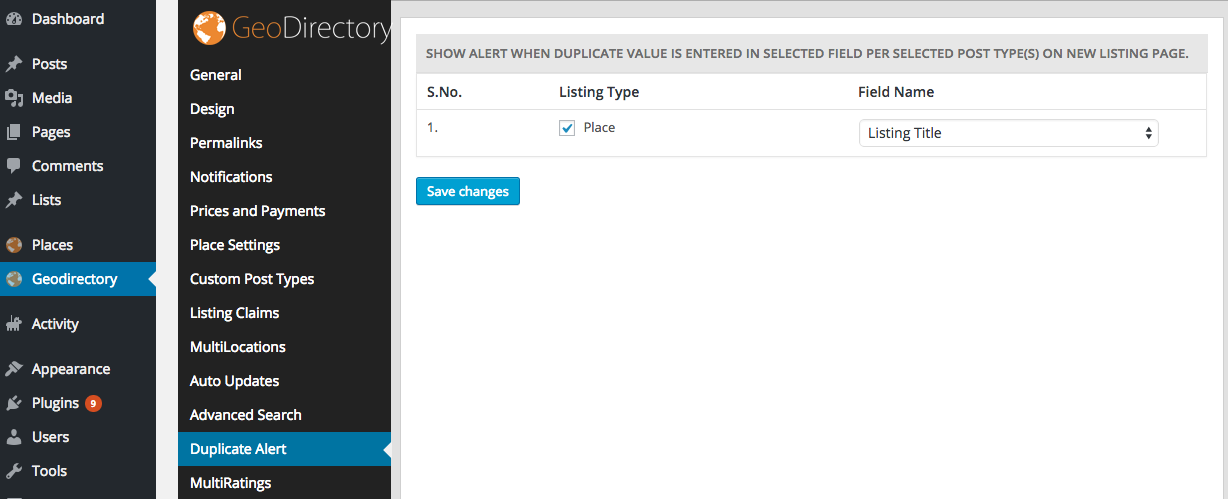
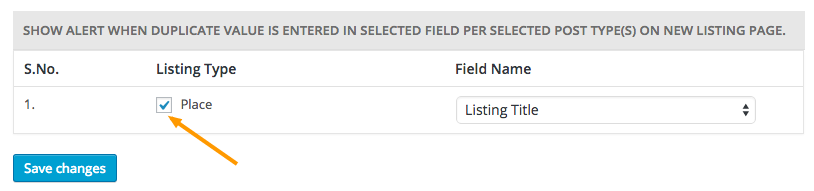
GeoDirectory Ajax Duplicate Alert:
If you need unique listings, then you can use this plugin to prevent duplicate listing. It will display alert when already existing duplicate title entered for title field. You can also prevent duplicates for the following fields. Listing Title, Address, Zip/Post Code, Time, Phone, Email
Installation:
- Visit wpgeodirectory.com ( Buy a subscription if Required )
- Navigate to My Account > Downloads ( Login if Required )
- Download Geodir Ajax Duplicate Alert zip file.
- Go to your WordPress site dashboard, Navigate to Plugins > Add New > Upload Plugin
- Browse and Upload the zip file you downloaded from wpgeodirectory.com
- Activate the plugin
Links
Configuration:
- Navigate to Geodirectory > Duplicate Alert
- Select Listing Type and Field name
- For example, if you want to prevent duplicate Title in Places post type, select Place for Listing Type and Listing Title for Field name
Usage:
- Add Listing page will display errors like A Place with this field is already listed! Please make sure you are not adding a duplicate entry when duplicate title entered
GeoDirectory BuddyPress Integration:
This add-on helps you to integrate BuddyPress with GeoDirectory. So your users can found all their listing, edit it, delete it from BuddyPress profile page. Its a must use plugin, if you need BuddyPress support for your GeoDirectory website.
Installation:
- Visit wpgeodirectory.com ( Buy a subscription if Required )
- Navigate to My Account > Downloads ( Login if Required )
- Download Geodir Buddypress Integration zip file.
- Go to your WordPress site dashboard, Navigate to Plugins > Add New > Upload Plugin
- Browse and Upload the zip file you downloaded from wpgeodirectory.com
- Activate the plugin
Links
Configuration:
- Make sure BuddyPress plugin is active
- Navigate to Geodirectory > BuddyPress Integration
- Select the post types in Show listings in BuddyPress dashboard
- Select the post types in Show reviews in BuddyPress dashboard
- Check Use BuddyPress registration form
- Check Redirect GD dashboard my listing link to BuddyPress profile
- Check Redirect GD dashboard favorite link to BuddyPress profile
- Check Link blog author link to the BuddyPress profile link
- Save Changes
Usage:
- Three new tabs Listings, Favorites, Reviews will be available in BuddyPress dashboard.
- If your username is admin, you can access buddypress dashboard using this link. http://your-domain.com//members/admin/
GD Booster:
This is a cache plugin from GeoDirectory. This plugin helps you to speed up your website. If you have large traffic on your website, then its a huge payload for your service since the pages has to be generated for each and every request. This plugin helps you to reduce server payload by caching the pages. So when the same page requested next time, it will be served from the cache instead of generating again. You can prevent server crash with good caching plugins. GD Booster is optimised for GeoDirectory listings.
Installation:
- Visit wpgeodirectory.com ( Buy a subscription if Required )
- Navigate to My Account > Downloads ( Login if Required )
- Download Geodir Gd Booster zip file.
- Go to your WordPress site dashboard, Navigate to Plugins > Add New > Upload Plugin
- Browse and Upload the zip file you downloaded from wpgeodirectory.com
- Activate the plugin
Links
Configuration:
- Navigate to GD Booster
- Select Yes, enable GD Booster!
- Save All Changes
Usage:
- When GD Booster active, pages will be cached. So make sure you clear your cache if your changes not getting reflected on your website.
GeoDirectory Re-Captcha:
reCAPTCHA is a free CAPTCHA service from Google that helps protect your site against spam, malicious registrations and other forms of attacks. This addon helps you integrate reCAPTCHA to all GeoDirectory related forms.
Installation:
- Visit wpgeodirectory.com ( Buy a subscription if Required )
- Navigate to My Account > Downloads ( Login if Required )
- Download Geodir reCAPTCHA zip file.
- Go to your WordPress site dashboard, Navigate to Plugins > Add New > Upload Plugin
- Browse and Upload the zip file you downloaded from wpgeodirectory.com
- Activate the plugin
Links
Configuration:
- Navigate to Geodirectory > Re-Captcha Settings
- Configure Google Re-Captcha Keys
- Check Enable Google reCAPTCHA for checkboxes for the forms you need.
- Save Changes
Usage:
Re-Captcha field will be available in the forms you selected.
GeoDirectory Social Importer:
With this add-on, you can import listing from facebook and yelp. Just enter the listing page url and then click “Import”. Data will be imported.
Installation:
- Visit wpgeodirectory.com ( Buy a subscription if Required )
- Navigate to My Account > Downloads ( Login if Required )
- Download Geodir Social Importer zip file.
- Go to your WordPress site dashboard, Navigate to Plugins > Add New > Upload Plugin
- Browse and Upload the zip file you downloaded from wpgeodirectory.com
- Activate the plugin
Links
Configuration:
- Navigate to Geodirectory > Social Importer
- Configure Facebook App Details if you are planning to support facebook
- Configure Yelp if you are planning to support Yelp
Usage:
- When social importer plugin active, Import Details from Social section will be available in Add listing page.
Stripe Payment GeoDirectory Add-On:
This add-on adds, stripe payment gateway support to GeoDirectory payment manager.
Installation:
- Visit wpgeodirectory.com ( Buy a subscription if Required )
- Navigate to My Account > Downloads ( Login if Required )
- Download GeoDir Stripe Payment Gateway zip file.
- Go to your WordPress site dashboard, Navigate to Plugins > Add New > Upload Plugin
- Browse and Upload the zip file you downloaded from wpgeodirectory.com
- Activate the plugin
Links
Configuration:
- Navigate to Geodirectory > Prices and Payments > Payments Tab
- Configure stripe gateway
Usage:
- Stripe gateway will be available in list of payment methods while listing upgrade. Users can proceed with stripe if they want


