Changing the layout of addresses

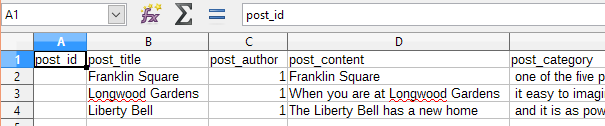
The default display of addresses is in this format:

Address: Street Address
City
Region
ZIP or postcode
Country

That format is not always how addresses are set out in some countries, or you want to drop the region or country etc.

The following code, when added to functions.php of your child theme, or as a code snippet when you use the Code Snippets plugin, will output exactly the same as the default display above:

[php]
add_filter(‘geodir_show_post_address’, ‘geodir_change_address_order’ , 100 , 2) ;
function geodir_change_address_order($html , $vars)
{
global $post, $preview, $wpdb;
$field_icon=”;
if (strpos($field_icon,’http’) !== false) {$field_icon_af = ”;}
elseif($field_icon==”){$field_icon_af = ‘<i class="fa fa-home"></i>’;}
else{$field_icon_af = $field_icon; $field_icon=”;}

if(!$preview)
{
$html = ‘

‘;
$html .= ‘<span class="geodir-i-location" style="’.$field_icon.’">’.$field_icon_af;
$html .= ‘&nbsp;Address:&nbsp;’;
$html .= ‘</span>’;
//print_r($_POST);

if($post->post_address){ $html .= ‘<span itemprop="streetAddress">’.$post->post_address.'</span>
‘;}
if($post->post_city){ $html .= ‘<span itemprop="addressLocality">’.$post->post_city.'</span>
‘;}
if($post->post_region){ $html .= ‘<span itemprop="addressRegion">’.$post->post_region.'</span>
‘;}
if($post->post_zip){ $html .= ‘<span itemprop="postalCode">’.$post->post_zip.'</span>
‘;}
if($post->post_country){ $html .= ‘<span itemprop="addressCountry">’.$post->post_country.'</span>
‘;}
$html .= ‘

‘;
}
return $html ;
}
[/php]

Always back up your functions.php before making changes, in case you make a mistake!

By adjusting parts of the code, we can move things around, or delete parts. Let’s for example change the format to:

Address:
Street Address
City ZIP or postcode
Country

The following changes to the above code give an example of how the address format can be customized:

[php]
if($post->post_address){ $html .= ‘
<span itemprop="streetAddress">’.$post->post_address.'</span>
‘;}
if($post->post_city){ $html .= ‘<span itemprop="addressLocality">’.$post->post_city.'</span> ‘;}
if($post->post_zip){ $html .= ‘<span itemprop="postalCode">’.$post->post_zip.'</span>
‘;}
if($post->post_country){ $html .= ‘<span itemprop="addressCountry">’.$post->post_country.'</span>
‘;}
if($post->post_region){}
[/php]

Linking to Google Maps from a detail page

  1. You can get Google Map directions to the location of a listing from a standard GD detail page.
    To get directions, you enter an address in the address field, and then click Get Directions:
  2. That will give directions on the Google map on the website page:
  3. The code snippet below will create a link on the detail page, that open Google Maps with the location of the GD listing ready on the map.
  4. On a mobile device you can then use the Google Map App to get directions.

    [php]function geodirectory_detail_page_google_map_link( $options, $canvas ) {
    global $post;

    if ( $canvas == ‘detail_page_map_canvas’ && !empty( $post->post_latitude ) && !empty( $post->post_longitude ) ) {
    ?>
    <p><a href="http://maps.google.com/?q=<?php echo $post->post_latitude . ‘,’ . $post->post_longitude ;?>" target="_blank"><?php echo __( ‘Get Directions on Google Maps’, ‘geodirectory’ ); ?></a></p>
    <?php
    }
    }
    add_action( ‘geodir_map_after_render’, ‘geodirectory_detail_page_google_map_link’, 10, 2 );[/php]

Changing the position on the page

  1. The above code will add the link below the map on the detail page.
  2. If you want to add the link in the profile tab, you can use this code:

    [php]function geodirectory_detail_page_google_map_link() {
    global $post, $preview;

    if ( !$preview && !empty( $post->post_latitude ) && !empty( $post->post_longitude ) ) {
    $maps_url = add_query_arg( array(
    ‘q’ => $post->post_latitude . ‘,’ . $post->post_longitude,
    ), ‘http://maps.google.com/’ );
    ?>
    <p><a href="<?php echo $maps_url; ?>" target="_blank"><?php echo __( ‘Get Directions on Google Maps’, ‘geodirectory’ ); ?></a></p>
    <?php
    }
    }
    add_action( ‘geodir_after_description_on_listing_detail’, ‘geodirectory_detail_page_google_map_link’);[/php]

  3. If you would like to move the link to the top, replace the string
    geodir_after_description_on_listing_detail
    with
    geodir_before_description_on_listing_detail

GD Core Plugin – Titles & Metas

These are the sections you will find when you install the GeoDirectory Core (free) plugin only:

OverviewGeneral – Google AnalyticsDesignPermalinks – Titles & Metas – NotificationsSet Default LocationPlace Settings – Theme Compatibility – Import & ExportGD Tools

On this page:

Introduction – Available variables – Using title & meta variables in widget titles

Introduction

  1. This image shows where to find the Titles & Metas settings:
  2. These settings allow you to change the meta title

    and the meta description (Meta descriptions are commonly used on search engine result pages (SERPs) to display preview snippets for a webpage):
  3. If you use the Yoast SEO plugin, the settings added to GD > Titles & Metas will not work, you will need to use the settings of the Yoast SEO plugin.

Available variables

All meta titles and meta descriptions can use the following variables:

%%title%% Title of a listing.
Do not use for listings pages.
%%sitename%% Your site name as entered at WP Settings > General Settings > Site Title.
%%sitedesc%% Your site description as entered at WP Settings > General Settings > Tagline.
%%excerpt%% This refers to the WP excerpt you can add to listings, posts and pages.
%%pt_single%% The singular form of a Custom Post Type, for example Place or Event.
%%pt_plural%% The plural form of a Custom Post Type, for example Places or Events.
%%category%% Indeed, the category.
%%id%% The ID of the page or listing.
%%sep%% Separator between parts.
%%location%% Location in this format: city, region, country.
%%in_location%% Location with a prefix of your choice in this format: in city, region, country.
You can translate in in the core language file.
%%location_single%% Location referring to the location of the page itself, for example Madrid, or Japan.
%%in_location_single%% Location referring to the location of the page itself, with a prefix of your choice, for example in Los Angeles, or in Argentina.
You can translate in in the core language file.
%%search_term%% Whatever was entered as a search term (for search pages only).
%%search_near%% Location entered in the Near field of the GD Search (for search pages only).
%%name%% Name of the user (for author pages only).
%%page%% Title of a WP page.
%%pagenumber%%
%%pagetotal%%

Using title & meta variables in widget titles

  1. To enable the use the above variables in the titles of GD widgets, add this code to your child theme’s functions.php file, or use the Code Snippets plugin:

    [php]// Use title and meta variables in widget titles.
    function gd_widget_title( $title ) {
    if ( !empty( $title ) ) {
    $title = geodir_filter_title_variables( $title, ‘location’, ” );
    }

    return $title;
    }
    add_filter( ‘widget_title’, ‘gd_widget_title’, 10, 1 );
    add_filter( ‘bestof_widget_title’, ‘gd_widget_title’, 10, 1 );
    add_filter( ‘gd_features_widget_title’, ‘gd_widget_title’, 10, 1 );
    add_filter( ‘geodir_cpt_categories_widget_title’, ‘gd_widget_title’, 10, 1 );
    add_filter( ‘geodir_popular_location_widget_title’, ‘gd_widget_title’, 10, 1 );
    add_filter( ‘geodir_location_description_widget_title’, ‘gd_widget_title’, 10, 1 );
    add_filter( ‘geodir_location_neighbourhood_widget_title’, ‘gd_widget_title’, 10, 1 );[/php]

  2. You can now add as a title to one of the above widgets, for example:
  3. And this would be the result for one of the location pages:

Updating your language files

Sometimes after an update of any of the GD plugins, you will find new words on your website and you cannot find how to translate them when looking in your language files.

This is because when a GD plugin is updated, the language file will have new language strings added.

This article explains how to merge the new language file with your PO and MO files already translated.

For this example, we will use a French GD core language file we need to update.

  1. Download the latest language file from the plugin:
  2. Navigate to your existing translate PO file:
  3. Open the geodirectory-fr_FR.po file with PoEdit:
  4. From the PoEdit menu, click Catalogue and then Update from POT file … :
  5. Browse to the PO file you downloaded at step 1, and Open:
  6. That will merge the new language strings with your translated file. Make any changes as required, save and upload.

Location Manager – Manage Location

These are the sections you will find when you install the Location Manager:

Introduction and Location Settings tabManage Location tab – SEO Settings tab – Add/Edit Location tab – Translate Countries tab

On this page:

IntroductionCity Neighbourhoods – Adding or editing locations – Merging locations

Introduction

  1. The Manage Location tab is where you can edit or merge locations, and add meta data for your location pages.
  2. Here you can also divide locations into neighborhoods.

City Neighborhoods

  1. Locations are based on the Google Maps API, and the size of cities (towns, suburbs or villages etc depending on the country) can vary greatly from country to country. Your locations need to be therefore always city > region > country, exactly like Google suggests when you add a listing from the frontend.
  2. In some countries, cities are divided into smaller sections, for example New York City is divided in the boroughs of Bronx, Manhattan, Brooklyn, Queens and Staten Island.
  3. The neighborhoods need to be manually added in the backend, and need to be manually selected by users adding listings.

Adding neighborhoods

  1. For this example we will add the New York City boroughs as GD neighborhoods.
  2. At GD > Multilocations > Manage Location tab, find the city you want to add neighborhoods.
  3. Click on the plus sign + and then click on Add Neighborhood:
  4. Then add the name of the neighborhood, and Set neighborhood on map:
  5. Keep adding all neighborhoods.

Location switcher

  1. Your visitors will now be able to filter locations by neighborhood:

Adding listings

  1. Your users will now be able so select the neighborhoods when adding listings:

Adding or editing locations

  1. As part of your initial GD Core plugin, you should already have a default location set.
    It is one of the compulsory basic installation steps.
  2. Best practice is not to add locations here, because every location will have a page created and you will only end up with empty pages.
    Wait for your users to add listings and locations will be automatically created as your users add listings from the frontend.
  3. There might be some occasions when you need to modify a location. For example a location has been added that does not conform to what the Google Map API would have added, and you need to correct the spelling for example.
  4. Do not delete locations unless you have no listings in that location; deleting locations will delete all listings in the location!

City Meta and City Description

  1. Towards the bottom of the editing page for each location, you will find City Meta and City Description fields.
    Enter your data (you can use HTML in the City Description field):
  2. The City Meta data will now be added to the source of the relevant location page:
  3. This information is also used for the GD > Location Description widget.

Merging locations

  1. Sometimes your users add locations to your database using different spelling than a location already in your database (for example LasVegas, Texas, US instead of Las Vegas, Texas, United States).
  2. Your GD database will treat this as two different locations.
  3. There is a tool to merge these two locations.
  4. From the Manage Locations tab, select the locations you want to merge.
  5. Scroll to the bottom of the page, and click Merge.
  6. On the next page, select the correct location you want to keep, and then click Set Primary.
  7. That will re-assign the correct location to all your listings in any of the locations you merged.
  8. Do not delete a location because that will also delete any listings in that location!
  9. You can also use the above process to correct any of your locations: just add the correct location first and then merge with any incorrect locations.

Linking Custom Post Types

On this page:

Introduction

With the Custom Post Types (CPT) addon, you can link two CPTs together, in the same way events can be linked to other listings.
Because CPTs can have different custom fields, pricing etc, this feature greatly enhances what can be listed on your site.

Applications

Here are a few examples to give you an idea how you could use this feature:

CPT Linked to CPT
Fast food chain Our hamburgers
Rock band All regular venues where the band plays
Car brands Our models

For the rest of the article we will use a car manufacturer CPT, and a car model CPT.

Installation

  1. Create your CPTs and adjust all settings as required, below are the settings we use for the example. Note that this is only an example, adjust the settings for your situation:
    CPT Cars Models Comments
    Has address Yes No We do not need addresses for the car models (optional)
    Franchise enabled Yes No We will allow dealerships to be added (optional)
  2. Go to the settings for the CPT you want to be able to link to another CPT. In our example we want the different car models to be linked to the car CPT, so we go to GD > Custom Post Types > Model CPT (example only) > Advanced Mode > Link business.
  3. Tick Link Business, select the CPT you want to link it to, and Save.

Usage

  1. When a user now adds a listing in the linked CPT (Models in our example), they can link it to a listing in the linkable CPT (Cars in our example).
  2. The Add Listing form for the linked CPT will have a search option to find the listing in the linkable CPT:
  3. Start typing at least the first three letters of the listing you want to connect (this is not a search function, but a auto-population function).
  4. You cannot connect a listing to a linkable CPT listing of another user (unless you are an administrator).
  5. When the system finds the listing, select it and click Fill in business details.
  6. This will pre-fill some fields of the new listing with the same data as the linkable listing.
  7. Change title, description etc as required.
  8. And this is how it will look, in the sidebar you will get a link from all linked listings to the linkable listing:

    and on the detail page of that linkable listing, you will get a tab with all linked listings”
  9. To change the layout in the tab with linked listings, go to GD > Design > Detail tab > Related Post Settings > Layout, and select the list view or the grid view of your choice there:

CSV Tips and Tricks

Saving a CSV correctly

  1. We regularly see CSV files that are saved with incorrect settings, for example they are not saved with comma separated values (CSV), but tab separated values, and then they look like this when opened:
  2. To make sure you save your CSV file correctly, choose Save a copy from the File menu:
  3. In the next dialog box, tick Edit filter settings and then Save:
  4. In the next dialog box, make sure you pick UTF-8 as character set and comma as field delimiter:
  5. Your file should now look like this when opened as a comma delimited file:

Updating or changing franchises using CSV import

Introduction

Maybe you already have a number of listings and you just installed the Franchise Manager Add-on, and you want to re-organize your listings, assigning some as main listings and some as franchises.

Or you want to add new listings to your directory using the CSV upload.

Or you just want to make some changes to some of your franchise listings.

Updating or changing franchises using CSV import

  1. Make sure you are familiar with the CSV import and export functionalities of GD.
  2. Activate the Franchise Manager Add-on if not done already.
  3. Make sure your main listings are added to your database already. If not, add them using your admin area or a CSV  import.
  4. Export your listings using the CSV export at GD > Import & Export.
  5. The table below shows an example of an exported CSV:
    post_id post_title ignored columns gd_is_franchise gd_franchise_lock franchise ignored columns
     10 Main 1 geodir_email, post_title  0
     11 Chain 0  0
     12 Franchise1 0  10
    1. post_id: An exported file always has a post_id for each post.
    2. gd_is_franchise: 1 means this is a main listing.
    3. gd_franchise_lock: This are the locked custom fields.
    4. franchise: A number other than zero here means this is a franchise of a main listing, in this example Franchise1 is a franchise of the Main listing.
  6. Now let’s make a few changes:
    1. Add a new franchise to Main.
    2. Change Chain into a main listing, and do lock the video custom field.
    3. Make Franchise1 a franchise of Chain.
  7. This is the new CSV file to upload:
    post_id post_title ignored columns gd_is_franchise gd_franchise_lock franchise ignored columns
     10 Main 1 geodir_email, post_title  0
     11 Chain 1 geodir_video  0
     12 Franchise1 0  11
    Franchise2 0  10
    1. Leave the post_id of existing listings, so they will be overwritten when re-uploading.
    2. New listings should not have a post_id.
    3. Changing gd_is_franchise to 1 changes Chain into a main listing.
    4. Adding geodir_video to gd_franchise_lock for Chain means that all future franchises of Chain will show the same video custom field as the main listing.
    5. Changing franchise from 10 to 11 for Franchise1 now assigns Franchise1 as a franchise of Chain instead of Main.
    6. Franchise 2 is a new listing, so does not have post_id and is assigned as a franchise of the listing with post_id 10 (Main).
  8. Finally, re-upload the CSV file, and make sure to select Update listing if post with post_id already exists on the Import & Export page.

Linking events to places

On this page:

Introduction Preparation Usage Options

Introduction

Events can be linked to other listings owned by the same user (or optionally from any other user), with the following result:

  • The event detail page will have a link to the place listing in the sidebar
  • The event will be added to a tab of the place listing

Preparation

You will need:

  1. The Event Manager activated with at least one category.
    1. By default, users can only link events to their own listings in the selected CPT. If you want any other user to link an event to a listing of another user, go to GD > Event Settings > Any linking Author and tick Allow linking to any post not just users own posts?
  2. The Pricing Manager activated.
    1. Create or edit a price package (can be free) and activate the event linking:

Usage

When a user adds an event, they will have the option to connect the event with another non-event listing.

  1. The Add Listing form for the event will have a search option to find the listing:
  2. Start typing at least the first three letters of the listing you want to connect.
  3. When the system finds the listing, you have two options:
    1. Select it: This will connect the event with the listing.
    2. Select it and click Fill in business details: This will pre-fill the main fields and address of the new event with the same data as the business listing. You can then change title, description etc as required.

Options

You can change how many events are shown in the listing’s Events tab at GD > Design > Detail > Linked events settings.