These are the sections you will find when you install the GeoDirectory Core (free) plugin only:
Overview – General – Google Analytics – Design – Permalinks – Notifications – Set Default Location – Place Settings – Theme Compatibility – Import & Export – GD Tools
On this page:
Important things to know – GD Listings – Import CSV – Mandatory fields for listings – Other fields – Uploading images – Import tips – GD Listings – Export CSV – GD Categories – Import CSV – Mandatory fields for categories – GD Categories – Export CSV – Tips and Tricks – Useful resources
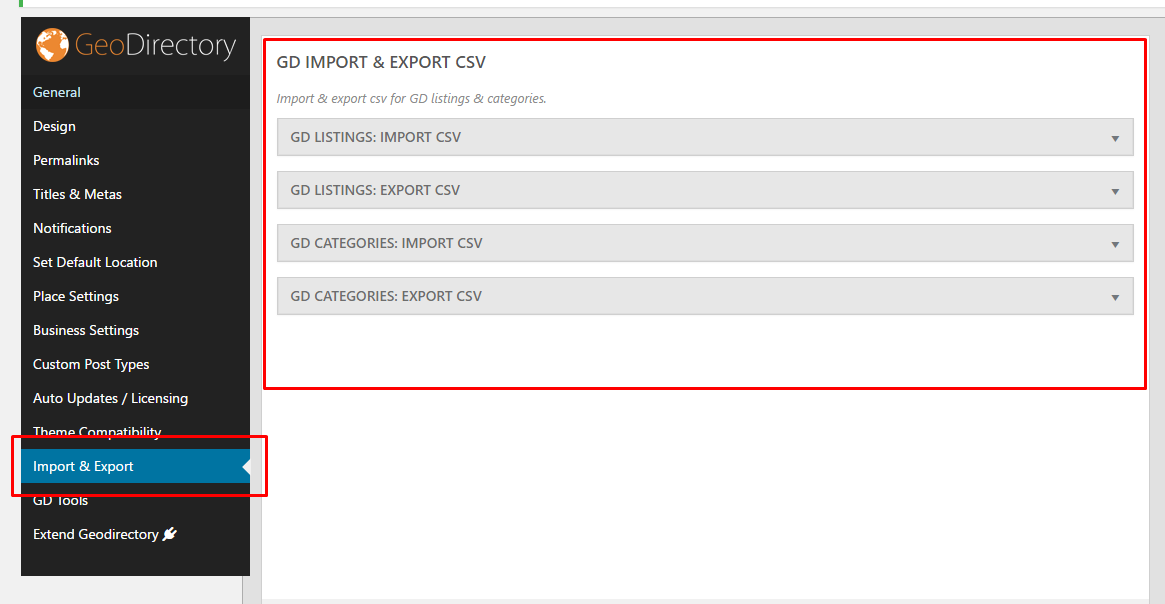
GeoDirectory > Import & Export
The Import & Export page allows you to upload listings or categories via a CSV file.
Go to your WordPress Dashboard and navigate to GeoDirectory > Import & Export
You can also download your listings.
Important things to know !
CSV files should only be edited with OpenOffice or LibreOffice Calc. This is because Microsoft Excel has auto-formatting built in which can not be disabled; we have seen many cases where this leads to broken phone numbers, addresses and 90% of the time wrong GPS information.
Download OpenOffice here: https://www.openoffice.org/download
Download LibreOffice here: http://www.libreoffice.org
- Do not change the order or the names of the columns of the CSV files.
- Do not delete any columns.
- Data separator for the CSV file MUST be comma (,) and delimiter MUST be double-quote (“)
- When adding a listing in a subcategory, you should also add the main category. Separate category names with a comma
- Categories may not contain commas. Categories with commas will make your import fail.
- You may import any UTF-8 characters from any language, but your spreadsheet must be UTF-8. If your CSV is not UTF-8 it will probably fail, so, save CSV as UTF-8.
GD Listings – Import CSV
The Import CSV section allows you to upload listings via a CSV file.
You also can download a sample CSV file to get you started.
post_id
- The first column in the CSV file is for the post_id.
- This field should be left blank, unless you want to update (overwrite) a listing.
- You can get the post_id of existing listings by exporting your GD listings.
- Do NOT add a post_id when importing new listings; WP needs to create its own post_id to avoid database conflicts.
Your CSV listings file needs to have data for all mandatory fields for the listings you want to upload.
These are the mandatory fields for listings:
- post_title: title or heading
- post_author: the WordPress ID of the WP user, for example you can use 1 for the first admin account created
- post_content: description
- post_category: use the name of the category or the slug;
- this category has to be created for the post_type before you import!
- if adding the listing in a sub-category, also add the parent category
- post_type: for example gd_place or gd_event; this CPT has to be created in WP admin before you import!
Keep reading for mandatory fields for gd_event post types.
The following fields (also mandatory) all relate to the location of your listings.
Note 1: If you are using the Custom Post Type addon and have disabled the requirement to use a physical location for a CPT, then you can leave these fields blank.
Note 2: We strongly suggest to add a few listings from the frontend, and then export those listings first. That will show you the type and format of the data required to be imported. Also, review the location notes if you have not done so already.
If you want to add locations outside your default location, you will need to install the MultiLocations addon before you can import your data.
- post_address: Street address [This can be the actual street address, or the name of the Business, etc – it just cannot be blank]
- post_city: City, town etc
- post_region: state, province etc
- post_country: country
- post_latitude: latitude in signed degrees format, for example -20.97625669
- post_longitude: longitude in signed degrees format, for example 162.45444
The following fields (also mandatory) all relate to the date and time of your events.
- event_date: This is the first date of the event – use this format 19/07/2015 even if the display of your dates is set different in your WP admin.
- event_enddate: Must be completed unless the event is recurring.
- For recurring events, we suggest you add at least one using the frontend or backend of your site, and then export the CSV file do review the requirements for the various fields.
Other fields
- post_author: Enter the ID of the user you want to assign the listing to. If left blank, then the post will be assigned to the user with ID 1, usually the administrator.
- post_status: Enter either publish or draft. If left blank, then the listing will be set to draft.
Uploading images
- The CSV file has columns for any images you want to add to your listings, look for the IMAGE columns,
- You can add additional columns if you want to add more images to your listings, they all should be named IMAGE.
- You only need to add the filename of the image, for example photo.jpg. The extension should be in lowercase, ie: .jpg, not .JPG. Uppercase file extensions will result in the image not being recognized when viewed in the site.
- When you finished uploading your CSV file, you need to upload your images by FTP into the upload folder for the current month; the folder location will be in this format:
/wp-content/uploads/year/month, for example /wp-content/uploads/2014/11
- The filename of the image will be used for the title attribute of the image, for example My_Photo.jpg will give a title attribute of My_Photo.
- The optimum image size is 800 x 600 pixels.
- Make sure your WordPress settings are set as follows: Settings > Media > Organise my uploads into month- and year-based folders, and Save changes > Yes.
Import tips
- It is possible that your category counts in the popular category or the CPT categories widget needs fixing after importing new listings. To do that go to GD > GD Tools and run Location category counts.
GD Listings – Export CSV
Exporting your listings gives you the opportunity to edit listings and re-upload them.
Exporting is also very handy after you have created extra custom fields or categories; just create one finished listing with the custom fields etc, and then export to get your very own sample CSV you can then use to upload your other listings.
GD Categories – Import CSV
You can import your categories and subcategories using a CSV file instead of adding your categories one by one from the admin area.
Download the sample file to check out the required structure and data.
Do NOT add a cat_id when importing new categories; WP needs to create its own cat_id to avoid database conflicts.
Your CSV categories file needs to have data for all mandatory fields for the categories you want to upload.
These are the mandatory category fields for categories:
- cat_name: the name of the category
- cat_slug: the slug to be used in your URLs
- cat_posttype: for example gd_place or gd_event; this CPT has to be created in WP admin before you import!
- cat_icon: the map marker to be used on your maps
GD Categories – Export CSV
Exporting your categories gives you the opportunity to edit them and re-upload them.
Tips and Tricks
See also CSV Tips and Tricks
Moving posts from one post type to another
- Create the new Custom Post Type and its categories
- Export the listings from the old CPT
- Change the post_type and post_category in the exported file
- Check the following import option: Update listing if post with post_id already exists.
- This will move all the listings from the gd_place table into the new CPT table, changing the categories.
Adding latitude and longitude in bulk to your CSV import file
The Find Latitude and Longitude website is currently offline while they are changing their site from a free tool to a paid version.
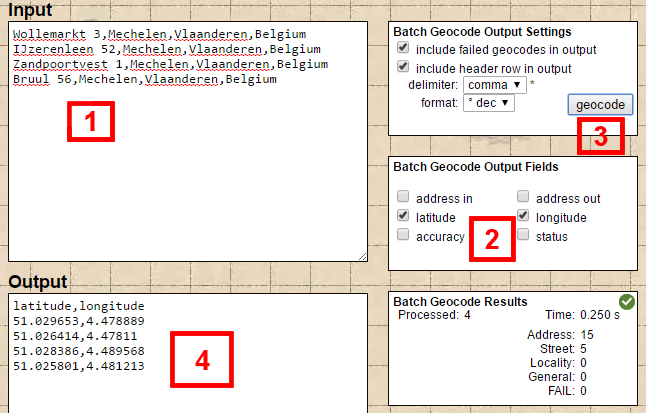
Go the the batch code page at the Find Latitude and Longitude website.
Step 1: Input one address per line in the input field:
- The easiest is to add the addresses to the CSV file first, and then copy and paste into the input field.
Step 2: Adjust the Batch Geocode Output Fields settings (optional)
Step 3: Click the Geocode button in the Batch Geocode Settings box.
Step 4: Copy the list that appeared in the output field with all the lat and long coordinates and paste it directly into your CSV file.
Useful resources
- myGeoPosition.com
- Find Latitude and Longitude
The Find Latitude and Longitude website is currently offline while they are changing their site from a free tool to a paid version.
- geocodio: convert US and Canadian street addresses only into map coordinates and vice versa.
- Géocoder un fichier CSV: convert French street addresses only into map coordinates
- GPS Visualizer’s Address Locator: you will need to use your own API key
- Batch geocoding
- Batch geocoding – US only
If, after reading the document above, the import is still encountering errors, you can enable debugging in WordPress so that the import will create error logs that will contain more details about the issues with the import.
- Enable debugging: https://www.wpbeginner.com/wp-tutorials/how-to-set-up-wordpress-error-logs-in-wp-config/
- Re-run the import.
- Review the WordPress error log.
- Address problems with the import file.
- Re-run the import.
- Review the WordPress error log.
- If additional questions remain about how to remedy errors with the import file, create a support request