Custom Post Types Add-on – Overview

Introduction

Our free GeoDirectory plugin ships with only one Post Type called Places. But sometimes you would like to have separate name for each listing type ( Ex: Bars, Hotels, Restaurants etc )  instead of one generic name Place.

Understanding Places, Categories, Listings and Custom Post Types

By installing our Custom Post Types add-on, you are removing that barrier. You can create Unlimited number of Post Types.

The advantages of this plugin are that instead of trying to manage a large diverse directory with many categories all under the one post type, you can split these into more manageable CPTs, you will then be able to add different custom fields to each CPT and be able to manage pricing for each easier.

This plugin also integrates well with our Advance Search Filters addon and will let you search per post type and also have different advanced filters per post type, for example a CPT “Hotels” could have filters such as “Free WiFi” and another CPT “Points of Interest” could have a filter “Great for Kids”.

Installation

  1. Visit wpgeodirectory.com ( Buy a subscription if Required )
  2. Navigate to My Account > Downloads ( Login if Required )
  3. Download Geodir Custom Posts zip file.
  4. Go to your WordPress site dashboard, Navigate to  Plugins > Add New > Upload Plugin
  5. Browse and Upload the zip file you downloaded from wpgeodirectory.com
  6. Activate the plugin.

Configuration

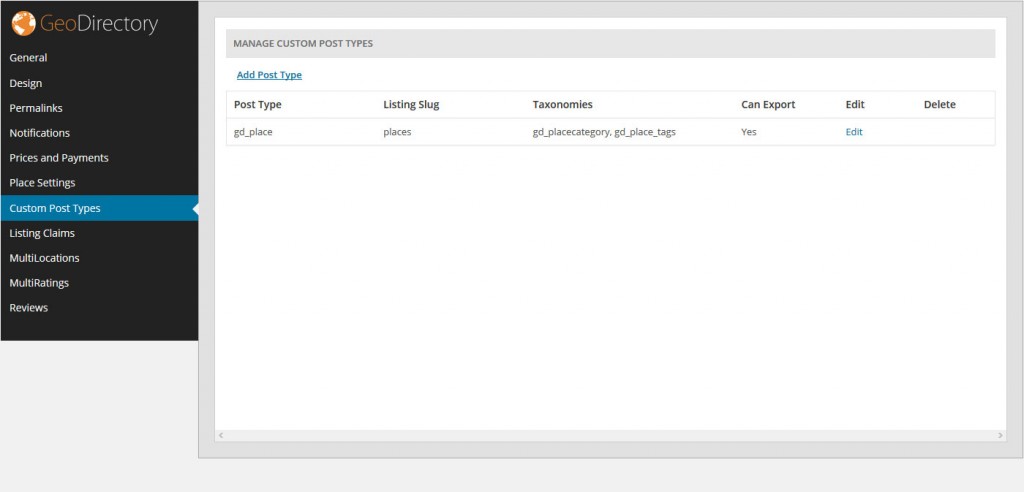
After activation you will be redirected to GeoDirectory > Custom Post Types page. This is the page where you can Add, Edit or Delete your post types.  No additional configuration needed.


gd_cpt

To Add a new post type

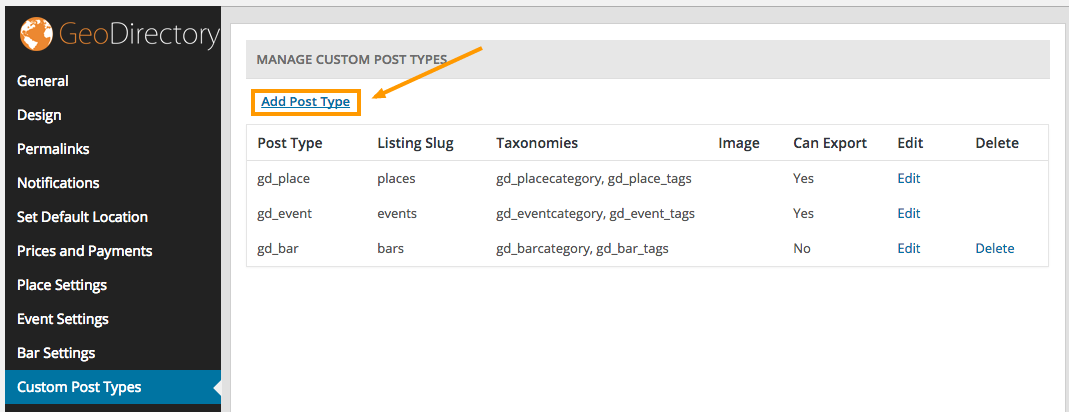
To add a new post type, click the “Add Post Type” link from the Custom Post Types page.

toadd

List of form fields and accepted values

The following example assumes you are planning to create a custom post type called Bars. If you are planning to create different post type, change the values accordingly.

Post Type

  1. Post type
    1. The new post type system name
    2. Usually singular.
    3. Minimum 2 characters
    4. Maximum 17 characters
    5. Lower-case characters and underscores only.
    6. Once added the post type system name cannot be changed.
    7. Example:  bar
  2. Listing slug
    1. The listing slug name.
    2. This will be displayed in your url.
    3. Minimum 2 characters.
    4. Maximum 20 characters.
    5. Lower-case characters, underscores and hyphen(-) only.
    6. Example:  bars
  3. Order in post type list
    1. Position at which this post type will appear in post type list everywhere on the website.
    2. Note: If the entered value is already an order of other post type then this will not make any effect.
    3. Example:  4
  4. Upload default image
    1. Default post type image.
    2. If you set an image here, this will be used as listing thumbnail image when no image available.

Labels

  1. Name
    1. General name for the post type.
    2. Usually plural.
    3. Example: Bars
  2. Singular name
    1. Name for one object of this post type.
    2. Defaults to value of name.
    3. Example: Bar
  3. Add new
    1. The add new text.
    2. The default is Add New for both hierarchical and non-hierarchical types.
    3. Example: Add New
  4. Add new item
    1. The add new item text.
    2. If you leave this blank Add New Item text will be used.
    3. Example: Add New Bar
  5. Edit item
    1. The edit item text.
    2. If you leave this blank Edit Item text will be used.
    3. Example: Edit Bar
  6. New item
    1. The new item text.
    2. if you leave this blank New Item text will be used.
    3. Example: New Bar
  7. View item
    1. The view item text.
    2. If you leave this blank View Item text will be used.
    3. Example: View Bar
  8. Search items
    1. The search items text.
    2. If you leave this blank Search Items text will be used.
    3. Example: Search Bars
  9. Not found
    1. The not found text.
    2. If you leave this blank Not Found text will be used.
    3. Example: No Bar Found
  10. Not found in trash
    1. The not found in trash text.
    2. If you leave this blank Not Found In Trash text will be used.
    3. Example: No Bar Found in Trash
  11. Profile tab label
    1. Text label for “Profile” tab on post detail page.
    2. This is Optional. So leave Empty unless necessary.
  12. More Info tab label
    1. Text label for “More Info” tab on post detail page.
    2. This is Optional. So leave Empty unless necessary.
  13. Photo tab label
    1. Text label for Photo” tab on post detail page.
    2. This is Optional. So leave Empty unless necessary.
  14. Map tab label
    1. Text label for “Map” tab on post detail page.
    2. This is Optional. So leave Empty unless necessary.
  15. Reviews tab label
    1. Text label for “Reviews” tab on post detail page.
    2. This is Optional. So leave Empty unless necessary.
  16. Related Listing tab label
    1. Text label for “Related Listing” tab on post detail page.
    2. This is Optional. So leave Empty unless necessary.

Nav Menus

  1. Posts
    1. If checked it will disable post listings (of the current post type ) in Appearance > Menus.
  2. Categories
    1. If checked it will disable post categories (of the current post type ) in Appearance > Menus.
  3. Tags
    1. If checked it will disable post tags (of the current post type ) in Appearance > Menus.

Supports

Registers support of certain feature(s) for a given post type. Each feature has a direct impact on the corresponding field displayed in the post edit screen

  1. Author
    1. If checked, Author feature will be enabled for current post type.
  2. Thumbnail
    1. If checked, Thumbnail feature will be enabled for current post type.
    2. Current theme must also support post-thumbnails.
  3. Excerpt
    1. If checked, Excerpt (Short description ) feature will be enabled for current post type.
  4. Custom fields
    1. If checked, Custom fields feature will be enabled for current post type.
  5. Comments
    1. If checked, Comments feature will be enabled for current post type.
    2. Also will see comment count balloon on edit screen when checked.
  6. Post formats
    1. If checked, Post formats feature will be enabled for current post type.

Description

  1. Description
    1. A short descriptive summary of what the post type is.

Menu Icon

  1. Menu Icon
    1. The url to the icon to be used for this menu.

Can Export

  1. Can Export
    1. When set to True, current post type data can be exported.

SEO

  1. Meta Keywords
    1. Meta keywords will appear in head tag of this post type listing page.
  2. Meta Description
    1. Meta description will appear in head tag of this post type listing page.

To Edit a post type

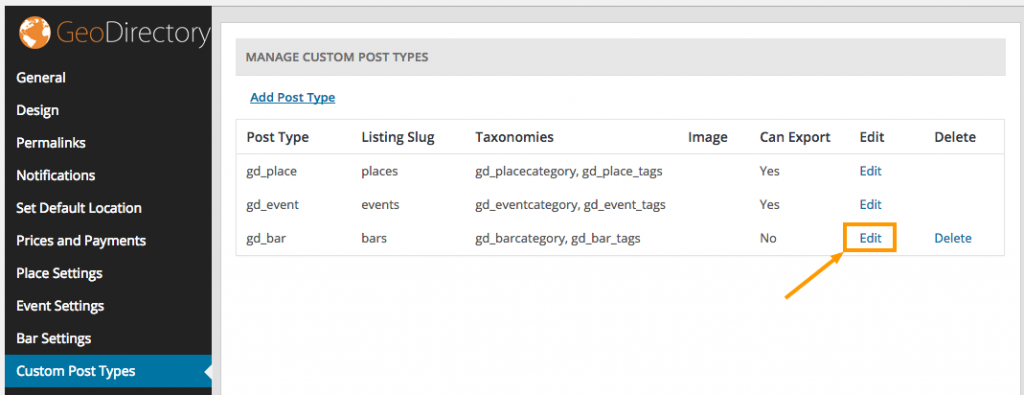
To edit a post type, click the “Edit” link from the Custom Post Types page.

toedit

To Delete a post type

To Delete a post type, click the “Delete” link from the Custom Post Types page.

todelete

Usage

Once you created a new post type, you can see new menu items in the following areas.
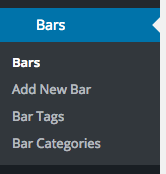
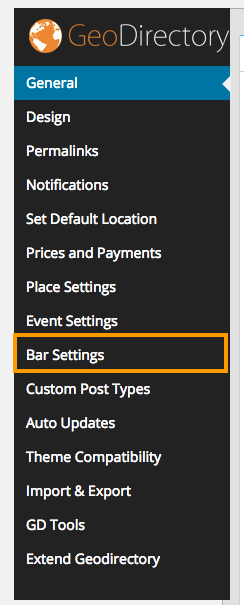
barsmenu

barsettings

Bar Settings

bartabs

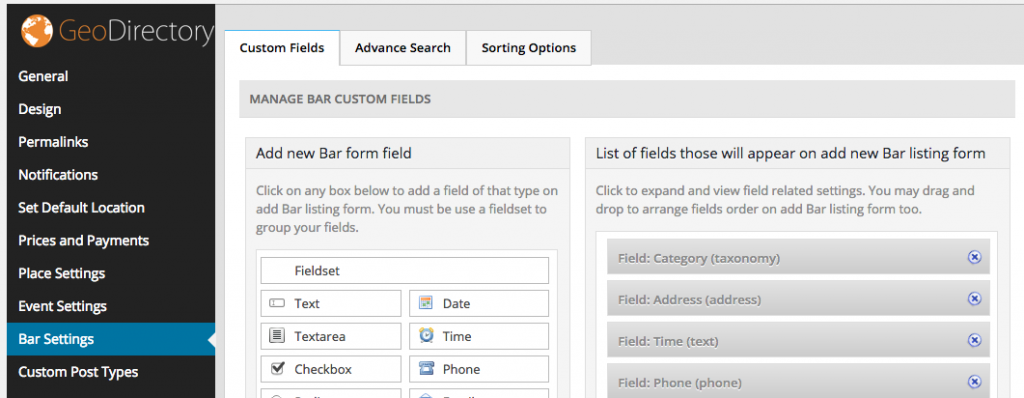
This page has the following tabs.

  1. Custom Fields
  2. Sorting Options
  3. Advanced Search ( Advanced search filters Required )

Custom Fields

To know more about custom fields, visit this section

Sorting Options

To know more about sorting options, visit this section

Advanced Search

To know more about advanced search, visit this section

GeoDirectory does not have access to your filesystem


If you receive the above error message this will mean that things like import / export won’t work as they can’t read or write files to the system, this will also cause problems for most of our themes as they dynamically write styles files from your settings.

You should follow the above links and read the page which explains the problems http://codex.wordpress.org/Editing_wp-config.php#WordPress_Upgrade_Constants

This problem is usually fixed by following the below steps:

1. Open your wp-config.php file located in the root of your website (you will need to do this via FTP or some other file manager)

2. Somewhere near the bottom of the file, usually just below the line “define(‘WP_DEBUG’, false);” try adding the line:
“define( ‘FS_METHOD’, ‘direct’ );” and then upload and refresh your admin area to see if the message has disappeared.  If the message does not disappear after a refresh try changing the line you added and specifically the ‘direct’ to the following and each time try uploading and refreshing to see if it fixes it:  “ssh2“, “ftpext“, or “ftpsockets“.

3. If #2 did not fix your problem try adding these two lines:
define( ‘FTP_USER’, ‘username’ );
define( ‘FTP_PASS’, ‘password’ );
Replacing the ‘username’ and ‘password’ with your FTP username and password, again try uploading and refreshing to see if it fixes the problem, if the problem persists repeat #2 now that you have the ftp user/pass defined.

The above three steps should fix the majority of problems, if not then please post in our support forum and a member of our support staff will assist.


Whoop Theme – Available Widgets

Available Widgets

Here is the list of widgets, added by whoop.

For GeoDirectory

  1. Your Next Review Awaits
  2. User Info
  3. Review of the Day

For GeoDirectory Events

  1. Are you interested?
  2. Popular & Latest Events

For BuddyPress

  1. Recent Activity
  2. Event Updates ( Also depends on GeoDirectory Events )
  3. Friends

For bbPress

  1. Today in Talk

Tip: All whoop widget names start with Whoop >   Example : Whoop > Your Next Review Awaits   So all whoop widgets can be easily found on widgets section when you search for Whoop >  using CTRL + F ( CMD + F on MAC )


Your Next Review Awaits

your-next-review

  1. Only logged in users can see this widget
  2. This widget fetches posts from current user’s bookmarks. ( User can bookmark a post from listing page by clicking bookmark button.)bookmark-button
  3. This widget needs upto 10 posts. So when not enough ( current user’s ) bookmarked posts available, it will look for some high rated posts which are not yet reviewed by current user.

User Info

user-info

  1. This widget displays logged in user’s information.
  2. The number 3 from above screenshot is user’s friend count. ( BuddyPress required )
  3. The number 8 from above screenshot is the number of reviews user posted.
  4. That Schenectady, NY part coming from Account Settings > Profile Info > My Hometown  ( BuddyPress required )
  5. Account Settings link can be found here.
  6. account-settings

Review of the Day

review-of-the-day

  1. This widget will be visible only when there is a Review of the Day available.
  2. You may have to set Review of the Day everyday.
  3. To set review of the day, Navigate to Comments 
  4. comments-page
  5. Under each comment ( Only reviews ), you can see a link named Mark as ROTD – ( Current Day and Date ). Clicking that link will mark that review as Review of the Day.
  6. mark-as-rotd
  7. If you would like to undo, you can click  Remove from ROTD – ( Current Day and Date )
  8. remove-from-totd

Are you interested? ( GeoDirectory Events required )

are-you-interested

  1. Only logged in users can able to see this widget.
  2. This widget is applicable only for Events post type. For other post types, it won’t get displayed.
  3. Enroll ( I’m in, Sounds Cool ) buttons will be visible only for future events. i.e The current event’s event start date should be greater than current date.
  4. Users can undo their actions by clicking Cancel link.
  5. undo-enroll

Popular & Latest Events ( GeoDirectory Events required )

pop-lat-events

In the above screenshot, same widget is used 3 times with different widget names.

  1. You can use this widget to list popular events or latest events.
  2. You can set the widget listing type by selecting widget type. ( Refer the following screenshot )
  3. widget-type
  4. When you place the widget in main content, the layout will be displayed differently. It will display, Browse all events button, See event for links and the submitter info. ( refer other popular events in the above screenshot )

Recent Activity ( BuddyPress Required )

recent-activity

  1. This widget displays information about the recent activity.
  2. Only logged in users can see filter links. ( Near You, Friends and Your Activity)
  3. Activity will be recorded and displayed, when a user becomes a friend with another user.
  4. Activity will be recorded and displayed, when a user write a review for a place.

Event Updates ( BuddyPress & GeoDirectory Events Required )

event-updates

  1. When a user click I’m in or Sounds Cool button from Are You Interested? widget, the activity will be recorded.
  2. The latest 5 activities will be displayed in Event Updates widget.

Friends ( BuddyPress Required )

friends

  1. This widget can be displayed only on BuddyPress user profile pages.
  2. So place your widget in BuddyPress Sidebar
  3. You can set the number of users to display on the widget. Default value is 4.

Today in Talk ( bbPress Required )

today-in-talk

  1. This widget shows latest forum topics


GD Core Plugin – Theme Compatibility

These are the sections you will find when you install the GeoDirectory Core (free) plugin only:

OverviewGeneral – Google AnalyticsDesignPermalinksNotificationsSet Default LocationPlace Settings – Theme Compatibility – Import & ExportGD Tools

GD Core Plugin – Theme Compatibility

GeoDirectory is compatible with any theme that features templates that follow the default HTML5 structure.

For any theme featuring custom HTML5 structures, it can be adjusted using the theme compatibility admin page.

For some themes we included the tweaks needed to get out of the box compatibility:

  • 2017
  • Avada
  • Boss
  • Divi
  • Enfold
  • Flatsome
  • Genesis
  • GeoDirectory Framework (of course)
  • Jobby
  • Jupiter
  • Kleo
  • MultiNews
  • X

By selecting each of them you will see that the options below will change.

For any theme featuring custom html5 structures that is not on that list, the compatibility options have to be tweaked accordingly.

This requires a little bit of experience templating with HTML and CSS.

GD Core Plugin – GD Tools

These are the sections you will find when you install the GeoDirectory Core (free) plugin only:

OverviewGeneral – Google AnalyticsDesignPermalinksNotificationsSet Default LocationPlace Settings – Theme Compatibility – Import & ExportGD Tools

On this page:

GD pages check – Multisite DB conversion check – Ratings check – Sync GD tags – Sync GD Categories – Clear all GD version numbers – Load custom fields translation

GeoDirectory > GD Tools

The GD Tools are your friend when things go wrong, and you should run these checks before seeking support.
If there is anything that seems broken, the GD tools might identify your problem and even fix it.

GD pages check

Run this tool if your GD pages are not working as you expect, or seem to be missing.

Multisite DB conversion check

This tool was introduced when GD became multi-site compatible a while ago. It is still useful to check if your GD database tables are intact and existing as expected. 

Ratings check

Checks ratings for correct location and content settings.

Sync GD tags

This tool can be used when tags are showing in the back end but are missing from the front end.

Sync GD Categories

This tool can be used when categories are missing from the details table (so they do not show up on the detail pages of your listings) but showing in other places in the back end (only checks posts with missing category info in details table).

Clear all GD version numbers

This tool will clear all GD version numbers so any upgrade functions will run again. 

Load custom fields translation

Translating custom fields is explained in detail here.

GeoDirectory Lists – Overview

Introduction

Using GeoDirectory Lists, you can create your own place list.  Example: My Favorite Restaurants

Note: As of now GeoDirectory Lists can be used only with Whoop theme. Other themes are not supported yet.

Prerequisites

  1. GeoDirectory
  2. Whoop Theme (Optional)
  3. Posts 2 Posts
  4. Buddypress (Optional)

Posts 2 Posts

GeoDirectory Lists heavily depends on Posts 2 Posts Plugin. So Please install it first before installing GeoDirectory Lists.

Installation

Please follow this tutorial, to install the plugin.

Reset Permalinks

  1. Navigate to Settings > Permalinks > Common Settings.
  2. Select Default option and then save it.
  3. Now select Post name and then save it again.

Links

  1. List index can be accessed by visiting yourdomain.com/lists/
  2. A new list can be created by visiting yourdomain.com/add-list/
Index Page screenshot

list-index

Add List Page screenshot

list-add

To create a List

  1. Navigate to Account Settings > Lists
  2. Click Create List button.
  3. create-list
  4. Enter List Title and List Description and then click Create
  5. You will redirected to a page where you can add items to your list.
  6. Drag and Drop items from the left side to right side. Note: You can see only the listings your reviewed.
  7. add-items
  8. After adding items to your list click Done to save.
  9. Click View List to view your list.

To Edit List Items

edit-items

To Edit List Title and Description

edit-title


BuddyPress Compliments – Overview

Introduction

BuddyPress Compliments is a buddypress addon created by GeoDirectory. BuddyPress members can compliment each other using this plugin.

Note: As of now BuddyPress Compliments can be used only with Whoop theme. Other themes are not supported yet.

Prerequisites

BuddyPress Compliments depends on the following in order to work.

  1. BuddyPress
  2. Whoop Theme

Installation

Please follow this tutorial, to install the plugin.

Configuration and Usage

After plugin activation, you can see a new menu link compliments under settings

  1. You can add unlimited number of compliment types with icons.
  2. Please note, the recommended icon size is 20px x 20px
  3. Here is the screenshot of compliment page where you can add compliment types.
  4. A Compliment button and Compliments tab are added to each profile page. ( Note: Compliments button will not be visible on logged in user’s profile page.
  5. When you click Compliments button a popup will be displayed with compliment types.
  6. Submitted compliments will be visible in user’s compliments section.
  7. compliments-section


GD Core Plugin – Export & Import

These are the sections you will find when you install the GeoDirectory Core (free) plugin only:

OverviewGeneral – Google AnalyticsDesignPermalinksNotificationsSet Default LocationPlace Settings – Theme Compatibility – Import & ExportGD Tools

On this page:

Important things to know – GD Listings – Import CSVMandatory fields for listings – Other fieldsUploading images – Import tips – GD Listings – Export CSV – GD Categories – Import CSV – Mandatory fields for categories – GD Categories – Export CSV – Tips and Tricks – Useful resources

GeoDirectory > Import & Export

The Import & Export page allows you to upload listings or categories via a CSV file.

Go to your WordPress Dashboard and navigate to GeoDirectory > Import & Export 

You can also download your listings.

Important things to know !

CSV files should only be edited with OpenOffice or LibreOffice Calc. This is because Microsoft Excel has auto-formatting built in which can not be disabled; we have seen many cases where this leads to broken phone numbers, addresses and 90% of the time wrong GPS information.

Download OpenOffice here: https://www.openoffice.org/download

Download LibreOffice here: http://www.libreoffice.org

  1. Do not change the order or the names of the columns of the CSV files.
  2. Do not delete any columns.
  3. Data separator for the CSV file MUST be comma (,) and delimiter MUST be double-quote (“)
  4. When adding a listing in a subcategory, you should also add the main category. Separate category names with a comma
  5. Categories may not contain commas. Categories with commas will make your import fail.
  6. You may import any UTF-8 characters from any language, but your spreadsheet must be UTF-8. If your CSV is not UTF-8 it will probably fail, so, save CSV as UTF-8.

GD Listings – Import CSV

The Import CSV  section allows you to upload listings via a CSV file.
You also can download a sample CSV file to get you started.

post_id
  • The first column in the CSV file is for the post_id.
  • This field should be left blank, unless you want to update (overwrite) a listing.
  • You can get the post_id of existing listings by exporting your GD listings.
  • Do NOT add a post_id when importing new listings; WP needs to create its own post_id to avoid database conflicts.

Your CSV listings file needs to have data for all mandatory fields for the listings you want to upload.

These are the mandatory fields for listings:

  • post_title: title or heading
  • post_author: the WordPress ID of the WP user, for example you can use 1 for the first admin account created
  • post_content: description
  • post_category: use the name of the category or the slug;
    • this category has to be created for the post_type before you import!
    • if adding the listing in a sub-category, also add the parent category
  • post_type: for example gd_place or gd_event; this CPT has to be created in WP admin before you import!
    Keep reading for mandatory fields for gd_event post types.

The following fields (also mandatory) all relate to the location of your listings.

Note 1: If you are using the Custom Post Type addon and have disabled the requirement to use a physical location for a CPT, then you can leave these fields blank.

Note 2: We strongly suggest to add a few listings from the frontend, and then export those listings first. That will show you the type and format of the data required to be imported. Also, review the location notes if you have not done so already. 

If you want to add locations outside your default location, you will need to install the MultiLocations addon before you can import your data.

  • post_address: Street address [This can be the actual street address, or the name of the Business, etc – it just cannot be blank]
  • post_city: City, town etc
  • post_region: state, province etc
  • post_country: country
  • post_latitude: latitude in signed degrees format, for example -20.97625669
  • post_longitude: longitude in signed degrees format, for example 162.45444

The following fields (also mandatory) all relate to the date and time of your events.

  • event_date: This is the first date of the event – use this format 19/07/2015 even if the display of your dates is set different in your WP admin.
  • event_enddate: Must be completed unless the event is recurring.
  • For recurring events, we suggest you add at least one using the frontend or backend of your site, and then export the CSV file do review the requirements for the various fields.

Other fields

  • post_author: Enter the ID of the user you want to assign the listing to. If left blank, then the post will be assigned to the user with ID 1, usually the administrator.
  • post_status: Enter either publish or draft. If left blank, then the listing will be set to draft.

Uploading images

  • The CSV file has columns for any images you want to add to your listings, look for the IMAGE columns,
  • You can add additional columns if you want to add more images to your listings, they all should be named IMAGE.
  • You only need to add the filename of the image, for example photo.jpg. The extension should be in lowercase, ie: .jpg, not .JPG. Uppercase file extensions will result in the image not being recognized when viewed in the site.
  • When you finished uploading your CSV file, you need to upload your images by FTP into the upload folder for the current month; the folder location will be in this format:
    /wp-content/uploads/year/month, for example /wp-content/uploads/2014/11
  • The filename of the image will be used for the title attribute of the image, for example My_Photo.jpg will give a title attribute of My_Photo.
  • The optimum image size is 800 x 600 pixels.
  • Make sure your WordPress settings are set as follows: Settings > Media > Organise my uploads into month- and year-based folders, and Save changes > Yes.

Import tips

  1. It is possible that your category counts in the popular category or the CPT categories widget needs fixing after importing new listings. To do that go to GD > GD Tools and run Location category counts.

GD Listings – Export CSV

Exporting your listings gives you the opportunity to edit listings and re-upload them.

Exporting is also very handy after you have created extra custom fields or categories; just create one finished listing with the custom fields etc, and then export to get your very own sample CSV you can then use to upload your other listings.

GD Categories – Import CSV

You can import your categories and subcategories using a CSV file instead of adding your categories one by one from the admin area.

Download the sample file to check out the required structure and data.

Do NOT add a cat_id when importing new categories; WP needs to create its own cat_id to avoid database conflicts.

Your CSV categories file needs to have data for all mandatory fields for the categories you want to upload.

These are the mandatory category fields for categories:

  • cat_name: the name of the category
  • cat_slug: the slug to be used in your URLs
  • cat_posttype: for example gd_place or gd_event; this CPT has to be created in WP admin before you import!
  • cat_icon: the map marker to be used on your maps

GD Categories – Export CSV

Exporting your categories gives you the opportunity to edit them and re-upload them.

Tips and Tricks

See also CSV Tips and Tricks

Moving posts from one post type to another

  1. Create the new Custom Post Type and its categories
  2. Export the listings from the old CPT
  3. Change the post_type and post_category in the exported file
  4. Check the following import option: Update listing if post with post_id already exists.
  5. This will move all the listings from the gd_place table into the new CPT table, changing the categories.

Adding latitude and longitude in bulk to your CSV import file

The Find Latitude and Longitude website is currently offline while they are changing their site from a free tool to a paid version.

Go the the batch code page at the Find Latitude and Longitude website.

Step 1: Input one address per line in the input field:

  1. The easiest is to add the addresses to the CSV file first, and then copy and paste into the input field.

Step 2: Adjust the Batch Geocode Output Fields settings (optional)

Step 3: Click the Geocode button in the Batch Geocode Settings box.

Step 4: Copy the list that appeared in the output field with all the lat and long coordinates and paste it directly into your CSV file.

Useful resources

  1. myGeoPosition.com
  2. Find Latitude and Longitude
    The Find Latitude and Longitude website is currently offline while they are changing their site from a free tool to a paid version.
  3. geocodio: convert US and Canadian street addresses only into map coordinates and vice versa.
  4. Géocoder un fichier CSV: convert French street addresses only into map coordinates
  5. GPS Visualizer’s Address Locator: you will need to use your own API key
  6. Batch geocoding
  7. Batch geocoding – US only

Troubleshooting

Enable Debugging to Generate Error Logs for Imports

If, after reading the document above, the import is still encountering errors, you can enable debugging in WordPress so that the import will create error logs that will contain more details about the issues with the import.

  1. Enable debugging: https://www.wpbeginner.com/wp-tutorials/how-to-set-up-wordpress-error-logs-in-wp-config/
  2. Re-run the import.
  3. Review the WordPress error log.
  4. Address problems with the import file.
  5. Re-run the import.
  6. Review the WordPress error log.
  7. If additional questions remain about how to remedy errors with the import file, create a support request

Themes – Creating a Menu

Go to Menu Dashboard

Navigate to Appearance > Menus

Create a Menu

Enter your preferred menu name in the Menu Name text field, then click Create Menu button.create-menu

Add some Menu Items

Check the menu items you need and then click Add to Menu button. 

add-menu-items

Set Menu Location

If you are planning to display your menu, then make sure you check at least one of the Theme Locations.  Sometimes you might wanna display your current menu on a widget. In that case you don’t have to check the theme locations.  Finally save your menu by clicking Save Menu button. 

save-menu


Whoop Theme – Overview

Introduction

Do you ever wanted to have your own website like Yelp?  Don’t worry.. We have got you covered. GeoDirectory’s Whoop theme makes your GeoDirectory powered site look like a yelp clone as close as possible. Sounds cool eh..? Alright.. Its time to get our hands dirty. This documentation assumes that you have a fresh WordPress installation. Let’s get started.

Prerequisites

Before installing our theme, lets install its dependencies.

  1. GeoDirectory (Required)
    1. GeoDirectory Events (Optional)
    2. GeoDirectory Lists (Optional)
      1. Posts 2 Posts (Required for GeoDirectory Lists)
  2. BuddyPress (Optional)
    1. BuddyPress Integration ( Required )
    2. BuddyPress Follow (Optional)
    3. BuddyPress Compliments (Optional)
    4. Invite Anyone (Optional)
  3. bbPress (Optional)

IMPORTANT

If used with GD + BBpress + BuddyPress and possibly several add-ons, this is no tool for a shared hosting or the average VPS. Having a Directory, Forum and Social Network requires resources so make sure to use at least a High End VPS or a beefier Dedicated Server.

Permalinks Configuration

Navigate to Settings > Permalinks > Common Settings. Make sure Post name is selected.

GeoDirectory Installation

  1. Navigate to Plugins > Add New
  2. Search for GeoDirectory – Ultimate Business Directory
  3. Install it
  4. GeoDirectory needs at least one location in order to work. So Set a default location first by following this tutorial. ( Tip: If you need multi locations, check our MultiLocations addon )
  5. You must set GeoDirectory Pages.  Navigate to Geodirectory > Permalinks > Geodirectory Pages and set the pages
  6. gdpages

GeoDirectory Events Installation

  1. Visit wpgeodirectory.com ( Buy a subscription if Required )
  2. Navigate to My Account > Downloads ( Login if Required )
  3. Download Geodir Event Manager zip file.
  4. Go to your WordPress site dashboard, Navigate to  Plugins > Add New > Upload Plugin
  5. Browse and Upload the zip file you downloaded from wpgeodirectory.com
  6. Activate the plugin.

GeoDirectory Lists Installation

  1. Visit wpgeodirectory.com ( Buy a subscription if Required )
  2. Navigate to My Account > Downloads ( Login if Required )
  3. Download Geodir List Manager zip file.
  4. Go to your WordPress site dashboard, Navigate to  Plugins > Add New > Upload Plugin
  5. Browse and Upload the zip file you downloaded from wpgeodirectory.com
  6. Activate the plugin.

Posts 2 Posts Installation

  1. Navigate to Plugins > Add New
  2. Search for Posts 2 Posts
  3. Install it

BuddyPress Installation

  1. Navigate to Plugins > Add New
  2. Search for BuddyPress
  3. Install it
  4. After BuddyPress activation, navigate to Settings > BuddyPress and Enable the following components.
    1. Friend Connections
    2. Private Messaging

    buddypress

    buddy-components

    If BuddyPress pages not working, reset your Permalinks.

    To reset your permalinks,

    1. Navigate to Settings > Permalinks > Common Settings. 
    2. Select Default option and then save your settings.
    3. Now select Post name option and then save your settings again.

BuddyPress Integration Installation

  1. Visit wpgeodirectory.com ( Buy a subscription if Required )
  2. Navigate to My Account > Downloads ( Login if Required )
  3. Download Geodir Buddypress Integration zip file.
  4. Go to your WordPress site dashboard, Navigate to  Plugins > Add New > Upload Plugin
  5. Browse and Upload the zip file you downloaded from wpgeodirectory.com
  6. Activate the plugin.

BuddyPress Follow Installation

  1. Navigate to Plugins > Add New
  2. Search for BuddyPress Follow
  3. Install it

BuddyPress Compliments Installation

  1. Navigate to Plugins > Add New
  2. Search for BuddyPress Compliments
  3. Install it

Invite Anyone Installation

  1. Navigate to Plugins > Add New
  2. Search for Invite Anyone
  3. Install it

bbPress Installation

  1. Navigate to Plugins > Add New
  2. Search for bbPress
  3. Install it

Heads Up!

If you are planning to use BuddyPress, please install it first before installing whoop theme, since whoop creates some BuddyPress custom fields while theme activation. If you don’t do that, you may have to deactivate and activate the theme again and when you do that, your widget settings might get lost.

Theme Installation

Please follow this tutorial to install the theme.

Menus

Whoop has 2 menu locations.

The Main Menu

Footer Links

footer-links

For each menu location, please create a menu and assign to the location by following this tutorial.

Basic Configuration

Lets make sure we have some basic settings in order to make our theme work properly.

  1. Would you like to add Add listing ( Ex. Add Hotel ) and View Listing ( Ex. Hotels ) links to the Main Menu? If Yes Navigate to Geodirectory > Design > Navigation > Show geodirectory navigation in selected menu locations > Select The Main Menu

Header

If you have followed our instructions correctly so far, then your current header might look similar to this screenshot.

header-view

Upload your logo

We believe, you are interested in adding your logo. If this is the case, navigate to Whoop Options  > Header Styling Options Site Logo, then upload your logo there by clicking upload button. Recommended logo size would be 160px width and 60px height. Make sure you click Save Changes button after setting your logo.

If you refresh your home page, now the header might look like this.

Add search box

Ok Lets add the search box in header.

  1. Navigate to Appearance > Widgets
  2. Click on “GD > Search” widget. A popup will appear with a list of widget locations.
  3. Scroll to the bottom of the popup. You will see a widget location named GD Header Right. Click on it. Make sure its checked. Then click Add Widget button. Refer the following screenshot.
  4. search-widget
  5. Thats it. Now refresh your home page. Your header might look like this.

Voila. Header part completed. That wasn’t so hard. Was it?

Footer

Footer Widgets
  1. Navigate to Whoop Options > Footer Styling Options > Enable footer widget areas
  2. Select the number of footer widget you need.

In our case we selected 4. So the Footer has 4 widget locations.

footer-wid-locations

So we need 4 menu widgets for our footer.

  1. Create 4 new menus by following this tutorial  But don’t set them to any menu location.
  2. You will see a widget called Custom Menu in Appearance > Widgets section.
  3. custom-menu
  4. Add that Custom Menu widget in all 4 widget locations and select menu for each widget location.
  5. select-menu
  6. You final result might look like this.
  7. footer-widget
  8. Footer widget section completed.
Copyright Text

Most likely, you would like to change your copyright text. If this is the case Navigate to Whoop Options > Footer Styling Options > Copyright Text

In that textarea field, clear everything and then enter your new copyright text. You can copy and paste the following text and alter as you prefer.

Copyright © 2004–2015 Whoop Inc. Whoop, Whoop logo, Whoop burst and related marks are registered trademarks of Whoop.

The result might look like this.

copyright-text

Footer Links

If you assign any menu to Footer Links menu location, then it will be displayed on the right side of copyright area.

Add some listings

Navigate to Places > Add New to add some listings. Please add at least 10 listings. If you are in a hurry then navigate to Geodirectory > General > Dummy Data and then populate your site with some dummy data which can be deleted later.

Tip: By default GeoDirectory supports only one post type called Places. So if you are planning to add more post types like Hotels, Restaurants, Bars etc., then check our Custom Post Types addon.

After adding some listings, you home page might look like this.


bbPress data

  1. Add some forums
  2. forums-forum
  1. Add some topics by visiting yourdomainname.com/forums . Make sure you created some forums first.
  2. Add some replies to each topic.

Available Widgets

A number of widgets included in whoop.  You can read more about each widget and its description by visiting this page.

Home Page

Navigate to Appearance > Widgets

Lets use some widgets to build our home page.

Before proceed, make sure you know about widget locations.  Widget locations indicated using arrows on the following screenshot.

wid-locations

Remove Default widgets from home page

Expand the following widget locations and completely remove all widgets from them.

  1. GD Home Top Section
  2. GD Home Content Section
  3. GD Home Right Section

Check the following screenshot for example.

remove-home-widget


Once you remove everything, the home page might look like this.

Now lets add some widgets to the these locations.

  1. GD Home Content Section
    1. Whoop > Your Next Review Awaits
    2. Whoop > Recent Activity
    3. GD > Best of widget
      1. Set Tab Layout to Tabs on Left
  2. GD Home Right Section
    1. Whoop > User Info
    2. Whoop > Review of the Day
    3. Whoop > Popular & Latest Events
    4. Whoop > Today in Talk
    5. GD List > Fresh Lists

home-add-widget

Listing Pages

Expand the following widget locations and remove only marked widgets from them.

listing-page

Search Pages

Lets keep the same listing page structure in search page too.

Expand the following widget locations and remove only marked widgets from them.

search

Listing Detail ( Single ) Pages

Lets remove all widgets from the following widget locations.

Expand the following widget locations and completely remove all widgets from them.

detail-widget

Now add the following widgets to GD Detail Sidebar

  1. Whoop > Are You Interested?  ( GeoDirectory Events Required and will be displayed only on single event pages )
  2. GeoDirectory : Business Hours  ( GD Business Hours Required : Note this was a third party plugin that is no longer available. GeoDirectory V2 will include Business Hours )
  3. GD > Related Listing

detail-sidebar2

For GD Business Hours you can use the following settings.

gdbishours

Note: GD Business Hour widget will be displayed only if you have filled the Business Hours information. This is how it look in sidebar.

business-hours

You might wanna remove the following details from the sidebar. ( Note: They are not widgets )

detail-sidebar

Its recommended to keep Listing Information and remove all other info boxes. But you can remove Listing Information box too if you prefer.

To remove those info boxes, Navigate to Geodirectory > Design > Detail and then Check the following checkboxes.

disable-info

Event Pages

Event Listing Page

events-listing

When you visit, yourdomain.com/events/  you can see normal event listing page, generated by GeoDirectory. Widgets used in this page comes from GD Listing Top Section, GD Listing Right Sidebar ( Scroll above and refer Listing Pages section )

Event Index Page

This page can be accessed by visiting this url.

yourdomain.com/events/?e_index=true

event-index

When GeoDirectory Events active, whoop registers the following widget locations.

event-index-sidebar

Just place the following widgets in those widget locations.

  1. Event Index Sidebar
    1. Whoop > Popular & Latest Events ( Widget Type: Popular events )
    2. Whoop > Popular & Latest Events ( Widget Type: Latest events )
    3. event-sidebar-widgets
  2. Event Index Content
    1. Whoop > Event Updates
    2. Whoop > Popular & Latest Events ( Widget Type: Popular events )
    3. event-index-widgets


BuddyPress Follow

No additional configuration required for BuddyPress follow. After plugin activation you can see two new tabs called Following, Followers in member profile page.

BuddyPress Compliments

To configure BuddyPress compliments, please follow this tutorial.

GeoDirectory Lists

To configure GeoDirectory Lists, follow this tutorial.

BuddyPress Profile Fields

BuddyPress profile can be Edited from Account settings > Profile Info

Some profile fields are automatically created when you activate whoop theme. ( BuddyPress must be activated before activating whoop theme. So If you don’t see any profile fields, activate some other theme and then activate whoop again )

To add more fields or Delete existing fields, Navigate to Users > Profile Fields

profile-fields

  1. Don’t remove Name field, since its required
  2. Don’t rename Group

Hide tabs from BuddyPress

If you would like to hide some tabs on BuddyPress profile pages, Navigate to Whoop Options > BuddyPress Options

buddytabs

Limit 1 Review / User / Post

By default user can post unlimited number of reviews on a listing. If you would like to limit 1 review for each listing, then navigate too Whoop Options > Review Settings > Limit 1 Review / User / Post  > Enabled

limit-review

Translate Whoop

Whoop theme is one of the Geodirectory Framework themes. Each Geodirectory Framework theme is translated with the same textdomain for the language file.

The file should be located on the server at:

/wp-content/languages/themes

File should be named as in the following examples:

geodirectory_framework-en_US.mo / geodirectory_framework-en_US.po
geodirectory_framework-es_ES.mo / geodirectory_framework-es_ES.po
etc